Follow Us @SewHalfCrazy

Showing posts with label hats. Show all posts

11/08/2017

Derby Worthy Cowboy Hat

11/08/2017 0 Comments

When the County Fair theme was decided on for Gold Cup, I knew that I wanted to make a Derby-inspired cowboy hat.

The first step was to find a cowboy hat that wasn't too expensive, in case I screwed it up. Amazon to the rescue! I found this hat {HERE} and it was perfect.
So after ordering the hat, it was time to take advantage of the massive sale at Michael's. All of their fall foliage was 70% off! Sweet! Now, what to do?

I turned to the internet and did some searches, but a lot of the derby hat styles are similar. I wanted something a little fun, but still nice looking. Etsy ended up being a great source of inspiration.

This hat, in particular, I really loved.
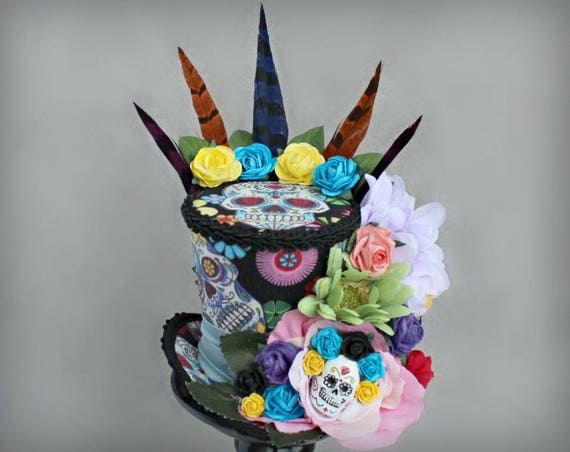
Day of the Dead Mini Top Hat from Little Miss Hattitude
 I love how colorful and fun this hat is, and so with this inspiration knocking around my head, I bought a bunch of stuff from Michael's. I hoped that I would throw everything I'd bought at it and something would stick.

I ended up spending about ~$40 on the supplies for the hat, and thankfully everything I bought made the cut. I had one golden fern bunch, a variegated green daisy bunch, a large purple peony bunch, a feather pick, 2 bundles of pretty teal/green feathers, and a whole bunch of hope. I managed to find the balsa wood horseshoes at Jo-Ann's in Culpeper.

I separated all of the fern leaves and started at the back of my hat. I wanted to great the look of a plume of feathers, but with ferns, so I created a waterfall effect of ferns by placing the shortest ferns at the base of the back of the hat, right against the brim and working towards the crown of the hat, using the longest ferns at the very top. I shaped each of the leaves to gently curve down. There may have been some glue gun burns and I may have glued one or two of my fingers to my hat.

So after getting my waterfall of ferns attached it was time to start with the purple peonies. I placed a row of peonies along the brim of the hat, forming a U-shape around the sides and back of the hat, and then I added a few more peonies to the left side of the hat, to create a nice asymmetrical look. I added a few up the crown of the hat on this side for more interest. Then I went back and filled in with the daisies. I created a small crown of daisies at the back of the crown, also hiding the base of the ferns a bit, and filling in where I thought there were holes. The feathers were next. I placed the pick of feathers towards the front of the hat to accent where the horseshoes were going to go, and then I gently glued each of the individual feathers into the fern waterfall, adding color, texture, and interest.

The final step of the hat was to add the horseshoes after my eldest and I had fun coloring them with some metallic wax, I glued them a little off kilter to each other. I was a little inspired by the Mad Hatter in Alice in Wonderland.

So that's how my hat came to be, and this little dear won best "Race-Inspired Hat" in the hat contest! Yay!


5/17/2017

A $25 Derby Hat

5/17/2017 0 Comments

So I know we've all see those derby hats that cost upwards of $150, and while they're gorgeous - who is really going to get their money's worth out of that hat?

Not me!

Now, I could've gotten away with my hat costing $3.44 + tax, but that hat was boring and I had big plans for my Gold Cup outfit. A boring hat was not in those plans. 

So Walmart had floppy hats for $3.44, and I immediately snatched up a white one, because I would never in a million years find a better deal on a hat. So the hat was exactly as advertised, a standard white paper/mesh floppy hat with no decorations, but with the help of some turquoise duct tape that matched my buttons exactly, and some super large peonies and turkey quills, I was going to turn this hat into something. The total cost for my decorations cost $21.95

Unfortunately, I stared at all of these supplies for 3 days, and then finally it was Friday and I needed to do something with this hat! So the only real plan I had was shaping the turkey quills and painting them red, so Friday morning, I trimmed the quills into this diamond shape, and recruited the boys to help me paint my 9 feathers before school. I grabbed some red acrylic crafts paint I had lying around and the 3 of us went to town painting the feathers. We were racing the clock a bit, as the boys needed to catch the school bus, but we knocked out all those feathers with plenty of time. 

I knew the weather called for rain, or at least some showers, so I hoping to make this hat stand up against the wet weather, and in that department my hat did marvelously well. It was truly a "floppy" hat by the end of the day. I was also worried about the paint running, but there was nothing to be done about that now. So an hour before I needed to get ready for work, I sat down in my kitchen with my glue gun at the ready, and starting gluing the flowers down. I placed the three flowers in a row right along the brim. 

Then I started at the hat. Looked at the clock, and then decided that I'd make bias tape out of my turquoise duct tape. Even if the flowers and feathers didn't stand up to the rain, my duct tape ribbon would! So I measured off about a yard of tape, and folded the tape in thirds lengthwise. I had planned on doing quarters and then folding that in half, but the tape didn't want to cooperate. Either way the duct tape now had the body I wanted. I was trying to go for a poor man's sinamay. 

I then decided that loops were the way to go for my duct tape. I created a couple of loops to fit between the flowers, and then I gathered up a bunch of loops and glued them at one end to lie against the brim underneath each end flower. I glued all that in place, being very generous with the glue. I didn't want any of these things moving. 

The last addition were the feathers. I had no idea how I wanted to arrange them, but in the end I decided that an arc of feathers was the way to go. So I generously glued the feathers down and positioned them how I wanted. 

In the end this hat was amazing. it withstood an all day rainstorm, umbrellas to the head, and wind gusts. I may have looked like a drowned rat, but my hat is as good as new now that it's had a week to dry. 

11/14/2016

Pattern Review - Elsewhen Rosabelle Cloche

11/14/2016 0 Comments
Photo Credit: Nancy Milburn Klek
If y'all read the blog post about my gold cup dress then you know that our theme this year was a 20's speakeasy, and the perfect hat for said theme was a cloche!

Luckily, I found a free pattern to make your own cloche. I was able to make this hat with leftover fabric from my dress and then I jazzed it up a bit more.

So the pattern I found for the cloche was from Elsewhen and is the Rosabelle pattern.

I found the pattern through another blog I follow, Sew Momma Sew, and her review of the pattern was spectacular.

The actual pattern is also super easy to follow, with well written directions, and pictures.

I used the satin from the contrast of my dress as a nice compliment to the outfit. I reinforced the satin with cotton muslin as recommended by Elsewhen. I then used the leftover lining fabric I had from the dress to line this hat. You can't get much more coordinated than that.

10/30/2015

Pattern Review - Vogue 8868

10/30/2015 0 Comments
Earlier this week, I reviewed the dress pattern for my Gold Cup dress and I said I was going to do a review of the hat pattern.

Today is that day!

I can't be the only person who goes out and buys patterns when they're on sale for those what-if and could-be moments.

I have a ton of patterns, and most of them are someday patterns. Someday I'll do something with them. Someday I'll make this. Someday patterns.

Thank goodness for my someday ways, because for this particular pattern someday came along when I wasn't happy with my hat options for my dress.