Follow Us @SewHalfCrazy

Showing posts with label sewing. Show all posts

3/14/2019

Pattern Review - Butterick 6582

3/14/2019 0 Comments
I'm finally getting around to sharing some of the outfits I made for our cruise back in February. Let me tell you - January was a whirlwind of sewing. I got so many new things sewn up that some didn't even get packed. I also forgot to take a lot of pictures of the outfits on the boat as well. Luckily, it's starting to warm up here in Virginia so I'll be able to snag some pictures of the outfits that need them.

The cruise had 8 informal nights and 2 formal nights, and I wore this crushed green taffeta number on the first of the two formal nights. The lovely thing about crushed taffeta is that it doesn't matter if it wrinkles because it's already wrinkly! Ha! It's the best thing for packing!
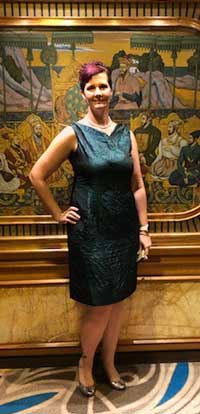
So back to the pattern, this pattern was super easy to sew up. It's a sheath style with some detailing at the neck and shoulders. I was able to alter it for me with no hiccups. The pleating at the shoulders is a nice touch and creates such an elegant neckline. It is a bateau style neckline, but with the way the front is pieced together, it adds a bit of a triangular shape to it rather than the traditional scoop.

I paired this fun 60's sheath with an old pair of Jessica Simpson snake print pumps and kept the jewelry classic, just pearls, and simple earrings. I love how the shoes, while fun, don't overshadow the dress.

I would say that this pattern would be good for someone who has sewn for a little bit and is ready for a bigger challenge. The zipper could give you some issues, but really the dress doesn't ask you do to do anything that is overly challenging.

I apologize for the lack of pictures, but this is the one and only picture of this dress that was taken.

Thanks for stopping by!

9/14/2018

Pattern Review - Simplicity 8561 & 8560

9/14/2018 6 Comments
Have you ever made a pattern and realized that you horribly messed it up by choosing the wrong fabric?

I have!

That's the story with this pattern. Well, actually patterns. Today is a two-for-one deal where I'm actually reviewing two patterns.

So we all know that exercise clothes can leave a lot to be desired when it comes to fit, colors, patterns, and most importantly pockets!

I do love that more and more styles of leggings are coming in longer lengths and we're seeing more and more pockets, but (isn't there always a but?) the only leggings that come in long lengths are the ankle length leggings. Don't get me wrong, it's great that I can finally get leggings long enough so that I don't have to layer socks over my ankles to keep them warm, but the problem I have is that they don't make capris in long length. It's so awesome to buy capri-length leggings and have them hit me just below the knee. I know, I know, capris are supposed to hit below the knee, but let's clarify - they're supposed to hit several inches below the knee not right at the back of my knee, would it kill a store to make some long length capris? So there's the crux of my legging problem. I want me-length capris that are cute.
Look at all the options! 

Enter the first pattern I'm reviewing - Simplicity 8560

There are a couple of looks to choose from on this pattern, but the one I was interested in was the view with those killer deep thigh pockets. POCKETS! Can you guys feel my excitement over these pockets?

So now that I'm done gushing about those killer pockets, it was also nice that the inset was finished off with some fun twists at the end.

Unfortunately the first time I made this pattern I used a super fun contrast fabric for the inset, and that fabric was perfectly fine. Just a lightweight athletic knit that I found on fabric.com. Luckily, I ordered enough of the fabric to get a few things made out of it. The main fabric, however, was a different story. It had some lateral stretch, no vertical stretch and I would definitely not classify it as a suitable knit for athletic wear, but that's where I found it - listed under athletic fabric. Oh well, that's the danger of buying fabric online. I much prefer visiting a store and being able to feel the fabric and see how it moves, flows, and stretches.

Even though the fabric choice was less than stellar for both patterns, I knew that these patterns were gonna be great, so a trip to Jo-Ann's fixed my main fabric woes. They have this great black refined Ponte (pon-tee) knit. It's so great that I've gone back and bought more of it. I really love this fabric. Jo-Ann's does carry a couple different types of Ponte knit, but this particular one is thicker than some of the others, but it's not as thick as a scuba knit. So now that I have the proper fabric, I'm super excited to get these patterns made again.

As with most knit patterns, cutting it out takes as long as sewing it up. Actually, altering the pattern to be the proper length for capri-length leggings for me is the most time-consuming part of this process, and I will admit that I was a little over-zealous with the lengthening. I think I should have only added 3" instead of 4", but c'est la vie!
Look at those twists!

So the guide sheet is straight-forward and offers some tips/tricks for knits and athletic wear. Most of the pattern can be sewn up on the serger which makes it super quick and easy. I topstitched most of the seams with a zig-zag stitch. The most complicated part of this pattern are the twists at the bottom of the leg. I would say to double-check which way you twist those things because there may or may not be a twist on my leggings that isn't going the same way as the other 5.

For once, I was really smart and cut out several things at once. So once I got the leggings done, I could move right on to the sports bra, Simplicity 8561.

The first time I made the sports bra I was nervous because other than bathing suits, I've never made a bra and let's be honest a sports bra is not the same thing as a bikini top. I am glad I had the practice on the terrible fabric while making the bra. The inset on the bra took a bit to finagle and get it right, but the second version came out much better. Of course, having the new perfect fabric was also a huge help.
Even the back is fun!

So the bra is super simple to assemble. All of the pieces are sized just like the bras you buy in the store, so it's not like you need to know an alternate size like you do for regular patterns. I was nervous when I remade the pattern because the first bra was so tight and uncomfortable, but I knew it was because of my horrible fabric choice. So the 2nd one was much better, but definitely not a running sports bra. I think when I make this bra again (and I will) I may make it a size smaller. I should have probably done that from the get-go. Just going with a smaller band size might work too.

I took a class a while ago about designing your own exercise clothes, and the teacher advised that you could/should make the clothes a size smaller if you want the clothes to be more form-fitting and have a more compressive feel. I do love me some compression tights, but for the legging pattern, I'm perfectly happy with how tight they are, especially since I have gained a little bit of weight back since the surgery. Not a whole lot mind you, but enough to where I notice that my clothes are fitting slightly different. I would go with a smaller size for the bra though. There is a bit of wiggle room and while that might be ok for yoga, I will be running again and I don't really feel like getting whacked in the face by my own bosom.
You can't even tell which is the busted leg. 
I would definitely suggest this pattern to someone who is ready to branch out into knits and/or exercise clothes. I get it. Knits can be scary, and so can exercise clothes, but these two patterns are well written and easy to follow. I don't know that I'd recommend these patterns to an out-of-the-gate novice, but to someone who has sewn for a bit and is ready for a new challenge. I would recommend though that if these patterns end up being your first foray into sewing knits then make them in a cheaper knit. I wouldn't go with a slub knit, but maybe a decent cotton interlock, because the athletic knits can get pricey and you don't want to go experimenting on expensive fabric only to mess it up.
I couldn't resist sharing this goofy pic!

Thanks so much for stopping by!

7/06/2018

Pattern Review - Kwik Sew K3998

7/06/2018 0 Comments

So it's day 4 in my ACL recovery journey, and I figured it was time that I start writing some of these blog posts that I've been hoarding since I knew I'd be stuck on my butt for a while.


I actually got this pattern done last month, but I got a lot of things done last month in my mad rush to get things done before knee day. I got so many things done that I hope I don't leave anything out.

So this pattern is not difficult and it goes together super quick. The only thing I will say is that I did measure my girl before cutting out the pattern, but I should have made a size bigger.

The pattern is well written, and it is a good introduction to making swimwear.

Swimsuits are fun to sew up because you encase the cotton elastic inside the seam allowance and they usually go together super quick.


The first rendition of this pattern did not fit her lengthwise, and it looked like one of those wrestler outfits. Not a good look.

So I chopped the one piece in half and made it a two-piece number. Voila! The project is saved.

After chopping the suit in two, I realized I shouldn't have cut it right at the seam where the flounce is, but 3/4" above the seam so that the elastic wasn't going to be encased in the flounce, but cest la vie.

My girl loves her suit, and that's all that really matters. It's not going to grow with her, and it'll only be for this season, but that's ok with me because I was able to use up some more of my stash on this project. I also probably still have enough of each of these fabrics to make her another swimsuit for next year.


Thanks so much for stopping by today!

6/04/2018

Pattern Review - Simplicity 1887

6/04/2018 0 Comments

I am so excited to share this next project with you guys! Summer showed up here for a bit in VA, but it seems now we're gonna need an ark to survive. Hopefully, the warm weather returns so I can bust these super cute shorts back out.


Ok, so I'm getting ahead of myself. So I've been seeing these super cute tie-front shorts everywhere lately, and it just so happens that I have a tie-front shorts pattern, so now is as good a time as any to bust it out. I bought this pattern last year (maybe?) and then did nothing with it because I couldn't decide on fabric for the shorts. I really like the shiny olive gold color in the picture, but don't you know that I can't find fabric like that?

I am also still on that self-imposed ban on buying new fabric until I work through some of my stash. Well as luck would have it, I had 3 different types of denim - all different weights and colors - hiding in the aforementioned stash. I examined all three and figured that the mid-weight denim would be perfect for this pattern. Just enough drape and light enough to still be comfortable in those 90 degree days that we did have a for a bit, and that will be returning.

One of the bonuses of this pattern is that it doesn't take a lot of fabric. 1.25 yards is all it takes, and that's for my size. I did lengthen it 2" because the super short inseam was worrisome, but I shouldn't have worried, because they're so comfortable that I didn't need to lengthen them. I ended up cutting off the added length before I hemmed them.

The pattern goes together super easy, and the guide sheet is well written. I should have measured my elastic at a smaller size because the shorts don't sit where they should on me, but tightening the tie at the front eases that. Stupid curve at the small of my back. Makes fitting pants so dang difficult.

Like I said this pattern is a breeze. It took me an afternoon to sew them up. Threading the elastic through the waistband was the most time-consuming part. So I would definitely recommend this pattern to a beginner. Not only is it easy, but it's also stylish and looks a lot more complicated than it actually is.

Thanks so much for stopping by!

5/29/2018

French Braided Pillow V2.0

5/29/2018 0 Comments

Several years ago, I saw a pillow at Target that I knew I could replicate. The problem at the time with the pillow from Target was that it was the wrong color. So I took some fabric that matched my decor and whipped up a pillow similar to what Target had, and I did it for cheaper. The original French Braided Pillow is {HERE}, and it's still going strong 8 years later.

So I was in Target {again} and I saw the most gorgeous pillow. It was another braided number and the most gorgeous shade of magenta. It was also a velvet type of material, but it had one thing that I really disliked. You could see all of the seam allowances if you moved the sections of woven material on the front of the pillow. This is not practical for a house who has children or will use the pillow as a pillow and has children. I repeated myself, but it's doubly true.
Find this pillow at Target {HERE}
This pillow inspired me to make another, better, version of my braided pillow. One with no visible stitching lines or exposed seam allowances. Luckily, I had a trip planned to Jo-Ann's with Mom and that was a very fruitful trip. I snagged this medium-weight upholstery fabric for $7/yd! I got 2 yards just to be safe since the pillow I was going to make this time around was 16" x 24".  So let's get onto the meat of how to make the fabulous pillow!

Materials

  • 2 yds of fabric
  • 16" x 24" pillow form or stuffing
  • Cutting Mat
  • Ruler
  • Thread
  • Needle
  • Scissors
  • Writing Stick

Cut List

  • 2 - 16" x 24" rectangles
  • 2 - 16" x 7" rectangles
  • 14 - 16" x 5" rectangles
*keep a few scraps for the last little pleats at the top corners. 

Instructions

  1. Starting at one corner of one of your 16"x 24" rectangles, mark a line that is on the bias and ends about the middle of the pillow. Repeat for the adjacent corner. Measure 1.5" above those lines and make another set of lines. Continue to mark lines all the way up the pillow.

  2. Fold one 16" x 7" rectangles in half lengthwise and line up the raw edges with your first marked line. Stitch in a 1/2" seam. Repeat for opposite side, the ends should overlap in the center of the pillow.

  3. With the remaining strips, you will create the braided pattern. Starting on the first line you stitched, with right sides together, line up raw edges and stitch a 1/2" seam. The two raw edges of the rectangle should align with the first stitched line and the next line above the opposite stitched piece. Refer to the photo to see exactly what I mean. By overlapping the pieces this way there will be no exposed seam allowances.

  4. Fold the strip out with the right side showing and line up the raw edge with the next marked line above the first line you just stitched along. Stitch 1/2" seam.

  5. Repeat steps 3-4 all the way up the pillow until you come to the last two marked lines on your pillow. As you can see in the photos below, all the seams will be neatly encased under all the pleats.


  6. When you reach the very top corners of your pillow, take some of your scrap pieces to cover the seam allowances. Stitch the first line as you have previously, and then measure 1" below your stitched line and fold the scrap back over the corner. Pin and stitch within the seam allowances (5/8") of the edge.


  7. Press your pleated pillow top and then with right sides together, stitch the pillow top to the bottom. Making sure to leave an opening for your stuffing or pillow form. I used a 5/8" seam because I wanted my pillow form to be really stuffed inside. Trim seams and corners, and turn pillow right side out. Stitch the opening closed with your needle and thread. 


Doesn't that pillow look right at home with the rest of my couch? I love the pop of color! 


Thanks so much for stopping by!

5/23/2018

Pattern Review - Jalie LouLouxe Skort

5/23/2018 0 Comments
Hey guys! I'm back, and even though I'm injured and slightly depressed over the frailty of my body, I have accomplished other things. One of those things was finally making a pattern I bought last year. I was interested in this pattern, because not only is it a fun looking skort, but the shorts have pockets! What?! Pockets? I'm sold. Pockets make all the difference in the world.

It's from a Jalie and its the LouLouxe Skort {see it HERE}. I was a little nervous about buying the pattern in the first place, because it's not one of my usual companies, and it's a digital download. I'd have to assemble the pattern myself, which is not a big deal, but more of a lack of convenience. I know that seems like a dumb reason.

So with my knee injury and me being in a funk because of it, I have tried to pull myself out of it by accomplishing other things. I also told my sister that I'd have this new running skirt for her and I was quickly running out of time to get it done. Nothing like waiting until 4 days before you leave to start on a project! Luckily, as with most knit projects, once you get it cut out, it sews up super quick.

This one is no different and the instructions for this pattern are clearly and concisely written, which is always nice. So once I traced the pattern size I needed onto my pattern paper, no need in ruining the main copy of my pattern if I didn't need to, the cutting out of the pattern was straightforward.

I dug into my stash for some of the fabric for this project, and I also went to Jo-Ann's for some lovely jersey for the rest of it. I chose a nice mid-weight knit black jersey for the shorts and waistband for this skort. I had a fun print with some glitz for the skirt portion. So I cut out all my pieces and start the assembly.

It goes together quicker than quick. There's nothing overly difficult about this pattern, other than making sure you have all your markings transferred and you know which pieces are going where. I did have to keep reminding myself which pieces were the front and back.

So I get the piece done, and I can't wait to get down to Nashville so my sister can try it out. As it turns out we end up going for a run on Friday, before the race. She dons the skirt and super cute sports bra, and I immediately start quizzing her. How's it feel? How are the shorts? How's the waist?


She says it all fits great, but the real test will be the run. I am happy that she's happy so far, and I'm equally excited about the prospect of making me one. She does express some concern about the length of the inseam and chaffing, but we figure that'll just have to be a test for Friday.

Friday comes and it's gorgeous outside, maybe even a touch hot. She's got her super cute skirt and bra outfit on, and I've got one of my favorites on, plus that stupid knee brace.

We set off for our 5k along the greenway near her house. It's gorgeous. If I lived in Nashville, I'd run this stretch all the time. It's peaceful and is relatively flat. What a nice treat to all of the hills in and around the area. She doesn't run outside, and to be fair she has a valid reason for it. This, however, does not stop me from good-naturedly egging her on about it. That's what sisters are for after all.

So we do our out-and-back on the greenway and she beats me at the finish. She always beats me. Stupid gazelle. Once I catch up with her, I immediately start firing questions at her about the skirt, and she's got glowing reviews for it. The shorts were long enough where she didn't chafe and it's really pretty wonderful. She really likes it. Yay! I'm so happy because now I want one!

So I think this pattern is quite easily a pattern that a beginner sewer could tackle. It's well written and easily constructed. The only 'difficult' part might be that it's a knit, but as long as you pick a knit with some decent 4-way stretch, then you should be good to go.

Thanks so much for stopping by!

3/01/2018

Pattern Review - Simplicity S0980

3/01/2018 0 Comments

Have you ever had a moment where you didn't know which project to work on, so you start on something new? Yea, me too.

This is what happened last Saturday when I had a few hours to myself and didn't know what to do with them. I decided that I needed a new skirt to wear for our outing that evening, so I pulled out a pattern I'd been wanting to make and grabbed some green denim that was originally intended for jeans but would now continue their existence as a skirt.

I don't know how long I've had this 70's  inspired pattern, but it's been a while and when I was "cleaning up" my sewing room (read - moving piles around) I found it and the denim that was never going to become pants. I mean I bought the denim to become pants, but I have no idea what I was thinking.

This pattern would be the perfect beginning sewing pattern. It's straightforward and incorporates a lot of skills that a beginner should cover, but not so many as to be overwhelming. The guide sheet also does an excellent job of outlining the construction of this super simple, versatile skirt.

I decided at about 1:30 to make the skirt, and by 2ish I was sewing it up. Of course, I didn't allow myself enough time to get it finished before my deadline because I decided to jazz it up a bit by adding top-stitching details to each of the seams. I also didn't have enough buttons. So many little problems adding up. The kicker came when I ran out of bobbin thread while top-stitching the waistband. That's when I walked away for a day.

The next day is when I realized that I screwed up my buttonholes. Not terribly, but I lined them up wrong when I was marking them, so I ended up having to add an extra to my skirt, but not that you can notice.

With the skirt finally done, and me trying to think outside of my fashion box, I headed to Target to take advantage of the sales and clearance stuff. Our Target is being remodeled so there is a lot of clearance! Score!

I ended up finding this fun striped shirt, which I'm not sure if it's black stripes or very dark blue stripes, but I kind of like that I can't tell, and this lovely mustard seed yellow cardigan. Some old wedges out of my closet, and the new skirt, and VOILA! I have a fun, versatile outfit that works all year.
My purple locks even worked with my outfit. I need to touch-up my grays, but the Pravanna violet is still looking good even after a month.

2/22/2018

Pattern Review - Simplicity D0844

2/22/2018 1 Comments

A bit ago, I saw this Instagram post come across my feed.

I was intrigued because pants, and especially jeans, are the most difficult to fit to a person, and I have found that most pant patterns are not fitted to anyone, and almost always require adjustment. I will give that they have gotten better in recent years with the addition of curvy, skinny, and average sizing, but even still there are fitting issues.

After reading all of the comments from Simplicity and MimiG, my mind was made up that I would give these jeans a go. I know I have mentioned on a few occasions that I am not a one-size-fits-all girl. I span 3 sizes from bust to hips. So much fun! Not. In addition to spanning all those sizes, I regularly have to lengthen patterns, because they are made for the average(?) female. Although these jeans have a 30" inseam, which seems extremely short to me. Usually, I prefer a 36" inseam, because high waters scarred me as a child. No one likes high waters, Mom! It wasn't her fault. It was a different time. They didn't make long length jeans the way they do now. Being as these jeans are skinny jeans, I didn't need 36". 34" would do the trick. So now with all of the tidbits settled, it was time to create new pattern pieces from the originals.

I watched MimiG's sew along videos for these jeans, not because I needed to know how to put them together, but because the guide sheet was not very clear on how to choose the right fit for your body for these jeans. MimiG did go into more detail, but really you could devote an entire 15-minute video on how to properly fit jeans to your person. She spent maybe 30 seconds, but it was an informative 30 seconds. In the video, MimiG says that she likes her clothing to be form-fitting, and denim will lose its elasticity and sag after a bit, and who wants a saggy butt in their jeans? No one. So she has the pattern piece in front of her and says that she could cut out the pattern of her hip measurement, but because she likes her clothes to be well-fitting, she opts to cut out the next smallest size, which happens to be 2" smaller than her actual hip measurements. This is not new, but it's totally dependent on how you like your clothing to fit your body. I like my clothes to fit well and follow my curves, but I don't like looking like I've been poured into them.

So I follow her advice and decide to cut out my pattern a size smaller as well. This happens to the be the size that my waist measurement falls into. Let me try and clear all this up because it's a lot of words where numbers might be better.

My hips are 48" around. My waist is 34". According to the powers that be my hips are a size 22 and my waist a size 20 according to this pattern (and every other pattern almost). For a size 22, the finished hip measurement (finished = hip measurement + wearing ease) is 48-1/2", which would fit me great, but the waist would be oh-so-gappy. My biggest problem with all jeans is that the waist never fits, so cutting out this pattern at a 22 would not do me any favors. The finished hip measurement of a size 20 was 45-1/2", which is 2-1/2" smaller than my hips, but the denim I was going to be using has a fair amount of stretch, so I could cut them out and not worry about not being able to fit my hips in them. Cutting them out as a 20 would also help ensure that the waist would fit more accurately. So with this plan in place, I set out to make myself new pattern pieces to accommodate the added length I would need, and ensure that I could reuse the leg pattern, because if these jeans turned out well, I was going to be making myself some more jeans, maybe in a boot cut!

As a side note, I could've altered the jeans through the hipline, but I've done that before and I don't like how it looks. It's much easier to just go with a smaller size and pray for the best. Not the most reliable of chances, but I've made enough pants, and been dissatisfied with enough of them that I was willing to take the chance.

So after I got my new pattern piece made, it was time to dig through the stash and figure out which denim I was going to use. Yes, I have multiple cuts of denim, because I hoard fabric. This is another chance at stash-busting my hoard, and if the jeans don't work out, then at least I have one less cut of fabric in the stash.

I also took a chance on a different way of cutting out my pattern. For years, I have pinned my pattern piece to the fabric and then cut it out, making sure to notch out the placement triangles. This time I used really big washers (same as MimiG did in her sew-along) and cut out all of the pattern pieces, and instead of notching out the triangles, I cut very small slits at them. This was big people. I don't do change, but I've taken several classes on sewing and pattern design and this is the way the instructors all do it, so why not see if this way worked for me. It was different. I did like not having to notch out the triangles, as that can be a pain in the ass, but not having the pattern piece pinned down was nerve-wracking at times. I don't know that I'm totally sold on not pinning down the pattern piece, but I'll give it a few more goes just for the sake of thoroughness.

So my pattern is cut out and it's time to sew. The guide sheet was very good at detailing and instructing on how to sew up this pattern, so I'm not really going to expand further on that. There are parts of pant/jean construction that will always be a pain, and this pattern is no different. My machine is starting to show her age and persnicketiness and gave me trouble at several parts of construction due to the thickness of the fabric layers. I may have to invest in a new machine here soon because to get her serviced/tuned up would cost as much as a brand new machine. This makes me sad. I may be more attached to my sewing machine than is healthy. I opted to invest in a nicer top-stitching thread, and the details really stand out. The jeans are starting look like legit!
   
 I get to try on the pattern before attaching the waistband, and I love how it fits so far! My hips are being hugged by the denim without being too tight. The waist is loose, but the waistband isn't attached yet, so I'm not concerned about that.
I get the waistband on and I'm in LURVE! They fit! They look great! I'm so happy. I will be making one small alteration though. Across the front of the jeans, they are a perfect fit, but once you reach the small of my back, it's gappy. Hello, gap. You haven't been missed. Luckily, the curvy pattern of these jeans allows for a taller yoke at the small of the back, and they sit almost at your natural waist. This is a good thing for all of us belt wearers because the jeans will be less apt to sag down below the belt while wearing them. So for the next rendition of these jeans, I will be altering the yoke to be a size 18 at the top of the yoke, and a size 20 at the bottom. I will then cut out a size 18 waistband, and hope for the best, because I will definitely be making these jeans again, and while digging through my stash I found another gorgeous denim which is just begging to be made into some trouser-type boot cuts.
I added rivets to my finished jeans and then proceeded to wear them the very next day. They are the most comfortable jeans I own, and I can't wait to make another pair. Right after, I pick up more top-stitching thread.
   
 I can't thank MimiG and Simplicity enough for these jeans and pattern, but I would suggest adding a page to the guide sheet on fitting said jeans. I would say that these jeans would be appropriate for an advanced beginner to beginning intermediate sewer. The fly is the main reason for this because even as an experienced seamstress it's still a pain in the ass. Its the nature of the beast.

Thank so much for visiting!

1/23/2018

Roman Blinds - A Tale of Two Blinds

1/23/2018 0 Comments

So Dana wanted to title this post "Blinded by the Light," I just wasn't feeling it even if I did laugh out loud at her song rendition.

Roman blinds from mini-blinds are not new. Not by a long shot and there are a plethora of tutorials out there, so I am not going rehash the steps I took to make these blinds. I am going to offer my tips and tricks because I built my two blinds differently.


I didn't mean to build them differently, it just sort of happened, but I'm getting ahead of myself again because I tried to make roman blinds a few years ago, but I used way to heavy of a cotton duck, and the glue just didn't hold. So in my frustration of that failure, I stowed the other 3 mini-blinds away until last week. The blinds in the living room were starting to fall apart, and I was just a little tired of them so it was time to replace them. A trip to Ikea with Mom a few weeks ago netted me some fun tone on tone wood grain curtains. I was going to line my curtains with some muslin, but I ended up not having enough to do both blinds, so I didn't line these babies because I wanted them done now. Unwavering impatience, remember?

So the two blogs I referenced the most for this project were from Reality Daydream and Honestly WTF. From there I kind of just made adjustments as I needed.

My windows are super tall, coming in at 75.5" long and 32.75" wide. My $4 mini-blinds were 31" wide, so when I cut and hemmed the curtains I made sure that the panel would fit snugly inside my window frame. I added 3" to the width of my windows, and 2" to the length of my windows for the cutting measurements. I decided to utilize the finished hem of the curtain panel for one of my end hems, which why I only added the 2" to the length. On the nonfinished end, I did a double 1" hem. The long edges had a .75" double hem. While I was ironing the hems, I pressed the rest of the curtain because it was really badly creased from the packaging.


So the first blind I did, I followed {mostly} the directions from Reality Daydream. I placed the blinds 8" apart and then had a 3.5" section of curtain that hung down below the end of the blind because my blinds were only 72" long and my window is 75.5" tall. I could've added string to the end of my blinds and lengthened them, but I couldn't be bothered, and having the bit hang down look nice. I did try placing stitch to hold the blinds down, but in the end, glued them down using Beacon's Fabri-Tac.  That glue is no joke. Its like superglue for fabric. It smells terrible but works wonderfully.

So after the curtain had dried overnight, which hindsight it didn't really need, I tackled stringing the blinds, the biggest hurdle was trying to figure out the proper orientation of the top rail. Since my curtain panel was a bit longer than my actual blinds, I didn't glue the last inch or so of the rail to the curtains, so that I could slide the rail into the hanging brackets. I also had a bit of a faff with the turning thing for the blinds. None of the tutorials mentioned removing the turning thing for the blinds. They only mention the lift cords, which while helpful was not helpful. So I ended up placing the top rail with the turning thing and the lift cords at the back of the blind.

For the other blind, I attached the blind skeleton as one step. I didn't restring the blinds, and either way was fine. One way was not better than the other, and luckily placing that top rail was faster, because I'd already figured out how the hanging bracket attached to the blind and so forth.

Hanging up the blinds was super easy and would've been without incident if I hadn't found not one, but two nails in the top casing of my windows, so I did have to adjust my brackets a little, but nothing that was swear-worthy.


I did need to go back and glue a bit of the top of the blind to the top rail, because I left a bit more space than I needed for the hanging brackets but better to much space than too little, and that glue did the job really quick.

After I put in the front stop of the bracket, I arranged the curtain edge over the bracket and along the side of my window.

Then it was time to adjust my folds and raise the blinds to where I wanted them. I don't like to have the windows fully blocked, but there is so much window, and there are 4 of these buggers on the front of the house. I just don't like people being able to see so far into my house, not to mention the house faces southwest, so in the afternoon and evening that sun is brutal. I need to have them low enough to where I feel like our privacy isn't invaded, but the sun can still come through. The nice thing about not lining these blinds is that they diffuse the light rather than block it like the other blinds I had up.


I am so happy with how these blinds turned out. I still have the dining room's windows to do, but sometimes it's better to just tackle a project piecemeal.

Oh, I did want to have a moment of truth here. I had to clear out some bins and things from the living room so that it would be picture worthy, so I piled it up into our dining room. After which I had the great idea to show you the difference in brightness between the two sets of blinds. You can also see how my little office area is set up in the living room. These were taken at the same time, and you can see how dark the dining room is compared to the living room now. I love that I don't need to adjust the blinds or turn on a light to see.


Thank so much for stopping by!

Cheers,