
How do you deduce how a pillow has been sewn together at a store with no intention of buying it? You unzip it, remove the innards, turn it inside-out and hold it up to the light while your mother takes pictures {because you let your phone completely die}.


Then have your Mom text you those pictures, then ask your mom to text you the right pictures {the pavilion pictures were lovely though, Ma} and then refer to those pictures while building your pillow. Simple. *laughs* Oh and we did put the pillow back to rights and back where she belonged...right above the $32.99 price tag.
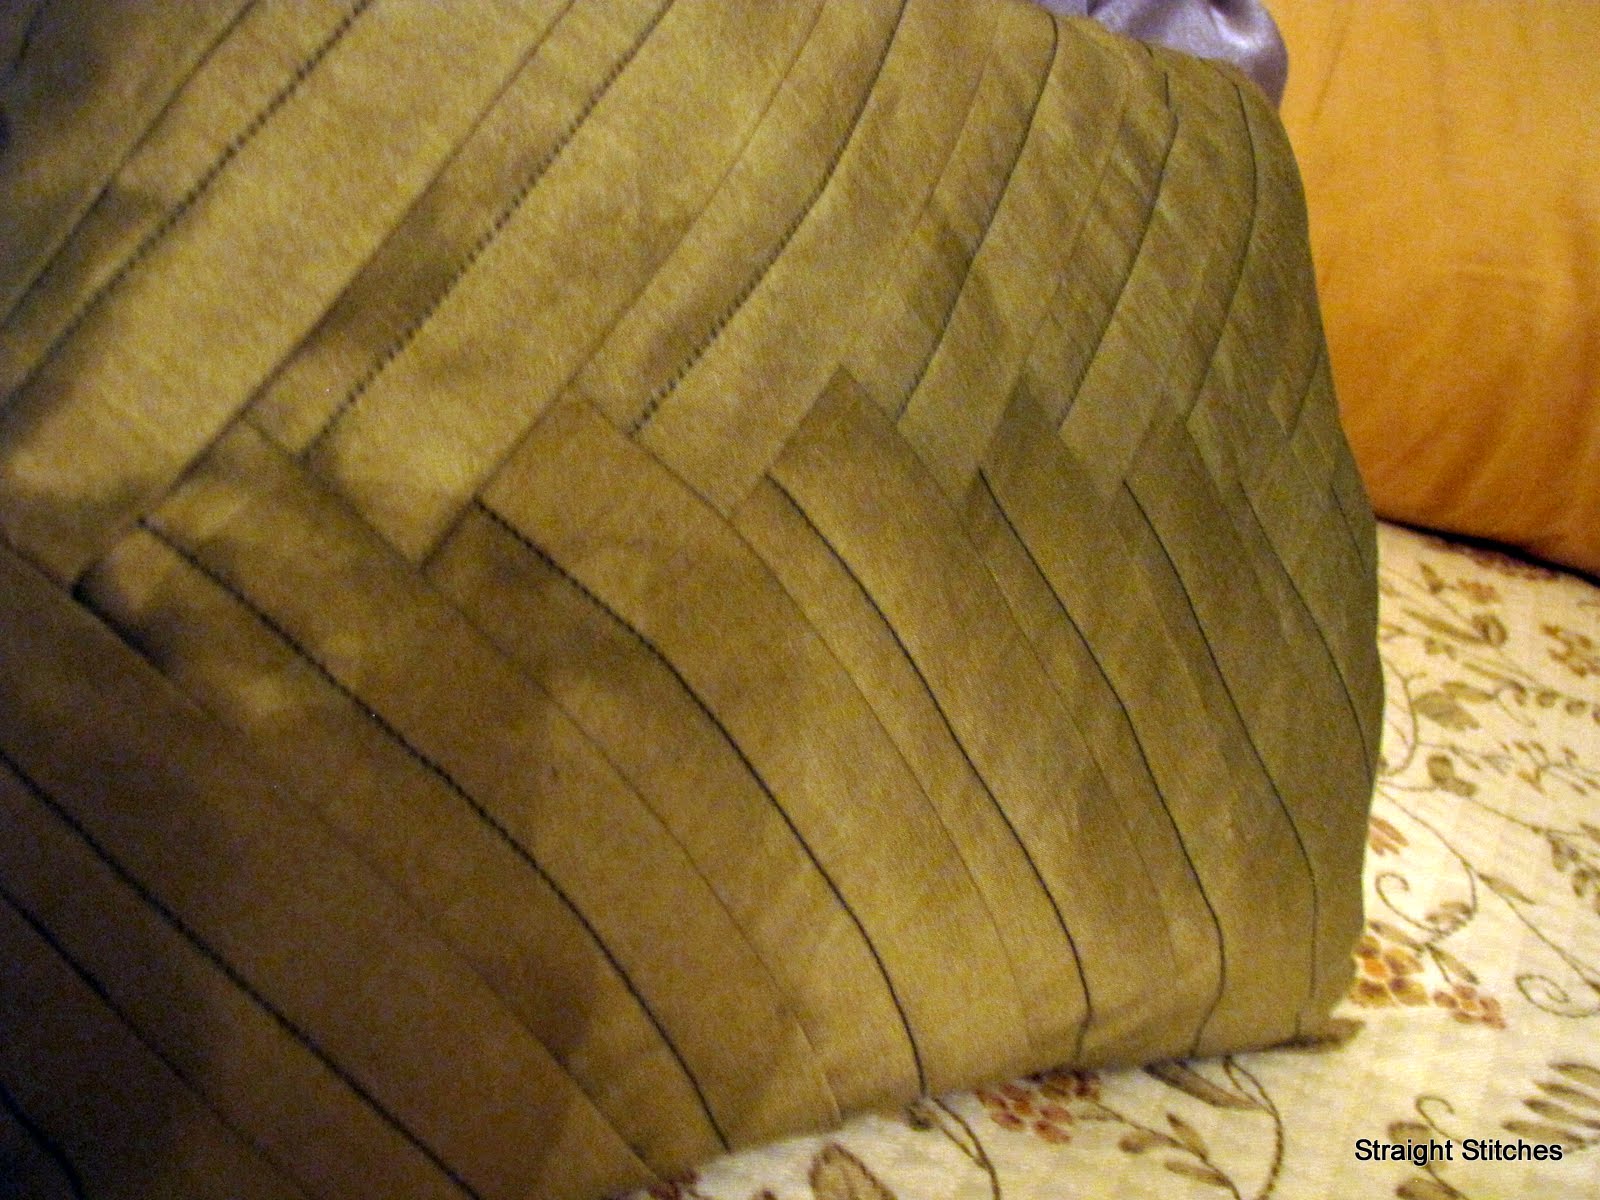
So here's your newest pillow and the show!
Stuff you'll use
Fabric - 1 Yard
12" x 16" pillow form (wish I had this!)
Rotary Cutter
Cutting Mat
Ruler
Thread
Needle
Scissors
Disappearing Fabric Marker or Chalk
What you'll do
Cut fabric into two 12" x 16" panels and twenty 3-1/2" x 11" strips. If the fabric is wrinkled then iron out the wrinkles. Fold one long edge on a strip over 1" matching wrong sides (right sides out), press. Repeat for the remaining strips. The refer to the below picture for a visual of what we're building.

One on of your panels, right side up, make three marks on the 12" side from either corner every 1-1/4" inches. From those marks draw a line on the bias (45 degree angle) inwards towards the center of the panel.

Lay one of your strips down so that the folded edge is against the innermost line. Make sure to leave enough overlap on your strip so that you can trim it evenly with the edge of the panel.
Stitch down the strip, 3/4" from the folded edge. Be sure to sew in a straight line as the stitching will be visible. Remember when picking your thread color, a good contrast is better than a bad match, as I've exampled here. With all the choices I have for thread colors, I did not have a green that matched this fabric.
 |
| All this thread and a not a matching green....sigh |

Lay the next strip on the panel, going the opposite direction of the first, but making sure to line up the folded edge of the strip with the line you made previously. Stitch this strip 3/4" from the folded edge, making sure to overlap this stitching over the previous stitching.

Trim the first strip's overlap (what is underneath the second strip) about a 1/4" from the seam.


With your ruler, measure 1-1/4" from the fold of the first strip and lay your next strip down. Stitch 3/4" away from the fold of this strip. If you need to, you can always mark a line 3/4" away from the folded edge and then stitch that line. Be sure to use a disappearing ink marker or chalk. Trim the underside of the 2nd strip even with this one's stitching. You want to remove the bulk of the strips in the center of the pillow.


You will continue to lay alternating strips 1-1/4" from the previous folded edge, stitching 3/4" away from each folded edge and then trimming the previous fabric 1/4" from the seam until the pillow has been covered in strips.

Turn your panel over and trim the strips even with the edge of your panel. With right sides together, stitch the panels together in a 1/2" seam, making sure to leave an opening for turning. Trim your corners and turn the pillow right-side out.


Stuff your pillow with the form (or if you're me then with fiber-fil) and then stitch the opening closed.

Sit back and enjoy your wonderful new creation.


Some notes - I used a faux silk that color shifts, and the effect is wonderful. Target's pillow was silver satin. A cotton chintz, silk, satin, even shirting material would do wonderfully for this pillow. The only requirement I can think of is that the fabric be able to crease because you want those pleats crisp. If you're having trouble getting your pleats to stay, then you can use a press cloth dipped in a 2:1 ratio of water to white vinegar. The vinegar solution will make the pleats permanent, even through washing.
I hope you all enjoyed today's pillow and have a wonderful day!

Linking up to:


I don't know if I would have your patience, but your pillow turned out beautifully! You may have found the idea at Target, but I'm sure the quality of your finished product is superior to what you would have found there. I've found that the fabric used on pillows at Target usually is pretty low quality. If you are handy enough to sew your own, it's a great solution.
ReplyDeleteThat is just gorgeous! But there is no way in heck I could do that...so I'll just admire it from afar...Wonderful job!
ReplyDeleteThat came out lovely. I really love that green. Feel free to send the pillow my way, LOL!
ReplyDeleteNew Friend Friday
That is seriously awesome Heather! You should design pillows, I have loved everyone you make!
ReplyDeleteEasy for you to say "I can make that". It turned out gorgeous and I love the color. But trust me, I'd have to buy the Target pillow lol.
ReplyDeleteWonderful job! I wonder if this would make a good round bolster pillow too.
ReplyDeleteThank you for all the comments I had a lot of fun with this pillow, and believe me it's a lot easier than you think. :) I am thinking I might have to pick up some ruffled eyelet lace for the next braid. :) Wouldn't that look darling?
ReplyDelete@Amanda - I think this would make a nice bolster. I have some lying around I might have try that out :)
What a great idea. I love how this turned out. Thank you so much for a fun tutorial.
ReplyDeleteI reaaaaaally love this pillow! And I loved your story of the pictures - I have done that exact same thing. haha. Thanks for the super clear tutorial. I can't wait to give this a try.
ReplyDeleteOH - and loved the vinegar-pleat hint. That is super helpful. :)
This is gorgeous! It makes me want to learn to sew!
ReplyDeleteGreat detective work and even greater end result; the pillow is stunning!
ReplyDeleteThat is just YUMMY! Love the texture and the weave and the technique, so so clever and wonderful. Thanks for going "undercover" and posting this great how to. Now I HAVE TO try it!
ReplyDeleteI have been planning to make this same pillow, also after seeing it at Target! I'm glad to see it worked for you...makes me feel more confident. I'm using the same concept to make Euro shams though, and have toyed with the idea of using ribbon instead of cutting fabric strips.
ReplyDeleteI also toyed with the idea of ribbon strips, but was afraid they'd shift too much. I have seen where they've woven strips of ribbon and then used that as the fabric, but they've interfaced the back and my concern was that it might look too stiff, but if you used a lightweight or knit interfacing it'd probably solve the stiff problem.
ReplyDeleteWhat a gorgeous pillow. Fantastic job and fabulous tutorial. It looks so professional! Thanks so much for joining The Sunday Showcase Party. I greatly appreciate it! Hope you are enjoying your week! ~ Stephanie Lynn
ReplyDeleteThis is stunning, Heather. Thank you so much for sharing. I will definitely be making a pair for my master bedroom. Keep up the great work!
ReplyDeleteThis is beautiful... I'm surely going to try it... :)
ReplyDeleteGreat job! Love the color and fabric choice!
ReplyDeleteI get in trouble for the same reasons... good to know i'm not the only one ! Awesome creation!!
ReplyDeleteCaroline
http://ateliercaroline.blogspot.com