Follow Us @SewHalfCrazy

Showing posts with label furniture. Show all posts

2/09/2018

That Damn Chair - A Remodeling Story

2/09/2018 2 Comments
Have you ever had a project that seemed simple and straightforward, and then it turned into this teeming monster that wants to thwart you at every turn?

Yea. Me too. 

Those projects, ugh. Those projects are the ones that make you want to throw a tantrum. 

This chair was like that. It should've been a straightforward job. Remove old crappy upholstery. Clean up the wood. Paint the wood. Add new foam to seat. Cover new foam and existing foam with batting. Add new fabric. Finish off with trim, and VOILA! A brand new old chair. 

If only it'd been that straightforward. 

I picked up this chair ages ago with the intention of revamping it, but it wasn't until I needed a better/prettier chair for my computer desk that I was motivated to actually do it. After moving my desk into the living room, I didn't like seeing one of our plain old kitchen chairs at the desk, and new that "Throne," as we'd come to call it, would be perfect. Except it was ugly. Puce velvet upholstery with walnut finished wood. Yuck. Good bones, but yuck. So there starts my tale of how this chair turned into such a project.

Now to be fair and honest, the trouble didn't begin until after I got my pretty computer throne painted and was starting on reupholstering the back of the chair, but let me start at the beginning. 

After removing all of the old upholstery, I wiped her down with a solution of warm water and vinegar and got off some really gross gunk. I decided that I'd paint the chair the same color as my laptop desk, which you can read about {HERE}. The color is chocolate raspberry and it's by Valspar. I picked up a sample size and then turned it into chalk paint, using {THIS} recipe. After two coats, the chair was ready for the fabric.

So the chair is probably ~40 years old. There's a groove where all of the fabric on the back was stapled into and then finished off with welting. Don't you know, I don't have a stapler that fits in that groove? I went to Lowe's to buy an electric stapler that looked like it had the extended nose I needed to fit inside the groove, but it didn't. It was a dirty, little, misleading stapler. It got returned posthaste. 
So then it was on to Plan B, just staple the fabric inside the small edge of wood between the edge of the back opening and the groove. No, go. The wood splintered and generally didn't like staples trying to be shoved into that area. 

Plan C emerged with me altering the plan and the look of the chair so that I could staple the fabric up near the decorative carvings on the chair. This would extend the upholstered area of the chair's back, but it would still look good and solve my stapling dilemma. Until I ran out of staples. I check the box and the box was empty. Of course, it was. Luckily (?) the box wasn't empty, it had just been emptied into the drawer in the toolbox. I have staples again! I finished stapling the back fabric of the chair, and it's looking pretty good. 

I couldn't find new 1/2" foam for the back cushion, so I took the foam that was on the chair and sandwiched it between some batting I had. Easy peasy lemon squeezy. The seat cushion needed to be replaced. The foam fell apart if you looked sideways at it, so a quick trip to the new Hobby Lobby in town garnered me some nice 2"x 22"x22" foam, that I then cut down to size. I traced the plywood seat bottom and cut ever so carefully around the edges.  Then I wrapped the top of that sucker in more batting. 

I spray my back cushion with a bit of spray adhesive and line it up against the fabric I'd already stapled and glue it in place. I wasn't going to be adding the decorative buttons and didn't want my foam or batting moving around. I probably didn't need to do this, but better safe than sorry. Then it was time to staple the front of the back cushion on. That actually went pretty smooth, other than occasionally putting a staple on top of another staple which worked out oh so well.
I get the back of the chair upholstered and then move onto the seat cushion. Fairly straightforward. I did buy some pretty slick looking metallic silver cording and start to edge the cushion in it and decide that I don't actually like the look on the seat, so I remove everything I'd just stitched down, and sew up the cushion. I ended up tracing the plywood seat bottom on the wrong side of my fabric and added a 1/2" seam allowance all the way around. Then I cut a 3" strip of fabric for the side of my cushion, and lined up the stripes in the back, and stitched the sides to the top of the cushion. I clipped the side fabric to my stitching at the corners and around the curves. In hindsight, I should've given myself more fabric on the edges just to make pulling it around the seat cushion easier, but it all worked out in the end. 
I glued on the silver metallic cording to the back of the chair and hated it. Unfortunately, when I was removing the trim, the glue did a bit of damage to both the chair and the fabric. I needed to fix what I'd just destroyed, only this time I'm out of staples. I go to Lowe's and buy the staples that fit my stapler, only they don't fit. What the hell? My stapler takes 1/4" staples. I bought 1/4" staples, but my staple gun won't fire the staples. WHAT THE HELL!? So I take out the staples, throw a small, angry tantrum, make myself a cup of coffee and head back out to the toolbox praying to find more staples. My prayers were answered. I found just enough staples to fix the back of the chair again. 

Then it's back to Hobby Lobby to find more trim. I end up finding a really nice braid that's on the wider side, which was needed to hide some of the more awful damage. The downside to wider braid is fitting into the tight corners of the chair back, but I'll take tight corners over showing ripped fabric, and as I learned hot glue is no joke when it comes to adhering stuff so I wasn't worried about the fabric giving way once I got the braid glued down. 
I finished gluing the braid and immediately loved my decision to go with a different trim. The wider, less flashy trim was perfect for the chair. Rather than competing with the bold fabric and color choice, it compliments it perfectly. A couple of touch-ups to the paint and this throne is ready for action! 
So there it is. That damn chair is done, and functioning wonderfully. What more could I ask for?

Thanks so much stopping by! 

6/09/2017

Gilded French Provincial Dressers

6/09/2017 0 Comments
You know how you have those projects that you will get to someday? And you just make do with what you have until someday arrives? I am so excited to say that I've knocked another project off my 'someday' list!

Man, it feels so good to say that. These dressers have been on the someday list for 7 years. 7 YEARS! Since I first decorated our room, I've known that I wanted to paint or change our very traditional and ugly dressers.

Now there's nothing wrong with their styling. We found these dressers in a consignment shop up in Jersey years ago, and it was love at first sight. I loved their curves and details, but I have always hated their color. Ugh. it was a tired and old looking pecan-ish color.

So when the hubs was out of town last week, it was time to make them pretty. I had a great plan. A grand plan. I had an incomplete plan, and it became a problem when I got the bodies of the dressers painted and then didn't know how to finish.

If y'all follow me on Instagram, then you maybe remember seeing this:
Yep, I got almost done, and then didn't know where to go from there. Luckily Pinterest was there to save the day. I spent an hour or so combing through their treasure troves, and then I finally knew what I was going to do.

Let  me back up a bit, because, as usual, I'm getting ahead of myself. I painted the bodies of the dressers in Arctic White by Valspar, and I used my fave DIY Chalk paint recipe {HERE}. I actually bought the quart of white back when we painted our room in January. The one part of my plan was that I knew the dressers were going to go white. With our room being such a strong, dark blue, I wanted the dressers to stand out, and what better way of making that happen than with a stark contrast.

So I haven't been quite honest, I did have a plan, but I was afraid it would look awful. Scouring pinterest really just reassured me that my plan might look good good. I'm going to veer a little off course here, because the following story just needs to be shared.

I head to Target, because I know they have gold paint. Target sells Devine Paint by Valspar, and they have some lovely and trendy colors. The gold I picked up was $20 for the quart, and called karat. Its an old looking gold, that looked to be just about the shade I'd used in my room for some of the other accents. I wasn't thrilled about the price tag, but the color was right, and if I found a better deal somewhere else then I could always return it.

Next on my trip was Lowe's, and I figure that while I'm there I'll ask about their gold paint. So after I pick up some kilz primer, sand paper, and chip brushes, I head over to the paint counter to ask about gold paint. The gent behind the counter is nice and asks what I'm doing. I tell him I'm painting the drawer fronts on my dressers and I'd like them to have a gilded look. He asks if I have gold paint already. I say that I do, but I wanted to check out what they have. The gent looks me dead in the eye and says that the gold paint that Valspar makes is only sold by the gallon and it's quite expensive, so that if I already have my paint and I'm happy with it, then I should stick with it. Well alrighty then. I thank the gent for his honesty and input and then continue on to the checkouts. I never did find out how much that other paint was.

So I sand and prime the drawer fronts. Then I roll on the first coat of the gold paint. I've made a mistake. I know I've made a mistake. This is not going to look like I want it to at all. I will not be deterred so easily though so at 11:30 pm on Friday, I decide to brush on the next coat of gold paint, and it is everything I hoped it be and more!

The paint is so thick. Almost like it's got glue in it, and it doesn't spread well. I'm putting on a heavier coat than I normally would simply because of how thick this paint is, but OHMIGOSH it looks fabulous. I don't know if its just the fact that its the 2nd coat, or that it's the fact that I'm brushing it on. I finish the 2nd coat on all the drawer fronts about 12:30 am, and I can't wait to wake up and see the morning sun hit my gloriously beautiful drawers.

I was not disappointed. This was the view of my dresser when I woke up. I wasn't done, with them, but the finish line was in sight. I still needed to paint all of the handles. So many handles between our two dressers, and I needed to clean up the top row of drawers on my dresser. Stupid faux double drawers. Do you know how hard it is to paint a clean line with chalk paint and a chip brush!? It's difficult.

I enlisted the kids to help me with the handles. They helped me carry them all down and arrange them on the drop cloth. Then they very happily told me when I missed a spot. So helpful. After getting all 24 handles painted in a similar, if a little lighter color gold, these beauties were done!


 I am so happy with how this project turned out. The 7 years it took me to decide on what to do with them was almost totally worth it. Completing this project also bring my master bedroom one step closer to being perfect!

Thanks so much for stopping by!

2/17/2017

Adding a POP of Color!

2/17/2017 0 Comments

When I started kicking around the idea of redoing our room, I knew that I wanted my vanity to have a bolder presence in the room and that meant finding the right big color for it.

My original plan was to paint the vanity the color that ended up on the walls, because I wasn't going to paint the room again. When the hubs said that we could paint the room, well that was a game changer, and I knew the exact color that the vanity would be painted - a bright emerald green, Luscious Green, to be exact.

Finding the color wasn't at all difficult, a quick trip to Lowe's and I had the chip, and then when I found the lamps and needed to paint them, the paint color was also a spray paint color! That's fate right there. I wish finding fabric with a strong green was as easy a task. That's a story for another day though.

1/23/2017

Creating a Retreat

1/23/2017 0 Comments

I'd like to think that my husband and I are not the only ones who neglect their bedroom. I mean it's a room that you sleep in, because, honestly, who really has more time than that to spend in their room? It's not like I'm a child who can get grounded to their room, but wouldn't that be amazing? Obviously, my children don't always think going to their room is amazing.

So we first decorated our room, several years ago, I never got it done, and made some (a lot?) of mistakes when I decorated it. After a few years, I didn't love what I'd done to our room, and wanted to change it up again. If you're curious as to the original update post, you can find it {HERE}.

The main problem is that our room is cavernous (it's something ridiculous like 17' x 22') and becomes a dumping ground for everything from things that need to be donated, to just stuff that I don't know where else to put. This does not make for a very inviting or relaxing area.

It's gotten to the point that our lives are hectic. With me going back to work, and my husband having to pick up a lot of the evening activities that the kids have, our room was causing us as much stress as our schedules. A change needed to happen. We needed a retreat.

5/06/2016

A Curio Named Elizabeth

5/06/2016 0 Comments
Don't you love free things?

I do.

My husband does not always like free things.

Especially when those free things sit in the garage for an undetermined amount of time and take up room, while he's trying to clean and set the garage up for his brewing.

Luckily, the curio we're talking about today did not sit in our garage very long, and I have known what it's fate was going to be since December. I just needed April to get here, because that's when the Nashville trip was planned.

You see, Dana moved over the winter and her booze had no home after they moved. Now I can't remember if it had a home in the old house, but in the new house it lived on the floor, and that's just terrible.

Enter the curio that transformed into a bar.

4/12/2016

Sofa Table Shoe Organizer

4/12/2016 0 Comments
So you know the old saying - "Necessity is the mother of invention"?

That's the reason for today's post.

Our family has a shoe problem. A big one. I may or may not be the biggest offender of this problem, but in my defense, my shoes do make it back up to my closet far more often than the most prolific offenders, my children. I'll give Baby Girl a pass, because she's a toddler.

We have shoes everywhere, and it's not for lack of trying to organize them. We have a shoe organizer, but it just doesn't hold enough pairs, and it's destroying the top of the closet door.

So while grumbling after fussing at the boys for the umpteenth time to pick up their shoes, and then tripping over a pair of my Hub's shoes, inspiration dawned.

The sofa table. I can replace the sofa table with a sofa table height shoe organizer. Apothecary style. I could build it.

From these incomplete but inspired thoughts, this plan came to life.


I looked around online, and didn't find anything that really suited what I needed, but I did take inspiration from several different styles and sources. This design, though, is all my own.

There are 18 cubbies that are more than big enough to fit a pair of sneaker or even a couple of books.

Here's another shot with some dimensions.


The piece is slightly longer than the sofa table we have now, but it's the same height.

Now I just have to figure out the wood requirements and price it out. Given the width, I may end up having Lowe's rip down some plywood boards to the 11.25 width I need. I'll also need some edging for the fronts and sides. I really wish our table saw hadn't died.

Be on the lookout for this project to come to life. I'm desperately tired of cleaning up shoes.

Cheers!

2/19/2016

Small Fry's Not-So-New New Room

2/19/2016 0 Comments

Small Fry was a very patient boy for 6 weeks.

6 weeks ago, we told him we'd be updating his room. He needed more space, and with smallest room in the house, the arrangement we had going on for him just wasn't working. 

He patiently waited while we worked on the basement before Super Bowl. Then less than a week after Super Bowl, he had his new set-up. I'll share a secret with y'all - he's worse than me about timelines and what he expects done.

2/12/2016

One of those projects.....

2/12/2016 0 Comments
So remember when I shared my plans for the bar table? It's been a few weeks, but let me refresh your memory.

Reclaimed Oak Bar Table

It will now be known as That %*&$ Table.


It was one of those projects. If it could go wrong, it did, and then some.

We're never getting rid of this table. It went so over budget, and it's stupid.

Ok, I might be done throwing my minor tantrum.

2/10/2016

Decoupage Pub Table

2/10/2016 0 Comments

I'm so excited about this little corner in our basement. This corner used to hold the bar, but when we moved the bar a while ago, this corner just seemed unimpressive. Now, it's mostly done. There are a few more things we want to do to the corner, but for now it's done. I shared the picture windows yesterday {HERE}, but now it's time to focus on the table.

Last year we got this pub table set for a steal off of our local yard sale site, and it sat unloved for almost a year.

We always knew that we'd be updating it, but we couldn't quite agree on how to update it. The hubs and I talked about several different things we could do to it, but never actually did anything to it, until last week.

1/13/2016

Where to start?

1/13/2016 0 Comments
Friday, I shared plans for our new basement built-in, and it's coming along fabulously!

Slowly, but fabulously. Tonight we'll be attaching the tops to the cabinets, and then tomorrow we'll be building shelves. Or at least one shelf. I'm hoping one bookshelf gets completed tomorrow night.

I'm jumping way ahead of myself though.

So I drew up the plans for the media center a while back, and tweaked it over several weeks, based on discussions with the hubs. Then I apparently "forgot" to show the hubs the final design. He saw it last Friday, along with all of you. It's a good thing he trusts me and he liked it, elsewise we'd have had some problems.

So to refresh your memory. Here is the media center.

9/18/2015

Adding Color to the Laptop Desk

9/18/2015 0 Comments
After the success I had with chalk paint on the console, I decided that my poor laptop desk needed some love. You remember the laptop desk - the one from {THIS} post.

I had been on the fence about doing anything to the laptop desk, because the graining was so pretty on it, but the scratches, dings, and dents were not so pretty. I decided that the top and the drawers could be left alone, but the body of the desk needed to be covered. Now I just needed a color. 

I was perusing my new HGTV magazine, and the backsplash in one of the spreads was just the color I was looking for. It was Toasted Coffee by Valspar, and that was definitely the color I wanted to add to my desk, until I saw it in person. In the magazine it looked more of a mustardy yellow-orange, but in person it was a lot more orange than mustard yellow, and while I liked the color, it would not do for my desk. It was way too loud. 

It really didn't take any time at all to find a new perfect color. I've been trying to incorporate more purple into my orange and aqua scheme, so I headed down to the purples and there was my winner. Chocolate Raspberry by Valspar. Its a lovely aubergine color. Not too purple, not too red, not too brown. Just right to compliment the red tones in my desk.

Vintage Painted Sewing/Laptop Desk

9/15/2015

Chalk Paint Console Update

9/15/2015 0 Comments
Chalk paint is not a new thing.

It might be a scary thing, but certainly not new. 

I love the idea of chalk paint. I don't love it's price. 

I'm a cheapskate, and that statement would make my husband proud. 

So I found {THIS} recipe via Pinterest. It's amazing. 

It also doesn't hurt that I was able to get a tub of Plaster of Paris for 50% off at Michael's. Yay coupons! 

I seem to have a penchant for starting project on items that I'm currently using, and plan to continue to use during the project. Makes my project planning super fun and easy. Not!

I decided to jump into the chalk paint with our TV console. 

9/11/2015

Stainless Steel Dresser Ikea Hack

9/11/2015 0 Comments
You know that moment when your kids become a little less kid-like and little more not-kid?

I am kind of loving that my oldest has started transitioning into a teenager. Not the mood swings or sass, but the good stuff. Like being able to discuss Greek gods. He loves the Percy Jackson series of books, and I love that he and I can discuss the Greek gods like adults. I love Greek mythology, and so does he. I think we surprised my husband one night by how in-depth we got talking about them.

Anyways, I have veered off-track again, so back to him growing up. As his interests have expanded, so have his tastes and his personality.

When the boys shared a room, we labeled their dressers so it was easier for Small Fry to know which drawers were his and out of which drawers he should pick his clothes. Once Small Fry moved back into his own room, the labels became superfluous for Big Guy.

Then I introduced him to Pinterest. It started with his birthday. He wanted a minecraft birthday party last year, so one day when I needed him occupied so I could focus on something else, I handed him my phone and had the Pinterest app opened and told him to do a search on minecraft birthday party ideas. Well the floodgates opened. He had a blast pinning stuff and exploring.

He started pinning things he liked for his room and not just the party. If you look at his board, {HERE}, you'll see all sorts of minecraft stuff for his room. Some of them, we've done. Other's I'd still like to tackle. Like {THIS} desk lamp!

Then he pinned this dresser. Wait. What?


5/23/2012

Oh the Vanity!

5/23/2012 2 Comments
So what started off as a very long project has finally reached completion!

Wahoo!

So the journey started like this.

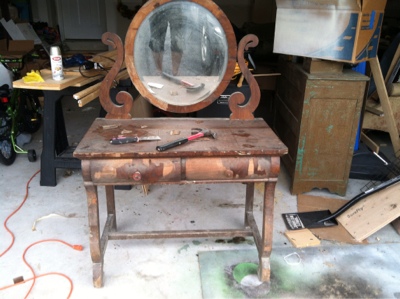
She's really beat up, but she's got such pretty potential. I love her lines and her femininity. Unfortunately, there's no saving the veneer. It has to come off.
It was tough going at times, and then I just had to stop, because the veneer was not coming off. So a $6 iron, some perseverance, hard work and about an hour later She was completely free of damaged veneer. yay! Now how to finish her? It would take me a while to figure it out. I fixed the pitting and gouges and then sanded until she was baby-butt smooth. Then it sat. And sat. And sat some more.

Then hubs and I moved it inside, and it sat for a few days. I did figure out what paint treatment she needed on the 2nd day though, then it was just finding time to do it. :) I decided on a dry brush technique using the yellow color already in our master bedroom and antique white.

After a mishap where I painted the desk portion and forgot to paint the mirror, the whole painting process took no time at all. So here she is back up in the room!

 Please pay no mind to the mess just off camera. I still haven't gotten all the fabric back into my sewing room. You'll also notice that pictures have moved around, and maybe even see a few new ones. More on one of them below!


 The hubs wasn't so sure about the shabby finish of the piece, but after everything was put together I think he liked it. He said he did, so that's what I'm going with. I love it! I love the whole look and how it all came together! I really love all the details too, including some of the cracked veneer that I didn't remove.
 So are you wondering about one of the pictures? Do you follow Straight Stitches on facebook? If not, then you have no idea that inside one of the drawers of this vanity I found a page of scribbles and math equations from either my aunt or my mom. How cool is that? The vanity was in my grandparents' outdoor shed and lots of critters took advantage of her, but they also left some nice details. Anyways, back to the paper, I decided that the perfect way to showcase it was to frame it and put it up near the vanity. I really like the story behind it and its just a cool thing to showcase.

So there's my new vanity and I am in love.
Heather

Linking up to:

Today's Creative BlogTDC Before and After


3/27/2012

Working on my vanity

3/27/2012 0 Comments
So if you guys follow the Straight Stitches Facebook page the you'll know that I started working on a vanity to replace the one that had been in our master bedroom. I gave the desk that I had been using as a vanity to Devlin so that he could have a computer desk in his room.

The vanity that I'm working on was in my grandparents' shed and was somewhat exposed to the elements. Luckily, the piece was veneered and it seems that the only real damage was to the veneer.

So out comes a cruddy iron ($6.50 at Walmart, baby!) and lots of water for the steamy action that commenced.

Removing the veneer with the iron was a fairly painless process, but it also didn't hurt that it was already humid outside because of the thunderstorms that were passing through the area.

I had the iron set to wool or linen with steam and it probably only required about 60 seconds of steam on a section to loosen the glue. Then came my trusty putty knife. I actually ended up leaving the iron on a section while working on a different section and then moving the iron to yet another section and the working on the section that the iron had just been resting on. I don't know of that's the correct way but it's the way that I did it and it worked for me.

So after removing all of the veneer, I stopped. I'm still stopped. Why? Because I don't know how to finish off this thing. I have pinned a few ideas which I'll share later, but the main problem is that idk renown if the top is going to be stainable. I don't even know that I want to stain it. I may just paint it and then distress it. Or I could tile it, but the problem with that is the cost associated with that. I would love to finish it all in mirrors but unless I win the lottery tonight there's no way I can justify that expense. So the poor thing sits.

Tomorrow I should at least take a sanding block to her to see exactly what I'm working with. Oh, I also found some errant notes from either my mom's or aunt's time in school. Apparently page 366 was homework. :)