Follow Us @SewHalfCrazy

Showing posts with label organization. Show all posts

1/18/2018

DIY Drop Zone!

1/18/2018 0 Comments

Days before Christmas seems like the best time to undertake a small construction project, doesn't it?

I thought so too! Nevermind that I had 19 people coming to dinner on Christmas Eve. What's a little sawdust, drywall dust, and paint?

This new drop zone had actually been in the plans since Thanksgiving, but I kept getting told that I needed to wait, because there was a couch to get rid of before I could implement my plan. Once that couch was gone though! It took a day or 2 to get the furniture moved and the space for the new drop zone cleared out.

I'm getting ahead of myself, let me tell you how this evolved. I bought an entire set of furniture for the family room after Thanksgiving, which meant that all the furniture that was currently in the family room would need to move downstairs to the basement, which further meant that I needed to get rid of 2 pieces of furniture. Luckily, my dad took the big red couch. The chair still needs to go to the dump. The kids have destroyed it.

So with all of that changing, I started looking at another spot in the house that wasn't working anymore. That spot was the itty bitty coat rack that held their coats and backpacks (sometimes), but more often than not, the chair in the living room would hold the oldest's backpack, the shoes would get thrown somewhere near the sofa table, and the two littles......well their crap just got strewn from the living room towards the kitchen. It drove the hubs and me crazy. So I started coming up with plans for a new and improved drop zone. The original plan was to build lockers over on the wall against the stairs in the living room, but that required work. Not that I'm afraid of work, but it would've had to wait until after the new year, and as my husband so eloquently called my unwavering impatience, it just wasn't gonna happen.

So I started really looking at spots and things we had on hand, and then an idea grew. What if I transformed my little office space into the new drop zone?


My area could move into the living room and we'd just use it as more of a parlor. At least then the room would be seeing regular use!

So now I have the perfect space for the drop zone, but how to implement it? I could still do lockers, but again that meant waiting. No, go. Then I remembered that I built a bench eons ago, and it was going to be homeless when the new furniture came in. Why not use it? It was a custom built bench to go over the laundry baskets we used as toy bins when the boys were small. It'd certainly work for a bench to put on shoes and house shoe baskets.


So I moved it and the memo board over to the new spot. Small Fry approves of this!  He and Baby Girl immediately jumped on the shoe basket idea, and it's been so great not tripping over their shoes. Big Guy took a little longer to come around, actually, we still have to remind him to put his shoes away.

I am loving this change so far, and it's not even done!

Next, I had to make sure I had the lumber. We've got loads of scraps in the garage from various projects, so I was fairly certain that I could find everything I needed, and I was right. I managed to scrounge together all the wood I would need for the wall. I even found the builder's paint!

I called my dad and asked him if he wanted to take a break from painting his basement to help me build some wainscotting for the area. I also told him I'd pay him by providing lunch and coffee. He's cheap, but good labor.

I drew up some cursory pictures, and texted them over to him, explaining what exactly I wanted. We went back and forth a bit over what he would bring over and what I had. In the end, the plans were set! He would come over the next day and build me the wall I wanted. Squeeeee!

Construction went exactly as you figured it would. It was a straightforward plan with nothing to really complicate it, except or the dang outlet. Oh well. The outlet is behind the bench so ending the wood a bit above it worked out well.


The only real hitch came when I was touch up the wall where the hallway color is. My sample can was a different shade completely! So I went back to Lowe's and discovered that they'd changed the name of the paint I had used (it's now called Wild Mushroom), but if I had the code then they could mix it up. Of course, I don't remember the code, that's why I remembered the name! Google search to the rescue! The paint is still a shade darker, but to be fair this paint has been on the wall for ~5 years, so some lightening is to be expected. I will be repainting parts of the hallway at some point so that you can't see all my touch-ups. Home improvement projects never go exactly to plan, do they?


You can see the terrible touch-ups in the picture, but look how nice the whole area looks! I love that the kids are using it and that the only shoes I've tripped over lately, are the hubs. I mean I don't love that, but it's so much better than dodging several pairs on my trek from the front door to the kitchen.


So there's the new drop zone, and I gotta say I love it a little more that it didn't cost me a penny, not including the $13 for the new paint for the walls. I love how simple and easy it came together and how much nicer it is now to walk in our front door and not see piles of kid crap everywhere. Who knew that such a simple change would bring so much peace?

Thank so much stopping by!

Cheers,

3/03/2017

Bullet Journal Love

3/03/2017 0 Comments

So the bullet journal is not a new thing. It's been around. In fact, I started using it last year, but it didn't stick around.

I started my bullet journal in March of last year, after I was feeling overwhelmed with all the sources of information I had stored in various places. I was drowning a little, because I would constantly forget things even though I knew that I'd put the information somewhere. Unfortunately, after May I stopped using my journal. I don't know why, but the journal sat dormant for the next 7 months.

4/12/2016

Sofa Table Shoe Organizer

4/12/2016 0 Comments
So you know the old saying - "Necessity is the mother of invention"?

That's the reason for today's post.

Our family has a shoe problem. A big one. I may or may not be the biggest offender of this problem, but in my defense, my shoes do make it back up to my closet far more often than the most prolific offenders, my children. I'll give Baby Girl a pass, because she's a toddler.

We have shoes everywhere, and it's not for lack of trying to organize them. We have a shoe organizer, but it just doesn't hold enough pairs, and it's destroying the top of the closet door.

So while grumbling after fussing at the boys for the umpteenth time to pick up their shoes, and then tripping over a pair of my Hub's shoes, inspiration dawned.

The sofa table. I can replace the sofa table with a sofa table height shoe organizer. Apothecary style. I could build it.

From these incomplete but inspired thoughts, this plan came to life.


I looked around online, and didn't find anything that really suited what I needed, but I did take inspiration from several different styles and sources. This design, though, is all my own.

There are 18 cubbies that are more than big enough to fit a pair of sneaker or even a couple of books.

Here's another shot with some dimensions.


The piece is slightly longer than the sofa table we have now, but it's the same height.

Now I just have to figure out the wood requirements and price it out. Given the width, I may end up having Lowe's rip down some plywood boards to the 11.25 width I need. I'll also need some edging for the fronts and sides. I really wish our table saw hadn't died.

Be on the lookout for this project to come to life. I'm desperately tired of cleaning up shoes.

Cheers!

2/19/2016

Small Fry's Not-So-New New Room

2/19/2016 0 Comments

Small Fry was a very patient boy for 6 weeks.

6 weeks ago, we told him we'd be updating his room. He needed more space, and with smallest room in the house, the arrangement we had going on for him just wasn't working. 

He patiently waited while we worked on the basement before Super Bowl. Then less than a week after Super Bowl, he had his new set-up. I'll share a secret with y'all - he's worse than me about timelines and what he expects done.

1/20/2016

Finished Media Center

1/20/2016 0 Comments
Well it's done.

The behemoth is complete.

Thank goodness.

Not that I don't totally love that the hubs and I built it, by ourselves, but man..........

Building it was the easy part. That finishing part......

It's a darn good thing, it's so freaking gorgeous, or else I might be a little more bitter about spending 16+ hours with it, just painting and sealing it.

1/08/2016

Building Some Storage

1/08/2016 0 Comments
Why is it that whenever January rolls around the hubs and I take on the house?

If you'd guessed holiday clean-up, you'd be wrong. It's Super Bowl.

We've hosted Super Bowl parties fairly regularly, but this is our 2nd year hosting it for the neighborhood. I'm actually excited. Well not to say I wasn't excited last year, because I was. The Pats were playing. I have to be excited for that. Patriot fan by marriage here.

I'm doubly excited this year, because of this!

8/07/2012

Coffee? Yes, please!

8/07/2012 0 Comments
Hey all again! I'm back! Two days in a row! 

I know, I know. Please  try to contain your shock and awe. :) 

So I'm back sharing things I've updated in my kitchen. When I moved all of the copper molds to above the kitchen cabinets, I moved the vases and jars I had up on the cabinets down to the counter top. I am using one as a utensil holder and the other two jars got turned into the most used items in the house, well, at least  one of them did. 

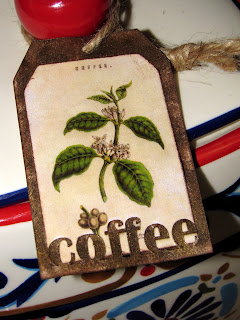
Problem? Yep, you couldn't tell the  jars apart, and unless you're in them every couple of hours (like me) then you'd have no idea which jar is which. Second problem - I don't like repeating myself (I blame this condition entirely on my children).  So my solution was simple! Tags for my jars! 
  
The tags were easy to make (hah!). I went to The Graphics Fairy and found some botanical prints of tea and coffee. Then worked on the tags until they were perfect in Silhouette Studio. It took some doing to get the letters to pop out of the back of the tag to act as a stopper for the images, but I got it and I loved the effect.

The only problem was the bright white cardstock I used. Never fear! Paint is here! I stamped all around the edges and then smeared the ink pad over the back of the tag, then I took metallic brown, black and gold and stippled them all over the tag. After all of that dried I glued the image inside the tag, and then topped it all off with a couple of coats of Mod Podge and called it a day. I love how these beauts look on my jars, and I love that I will never have to tell anyone again where the coffee  is. :)

Heather

 Linking up to:
 

5/30/2012

New Hang Out!

5/30/2012 1 Comments
How many of us have a lot of jewelry?

I do! I do! I do!

I never 'knew' what all I had though because I couldn't find it or see it all. It was in drawers or in piles in a couple of different places in the bedroom.

Not any more! I can see almost all of my earrings and brooches now. A few select necklaces are out as well.

You know what's even better. I reused an old window that I had to make said jewelry shine! Here's what I made!

These jewelry holders are all over blog land, and I'm happy to say that this project didn't cost me one red cent. Well it did at one time, but I did not buy anything new to make this jewelry display.

So here are some close-ups!


I just stapled the hardware cloth inside of each frame. This was not as easy a task as one would think, but I made it work. Fitting the hardware cloth inside the frames and then laying down a bead of silicone probably would have been easier and more secure than the staples I used, but silicone would have taken too long to dry. I wanted this thing up pronto!

Another note - did you notice the heart hanging from the window? Its full of rose petals from the first rose that the hubs ever gave me.

Now I just need a good way to organize all those rings I have!
Heather

7/25/2011

Form and Fun-ction

7/25/2011 6 Comments
Did you guys see my guest post over at Creating my way to Success?

You didn't!?!?!?!?!

You must go see it. Now. Here's the link - LINK!

Ok, so that console is now done. Yay!

I picked up this beaut at the Salvation Army a few months ago, and knew that she was going to replace the black console that had been in this spot since we moved in. Here's the console that was there.
She wasn't a bad console. Just low and doesn't have a lot of storage. Oh and we have a white dog. Guess what shows up super well on black furniture? Yep, you guessed it. Fur and dust. blech.

So here is what the piece looked like before. :)  I don't have great before pictures, but you get the idea. The piece is a Bassett furniture number, and its HEAVY. I had to make sure to have the thing moved inside before Steve left for Vegas. I just made it.

So now that you've seen her ugly beginnings, lets take a look at her transformation, and how I'm utilizing her oh-so-amazing drawers. :)
 LOOK! They hold the DVDs so very nicely. Not that my children put the DVDs away any better than they did with the baskets, but still they're completely hidden when they are in the drawer!


 I used two different knobs on this piece, which is a first for me. The nickel knobs are from Target and the pretty ceramic knobs are from Hobby Lobby (from my trip to Nashville in June) :) I decided to paint the original backplates a nickel color to match the Target knobs, but to also make the ceramic knobs stand out.


The top is stained with one coat of Minwax Jacobean stain and I protected the whole piece with a coat of wax. The paint color is Metro Mist by Valspar and I primed the body of the piece with tinted Kilz oil-based primer. Oh then I did a light glazing with Valspar Asphaltum glaze. Love the result! Especially against the orange of the family room.


So what do you guys think? Did I do a good job? I love the character that this piece has, not to mention all the storage.

Oh do you want to see how I hooked this baby up without Steve's help?

Yep. I took pictures of how the DVD thing and the DVR cables were aligned. They helped a lot because I hooked it up right the first time! Yay me!

Stephen was quite happy with the change when he got home. The best part? Harrison can't reach the boxes anymore. Oh Yea!

See you guys tomorrow!
Heather

Linking up to:

6/02/2011

New Job for an Old Window

6/02/2011 1 Comments
I love old windows.

So I have a lot, I mean A LOT of old windows. I picked up about 23 of them at an estate auction last year.

I have used 4 of them for projects so far. The hubs wants me to clear the windows out.

So I took one of the more beat up window frames, the glass was gone, and decided that I needed some love for above my computer monitor in my nifty new computer closet. :)

Along with my window frame, I had the hubs cut three 1/4" plywood panels to fit inside the window spaces, and then grabbed my cork board contact paper stuff, some low loft batting, a fat quarter, some ribbon, and my stapler and a glue gun. The picture below is not a good representation of what you're about to see.
Oh and the pictures for this how-to end here, until the finished product. It might be the worst tute ever. :)

So I cut down my corkboard to fit the panels, then just adhered it to the wood. Easy Peasy.

For the padded memo board, I wrapped the batting and the fat quarter around the wood panel. Yanked out my stapler and then went to town around the edges. I did make sure to stretch everything nice and tight.

Next the glue gun and ribbon came out. I kind of eyeballed where to put the first 45 degree ribbon and then went from there. Hot gluing one edge first and then pulling the ribbon taut and gluing the other edge down.

I used an entire roll of ribbon for this.

After all of that work, I pushed the panels into the openings of the frame and then stapled everything in.  Add picture hanging stuff of your choice and . . . VOILA!

Insta - fun over my monitor. It's also quite handy at holding things. :)


Here's a close up of my pictures, cause I know you want to know who they are. Obv the photo strip is Dev and Steve. I should really put a picture of Harrison too. :) The gorgeous lady with the dog is my Mom and our first dog, Patches. Then the handsome fella in the uniform is my Daddy! He's sporting his Hargrave uniform :)

So that's what I did last night after the kids were fast asleep. :) One more window saved, and only 18 or so left to do something with.

I hope you guys have a great day!
Heather

5/26/2011

Red Letter Day

5/26/2011 8 Comments
OMG! It's a red letter day! For the first time a in a while, I'm actually writing this post ahead of schedule. :)

Yay me! I'm just going to go ahead and pat myself on the back. You don't mind, do you? I hope not, cause its happening. :)

So without any ado - HERE'S MY NEW CRAFT SPACE! *slightly excited, can you tell?*
There are still holes to sand and paint.
 Not everything is in its place.....yet.

But I have space! Lots and lots of space!

And I love it!

What do you guys think?

Oh yea - the desk. Totally an Ana White design. Find it here! :)

Have a great day guys. I'm going to finally get back to sewing.
Heather