Follow Us @SewHalfCrazy

Showing posts with label kitchen. Show all posts

8/07/2017

DIY Coffee Trivet

8/07/2017 0 Comments
So it's no surprise that I love coffee, or that I have several recipes and gadgets around my house solely devoted to coffee, and today's post is no different.

I had a coffee trivet. Only it didn't stand up to the daily abuse it received. Dana actually gave me this tile trivet several Christmases ago, and I loved it. It was just a simple 'B' on the tile with felt pads underneath. It did the job as spoon rest, mug rest, and counter beautifier.  Until it didn't do the last very well. The 'B' started wearing off, and then the trivet just looked kind of sad.

I knew that I was going to attack it with an oil-based sharpie and some kind of coffee hand lettered art, but there were so many choices! How was a girl to choose?

Enter the snarky throwback to my youth and my early introduction to rap. How could I not choose this quote?

Then there was the matter of designing the image. Luckily, I'd found this wonderful tutorial {HERE} on how to hand letter within a circle, and then everything clicked and fell into place.

I actually used one of my larger mugs as my circle guide, and then went from there.

The next time I do a project like this, I will have 2 oil-based sharpies on hand, because the one started running out towards the very end of my project. It was quite annoying, but cest' le vie.

After I let the tile dry for about 24 hours, I baked it in the oven and then let it cool inside the oven, and now several weeks later, my trivet looks as good as new, and it brings a smile to my face every morning.

I do only hand wash the trivet, but it has survived that and coffee stains, and compliments both of my coffee makers. Now I think it's time for another latte. If only I could get my orange sugar syrup right....

That is a post for another day though. Thanks for stopping by!

7/05/2016

Faux Reclaimed Wood Cornices

7/05/2016 0 Comments

I love when a project is done, and looks as good in real life as when you first thought up the idea.

I especially love when a project goes easily, then gets a bit annoying, and then ends up finishing on a high note. Ok, I don't actually love that. I wish this project had just gone the way it was supposed to. Easily.

No such luck.

The first cornice went up like a dream. The second cornice......

I digress.

7/20/2015

Brightening the Kitchen

7/20/2015 0 Comments
When we moved into our house 6 years ago, I knew that our kitchen was going to be a deep red. I had seen a model home, in our area, with antiqued white cabinets and walls the color of autumn maple leaves. I was smitten. That was the kitchen I wanted.

Well, I didn't get antiqued white cabinets, but I did get the wall color. I loved it. It made me happy. Then last year, I started to have stirrings of wanting a lighter, brighter kitchen, but I still loved the red. I just wanted to be able to work in the kitchen without having to turn on a light.

So this is what the kitchen looked like 4 years ago. Right after we finished tiling the backsplash.

9/25/2012

Perks....

9/25/2012 0 Comments
So I know I've mentioned that I've gone back to work, but what I haven't advertised is that I now work at Lowe's.

I'm a cabinet specialist (aka - kitchen designer), and I love my job. I didn't think I would because it was such a change from staying home with the kiddos, but I really do love being out of the house and contributing to the household. I miss the guys, of course, and the retail hours take some getting used to, but all in all I think everyone is adapting well.

One of the perks of working at Lowe's is seeing what goes on clearance pretty early on.

Like this pendant -
I got this beaut for less than $40 from originally being $160. LOVE!!!

She's the new jewelry over the kitchen sink. She doesn't produce much light, but lord she's gorgeous.

What do ya'll think?

Heather

8/07/2012

Coffee? Yes, please!

8/07/2012 0 Comments
Hey all again! I'm back! Two days in a row! 

I know, I know. Please  try to contain your shock and awe. :) 

So I'm back sharing things I've updated in my kitchen. When I moved all of the copper molds to above the kitchen cabinets, I moved the vases and jars I had up on the cabinets down to the counter top. I am using one as a utensil holder and the other two jars got turned into the most used items in the house, well, at least  one of them did. 

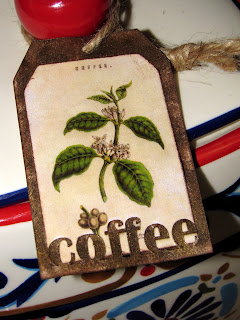
Problem? Yep, you couldn't tell the  jars apart, and unless you're in them every couple of hours (like me) then you'd have no idea which jar is which. Second problem - I don't like repeating myself (I blame this condition entirely on my children).  So my solution was simple! Tags for my jars! 
  
The tags were easy to make (hah!). I went to The Graphics Fairy and found some botanical prints of tea and coffee. Then worked on the tags until they were perfect in Silhouette Studio. It took some doing to get the letters to pop out of the back of the tag to act as a stopper for the images, but I got it and I loved the effect.

The only problem was the bright white cardstock I used. Never fear! Paint is here! I stamped all around the edges and then smeared the ink pad over the back of the tag, then I took metallic brown, black and gold and stippled them all over the tag. After all of that dried I glued the image inside the tag, and then topped it all off with a couple of coats of Mod Podge and called it a day. I love how these beauts look on my jars, and I love that I will never have to tell anyone again where the coffee  is. :)

Heather

 Linking up to:
 

8/06/2012

$3.63

8/06/2012 0 Comments
Hey guys! I've been busy this last week!

I don't know how many of you look at the Facebook page, but if you subscribe to Straight Stitches on Facebook, then you would have seen sneak previews of things I've been working on!

So a while back on Pinterest, I saw this pin -

Love those letters! I need some of those letters!

So I made myself some paper mache letters using cereal boxes, a phone book, flour and water. Dev even helped me make the letters. A good, messy time was had by all.

So after the letters were dry, I painted them with some copper paint and then just hot glued my pennies to them! $3.63 worth of pennies to be exact.

I ended up overlapping the pennies so that more of the letter was covered, but I like the dimension and depth the layering gives the letters.

I also ended up rearranging my copper jello molds when I decided to  put these letters over the pantry door. They are now above my cabinets, and there is plenty more room for more molds! Not that  I'm happy about that or anything. :)


I am loving the simplicity of my letters, and how they add a bit of shine to my brick red walls. See you guys later!

Heather

12/29/2011

Getting My Art On

12/29/2011 5 Comments
Hey guys!

Boy, this week week between Christmas and New Year's really wreaks havoc with stuff. I haven't been doing things I know I should, and instead sitting on my tuckus enjoying all the trimmings of Christmas.

I did get a ton of stuff done before the holidays, but I only took pictures of  one of the gifts, because I'm a dodo.

Dana will have to supply some photos of her gift for you guys, but I'm sure she will. I'm an excellent nag. Ask the hubs. :)

So anyways, back to the conversation at hand - handmade gifts. I should really say altered gift in this case, but whatever the case - I want some for myself.

My sister, Nicole moved into her own place with her fiance' this year and as such she's been setting up her house.

She's decided that the colors in her kitchen will be black and white. That's a palette I can work with. :)

So I headed to Target and got some of their flour sack dish towels. These are great. They're large and they're only $5 for 4 of them.

Then I found these Sharpie fabric markers.
Click the picture to go to Sharpie's page.
Now, I bought them before I really thought about the implications.

I would have to draw on these towels with these. Draw. Ergh. I'm not an artist. Not the pencil and creating and image out of it kind of artist, but my head down and ram it attitude provided me with the determination (note that I did not say confidence) to tackle this project.

I went to The Graphics Fairy and downloaded a couple of black and white steampunk images. Love her site! So then I printed out said images in a 5 x7 format, but I made sure that the images weren't cropped or anything.

I laid the pictures beneath the towel and outlined the picture, then I moved the image out from underneath the towel and went to town on them. I think I did alright. here are some close-ups.


The fan is my favorite one, and the utensils were the first ones I did. I think I improved between them and all the rest. The marker was very smooth and didn't catch on the fabric at all.

I want some for myself now, and I have some good ideas with the rest of the colors.

See you guys later!
Heather

9/08/2011

Going Homemade

9/08/2011 0 Comments
I've been using homemade laundry detergent for a while now, and I love it.

When I saw that Simply Designing had a recipe for a homemade dishwasher detergent I was all over it. Luckily I had most of the supplies on hand and the only thing I had to buy was Lemi-Shine.

Simply Designing Dishwasher Detergent Recipe

I changed the recipe to have less Lemi-Shine because we do not have hard water, so I only used 1 cup of it.

I haven't used the new detergent yet, because the last bottle of store bought stuff is stubbornly holding on, but I did make a super cute container for the homemade stuff. :)

Its the exact same jar as the laundry detergent, and I did exactly the same thing as I did for that container. Easy Peasy.

I can't wait to see how lovely and clean my dishes come out - and to save some money on dishwasher detergent. :)


Heather

6/14/2011

A Labor of Love

6/14/2011 2 Comments
Sometimes we say silly things. Sometimes I we say things like, "My back splash is going to be so much easier to do than Heather's". After all, Heather used all natural stone. I read about her epic adventure in back splashing. How bad could mine be? Bad. It turned out so well, though! Let us begin.

We start with a workspace. My kitchen floor was the best place to do this. I laid down a towel so that the hammer would have a place to drive into. If I had just tried to break the tiles on the floor, the floor would give resistance, pushing back against the hammer blow. The towel lets the force of the hammer continue down and down and through the tile.

*You may wonder how I know these things. Believe it or not, I actually did something similar with mirrors in high school for an art project.

Make sure to use a plastic bag to contain your pieces. Otherwise slivers and chips will fly everywhere. Porcelain tile doesn't shatter or anything, but you will get the occasional bit of shrapnel. You'll also have to change bags when the current one gets too many holes sliced into it. Yes, porcelain edges are very sharp...as we all found out.

Ready to strike! I generally hit in the center once and then hit each of the resulting pieces in the center as well.

Tadaa! A bin full of pieces! This was about two boxes of tiles, which turned out to be more than I needed, so we were actually able to return the third. Don't open anything unless you're certain you're going to use it. Oh, and for any one who is curious, we used tiles from a company called Castle Stone.


Ah, my kitchen walls, our blank slate. We taped off the areas where the back splash would end. This also kept the grout from getting where it didn't need to be.

This is my listello, the border for the back splash. Isn't it gorgeous? I love the colors!

Here's the labor and the love part. The placement of all the broken tiles was done freehand. That means we had to search through all those countless pieces for something that would fit. It's actually really impressive that we finished as fast as we did. By "we" I mean "Heather and Mum". They really did about 90% of all the work while my husband was laid up with tooth pain and had to be taken on a fruitless trip to the ER.

If I didn't already know Heather and Mum loved me, this proved it. They were so patient and generous all weekend through all the unexpected difficulties. I am very thankful for both of them. :-)

Here's Heather mixing up the grout. She did me a great service by going out and getting a better grout color for. I had originally chosen a color called Pearl Grey, but that was really a bit too dark. Heather found (don't ask me how, it's a talent of hers) a different color called Smoke Grey, which was perfect!

Here's the grout all done. Didn't I tell you Heather found the perfect grout color? :-)

Here's the finished product, or as finished as it is so far. I have to caulk tonight, but it's all done otherwise. I hope you like!

Finally, if you ever have any back splashing questions, Heather is a great source for information. She knows what she's doing. Big, huge, endless thanks to these two great ladies in my life for everything this weekend. I love you both!