Follow Us @SewHalfCrazy

Showing posts with label art. Show all posts

8/07/2017

DIY Coffee Trivet

8/07/2017 0 Comments
So it's no surprise that I love coffee, or that I have several recipes and gadgets around my house solely devoted to coffee, and today's post is no different.

I had a coffee trivet. Only it didn't stand up to the daily abuse it received. Dana actually gave me this tile trivet several Christmases ago, and I loved it. It was just a simple 'B' on the tile with felt pads underneath. It did the job as spoon rest, mug rest, and counter beautifier.  Until it didn't do the last very well. The 'B' started wearing off, and then the trivet just looked kind of sad.

I knew that I was going to attack it with an oil-based sharpie and some kind of coffee hand lettered art, but there were so many choices! How was a girl to choose?

Enter the snarky throwback to my youth and my early introduction to rap. How could I not choose this quote?

Then there was the matter of designing the image. Luckily, I'd found this wonderful tutorial {HERE} on how to hand letter within a circle, and then everything clicked and fell into place.

I actually used one of my larger mugs as my circle guide, and then went from there.

The next time I do a project like this, I will have 2 oil-based sharpies on hand, because the one started running out towards the very end of my project. It was quite annoying, but cest' le vie.

After I let the tile dry for about 24 hours, I baked it in the oven and then let it cool inside the oven, and now several weeks later, my trivet looks as good as new, and it brings a smile to my face every morning.

I do only hand wash the trivet, but it has survived that and coffee stains, and compliments both of my coffee makers. Now I think it's time for another latte. If only I could get my orange sugar syrup right....

That is a post for another day though. Thanks for stopping by!

6/30/2017

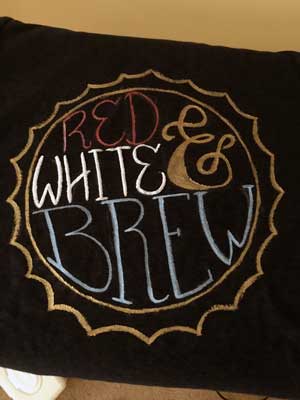
DIY Patriotic Shirts

6/30/2017 0 Comments
Can you believe that Independence Day is next week?!?! What?!?!

Where the heck has the year gone?

Luckily, I was on the ball this year, and made our patriotic shirts early enough to actually wear on the 4th. Go me!

I did some searching on the googles, and found some patriotic phrases I liked for the fam and then set about drawing out the images for the shirts.

I created rough drafts and then final drafts on paper, and then used them as guides for the shirts. I lettered the shirts with a combination of sharpies and fabric paint. Each person got a personalized shirt to fit their interests or personalities.

I must say I'm pretty proud of each of these creations, although the hubs shirt was a pain. Apparently his shirt was cut much smaller than the advertised size, and so needed a bit more customization, but I wasn't about to redo my artwork, so I cut out around my original artwork, staying about 1/4" away from the painted edge, and then stitched it down to a shirt that was in fact the same size as was advertised. So his shirt officially takes the cake as the most involved shirt.

My shirt was a close second, because I wanted to create a watercolor affect for the flag, and that took a bit of planning and prayer, but luckily it turned out well on the first try, from there it was just a matter of lettering everything with my trusty black sharpie.


The kids shirts were all fairly straightforward, the only one that had a bit more done to it was Baby Girl's because I sewed some star rhinestones to it to add a bit more sparkle. A girl can never have too much sparkle.

Thank so much for stopping by!

6/12/2017

Peacocks and Flamingos

6/12/2017 0 Comments
You know how there are just some phrases that stick with you? I saw this quote while surfing the interwebs for inspirational quotes for girls, and it really struck a note. Not because it's true, because it's totally true, but it applies to everyone.

So the inspiration was this image. I'm sorry that I don't have the proper web credit, but it was a google image search. I could totally do the text, but I'm no good at watercolors, even though I love them. So how could I achieve the same effect as this gorgeous inspiration piece?

Go tribal. I knew that there were tons of examples of tribal peacocks so I found one that would work and then used that as my guide, but what about the flamingo? I couldn't find any tribal flamingos that I liked or thought that I could draw, so I ended up drawing that flamingo from scratch.

I think it worked out pretty well, and after many, many, many sketches I was finally to a place where I liked my pencil drawing.

Then I sat on it. I didn't do anything with the sketch for a few days. Then I decided that Baby Girl needed a new shirt, but I also wanted a hard copy of my art. So I decided that I'd work on the hard copy of the art first. The hard copy still isn't done to my liking. Moving on.

Next was Baby Girl's  new shirt. Target has some really adorable plain white tee's for the kids right now. The sleeves are cuffed and it's got a cute silhouette. I like this shirt so much that I bought another shirt for her 4th of July shirt.

So I started with my sharpies. Love my sharpies! I gently outlined all the text and the main bits of the birds. I used a light hand so that the sharpie didn't snag on the material of the shirt. I then went back and added thicker strokes to the first lines I'd made. I was definitely following the "You can always add more" rule.

So after the sharpie was on and I was happy with it, I heat set it with the iron. I turned my iron up to the wool setting and then using a press cloth ran over the drawing for about 30ish seconds.

Next I prepped my paint. I wanted to water down my paints to create a watercolor effect with my fabric paint. I added a bit of water to each color until it looked right. I then gently went over each line of the birds, adding color as I saw fit. I finished up the birds with some hits of glitter or pearl paint. The bits of glitter are just the thing to make each bird stand out.

You can see that how the color spread on the dry shirt, creating this kind of abstract watercolor effect. I really like how it all came together, and Baby Girl was very happy with her new shirt!

Thanks so much for stopping by!

4/20/2017

Art for the Kids

4/20/2017 0 Comments


If you follow Sew Half Crazy on instagram {HERE}, then you'll have seen these pictures a while back. It's been a bit crazy here, and I'm only just now getting to write this post. 

I wanted to share with you a cute little $1 inspired art project that I made for the kids. Well 2/3 of the projects costed a $1, the other one cost $3. All the rest of the supplies I already had on hand, which were - 
    • 140 lb. press watercolor paper
    • Watercolors
    • Sharpie black pen
    • Regular No. 2 pencil
    • Large coffee mug (for the circle gem)
    • Small medicine cup (for the moon)
    • Ruler

So these were projects that just kind of evolved. I've wanted to add the Proverbs verse to Baby Girl's room for a while, but just didn't know in what way. Then inspiration struck, and I saw some watercolor gems. Bingo!  I used a very large coffee mug to draw the large circular edge of the gem, and then just measured out somewhat even lines from the center. After I'd filled the circle with geometric shapes, I went to work coloring them in with watercolor. I tried to stay away from my pencil lines, so that I could erase them later. Once it was dry and I'd erased the pencil lines, I sketched out the verse, and then went over it with my Sharpie.


Her art is the largest of the three pieces, and after I got it made it sat for a while, because I didn't know how/where it was going to go in her room. 

I really planned this project out, as you can see. Then one day in Target over by the $1 section, I saw these awesome little easels. So I snatched up 3. Two of the smaller size which were $1 each, and then the larger one for Baby Girl, which was $3. Perfect! 

So I took the mod podge and glued Baby Girl's art to the easel. I didn't cover the top of the art with any mod podge, because I didn't seal it and I didn't want the colors or the ink to run. 

While I was working on Baby Girl's art, my Big Guy tells me that he really likes the watercolor gem, but not that it's a gem. So I had another inspiration. I'd back his art with a random geometric pattern, and just color it in like I did the gem, but what to put on it? 

A few days later, Big Guy comes upstairs angry at his computer, because he closed the program he was using and didn't save his work, and he lost everything. Hubs and I started chuckling and commiserating with him over the plight of auto-save, but tell him it's life and it's his fault, because he should've saved his work. 

A few days later, I'm browsing the internet for quotes, and I find the perfect one for my Big Guy.  I draw it out, and get it how I want it too look, and then put it on the painted background I'd created earlier. I mounted it to the smaller easel, I'd picked up. These easels were 2" x 3". The perfect size for a little reminder, as I figured he'd put this on his desk. 


He loved it, and immediately knew that the quote was in reference to his lost work, but at least now he smiled about it. 

My last piece of art was for my Small Fry, and I knew what I wanted to make for him, but not how I wanted to display it. I have always said, "I love you to the moon and stars," to Small Fry. It's our thing. While browsing the internet, once again, for inspiration on how to display that quote I came across this image - 

To the moon and back Hand lettering by Heidi Nicole:
{Original Post}
It was perfect for my Small Fry. So I set off to make my own version of this for him. I used a medicine cup to make the 2 perfect circles for the O/moon. I had no idea what I was doing with my watercolors and the moon, but I just kept blending it and adding a bit of color until I was happy with how it looked. Sometimes the best plans, don't really involve a plan. The stars are actually metallic gold, and I love just the little bit of glitz that they add. 


I mounted it to my last small easel, and placed it on his little corner shelf. Small Fry told me it's the last thing he looks at every night. Sometimes that kid really knows how to melt my heart. 

I love that each kid now has a little bit of art that their mom made. 

Have a lovely day! 

2/02/2017

Watercolor Splatter Art

2/02/2017 0 Comments

So we've all been on pinterest and found certain projects that on the surface look fairly simple to accomplish. Then you get into the project, and you realize that you are so far over your head that you need to take a different approach. 5 approaches later, you realize that you are not an artist and you have merely accomplished an impressive display of pinterest fails.

Agate watercolor art was my downfall. What could be so hard about that? A lot. Or maybe it's just me. Either way, after 5 or 6 tries, I resorted to a different approach for my watercolor art in my bedroom.

I threw paint. I'm good at throwing paint.

2/16/2016

8/14/2015

Family Plaque

8/14/2015 1 Comments
When we found out our family was expanding, there were a lot of emotions. There were even more emotions when we found out our newest addition was going to be a girl.

Now don't get me wrong, I love my boys more than life itself, but a girl was new and a little bit daunting. Boys are easy, comparatively.

Either way, one of of the first projects I completed that included our updated family names was this plaque.

Family Plaque

8/11/2015

Shakespeare Chalkboard Art - Printable

8/11/2015 0 Comments
If my husband were writing this post he'd probably tell you that I am obsessed with quotes.

I could maybe write a book about my life and every chapter would be a quote. 

Words are magical. I love how words can be put together and evoke different emotions. Next to smells, I think, words are the things I most associate with memories. 

So when I was decorating Reagan's room, I knew I wanted a quote, but which one? 

There are so many to pick from.

 So many that speak to me. 

So many that I want to inspire Rae as she grows in this room. 

Which is why, when a friend posted a favorite quote from The Bard himself, I knew that was the one.

It's also from one of my favorite plays - A Midsummer's Night Dream.

Shakespeare Chalkboard Art

12/04/2013

Flight of the Butterfly

12/04/2013 0 Comments
If you follow Straight Stitches on Facebook or follow me on Instagram (haboyajian), then you know a few days ago I shared a photo with a 1/2 done project. Well that 1/2 done project is now fully done and on display in Rae's room.


I know this isn't your typical sampler for a baby's room, but the boys both have cross stitch samplers in their room and I didn't want Rae to feel left out. I don't particularly enjoy cross stitch though. I mean, I can do it, I just don't like too. I get about 85 - 90% done and then I usually put the project down and forget about it. All those finishing stitches are annoying, which is why I didn't want to do a cross stitch sampler for Rae. That and I only half-heartedly looked for a sampler and I didn't  find any that I had  to have.

I did a couple of google image searches for modern baby samplers and quilled art, and then VOILA! Inspiration hit. After some playing in photoshop and more google searches for appropriate butterfly images, my butterfly sampler was taking flight.

I did opt to 'freehand' the lettering on her sampler and by that I mean, print out my master copy of the sampler and lay it over a light box with my nice cardstock and trace around the letters. All of the inside touches on the lettering is all me though! I think I did pretty good!


Then it was on to the paper play. Using free time any time I could, I glued up those strips of paper. All told it probably took a good 3 days to get the butterfly done, but I feel like it was totally worth it.


I found the glittery frame at Michael's and when I saw it I knew instantly that it was what I wanted to frame the sampler in. Thank goodness for sales!


Heather

5/29/2012

Pinterest Challenge!

5/29/2012 1 Comments
So I know we all have  things pinned under the "I want to try this" file.

Personally - almost everything I've pinned is in that file.

I can knock one of my pins to the "I've done that" file!

I saw this project a while ago and I knew I wanted to try it.

I like to think of myself as artsy. Not in the painter-can-draw sort of way, but in the ways I can interpret things. What I'm sharing with you today is definitely under the I'm-trying-to-be-a-painter category, and I think it turned out pretty darn well.

This is a progressive water color painting and I got the idea from here!
Elise has such great directions on her site, that I didn't have any trepidation about starting this  project. Seriously, she made it so easy.

Here are some more shots of my art project. I love the pop color she adds to the wall in my bedroom. You all know I've got a soft spot for orange. :)


So there's my pinterest-inspired art! What do you guys think?

Heather

Linking up to:

12/29/2011

Getting My Art On

12/29/2011 5 Comments
Hey guys!

Boy, this week week between Christmas and New Year's really wreaks havoc with stuff. I haven't been doing things I know I should, and instead sitting on my tuckus enjoying all the trimmings of Christmas.

I did get a ton of stuff done before the holidays, but I only took pictures of  one of the gifts, because I'm a dodo.

Dana will have to supply some photos of her gift for you guys, but I'm sure she will. I'm an excellent nag. Ask the hubs. :)

So anyways, back to the conversation at hand - handmade gifts. I should really say altered gift in this case, but whatever the case - I want some for myself.

My sister, Nicole moved into her own place with her fiance' this year and as such she's been setting up her house.

She's decided that the colors in her kitchen will be black and white. That's a palette I can work with. :)

So I headed to Target and got some of their flour sack dish towels. These are great. They're large and they're only $5 for 4 of them.

Then I found these Sharpie fabric markers.
Click the picture to go to Sharpie's page.
Now, I bought them before I really thought about the implications.

I would have to draw on these towels with these. Draw. Ergh. I'm not an artist. Not the pencil and creating and image out of it kind of artist, but my head down and ram it attitude provided me with the determination (note that I did not say confidence) to tackle this project.

I went to The Graphics Fairy and downloaded a couple of black and white steampunk images. Love her site! So then I printed out said images in a 5 x7 format, but I made sure that the images weren't cropped or anything.

I laid the pictures beneath the towel and outlined the picture, then I moved the image out from underneath the towel and went to town on them. I think I did alright. here are some close-ups.


The fan is my favorite one, and the utensils were the first ones I did. I think I improved between them and all the rest. The marker was very smooth and didn't catch on the fabric at all.

I want some for myself now, and I have some good ideas with the rest of the colors.

See you guys later!
Heather

4/07/2011

CSI anyone?

4/07/2011 0 Comments
So I got rid of my sentimental photos of the boys in lieu of some new art and tchotchkes, but I still wanted something meaningful and unique to the family, so then I thought what's more unique than a thumbprint?

So this is what I came up with!


Ok I know exactly which print belongs to which boy, but I am loving the graphic quality of the art. Even if it didn't turn out exactly right. :)  Let me tell you what I did, but first the only supplies I needed were - stamp pad, plain paper, paint, 2- 8x10 canvases, paintbrush, omni gel transfer medium.

First I stamped each boys' thumbprint on a sheet of plain white paper.

I ended up having to do several prints, and then choose the best of each print.

Then I took a picture of the prints and loaded them up into Photoshop and then removed all the color. I wanted black and white. I used my magic wand to eliminate any grays in the photo. I printed out the thumbprints so that they were 8x10. I wanted the prints to take  up most of the canvas space.

I then took my prints to Staples to photocopy them, because the transfer gel really only works on toner ink, not ink jet. I then took my pretty prints and applied the gel per the instructions. While the coats of gel were drying I then painted my canvases. I used colors in my family room and kind of slopped them on and then blended all of them together with my paintbrush. Think 2 year old method of smearing. :)

I then soaked my prints in water....and gently rubbed off the paper backing. I thought I had done a better job of it than I actually had, but the result has grown on me. :) Glue the transfer down  to the canvas using the gel.

 I am in love with my unique art. :)

What do you guys think? Have a great day guys!
Heather