Follow Us @SewHalfCrazy

Showing posts with label pillows. Show all posts

5/29/2018

French Braided Pillow V2.0

5/29/2018 0 Comments

Several years ago, I saw a pillow at Target that I knew I could replicate. The problem at the time with the pillow from Target was that it was the wrong color. So I took some fabric that matched my decor and whipped up a pillow similar to what Target had, and I did it for cheaper. The original French Braided Pillow is {HERE}, and it's still going strong 8 years later.

So I was in Target {again} and I saw the most gorgeous pillow. It was another braided number and the most gorgeous shade of magenta. It was also a velvet type of material, but it had one thing that I really disliked. You could see all of the seam allowances if you moved the sections of woven material on the front of the pillow. This is not practical for a house who has children or will use the pillow as a pillow and has children. I repeated myself, but it's doubly true.
Find this pillow at Target {HERE}
This pillow inspired me to make another, better, version of my braided pillow. One with no visible stitching lines or exposed seam allowances. Luckily, I had a trip planned to Jo-Ann's with Mom and that was a very fruitful trip. I snagged this medium-weight upholstery fabric for $7/yd! I got 2 yards just to be safe since the pillow I was going to make this time around was 16" x 24".  So let's get onto the meat of how to make the fabulous pillow!

Materials

  • 2 yds of fabric
  • 16" x 24" pillow form or stuffing
  • Cutting Mat
  • Ruler
  • Thread
  • Needle
  • Scissors
  • Writing Stick

Cut List

  • 2 - 16" x 24" rectangles
  • 2 - 16" x 7" rectangles
  • 14 - 16" x 5" rectangles
*keep a few scraps for the last little pleats at the top corners. 

Instructions

  1. Starting at one corner of one of your 16"x 24" rectangles, mark a line that is on the bias and ends about the middle of the pillow. Repeat for the adjacent corner. Measure 1.5" above those lines and make another set of lines. Continue to mark lines all the way up the pillow.

  2. Fold one 16" x 7" rectangles in half lengthwise and line up the raw edges with your first marked line. Stitch in a 1/2" seam. Repeat for opposite side, the ends should overlap in the center of the pillow.

  3. With the remaining strips, you will create the braided pattern. Starting on the first line you stitched, with right sides together, line up raw edges and stitch a 1/2" seam. The two raw edges of the rectangle should align with the first stitched line and the next line above the opposite stitched piece. Refer to the photo to see exactly what I mean. By overlapping the pieces this way there will be no exposed seam allowances.

  4. Fold the strip out with the right side showing and line up the raw edge with the next marked line above the first line you just stitched along. Stitch 1/2" seam.

  5. Repeat steps 3-4 all the way up the pillow until you come to the last two marked lines on your pillow. As you can see in the photos below, all the seams will be neatly encased under all the pleats.


  6. When you reach the very top corners of your pillow, take some of your scrap pieces to cover the seam allowances. Stitch the first line as you have previously, and then measure 1" below your stitched line and fold the scrap back over the corner. Pin and stitch within the seam allowances (5/8") of the edge.


  7. Press your pleated pillow top and then with right sides together, stitch the pillow top to the bottom. Making sure to leave an opening for your stuffing or pillow form. I used a 5/8" seam because I wanted my pillow form to be really stuffed inside. Trim seams and corners, and turn pillow right side out. Stitch the opening closed with your needle and thread. 


Doesn't that pillow look right at home with the rest of my couch? I love the pop of color! 


Thanks so much for stopping by!

2/26/2016

Flashback Friday - Woven Pillow

2/26/2016 0 Comments
Flashback Friday
There are a lot of inspired posts in the archives, and I'm digging them out to share with you all again. Hence, the new themed day. This isn't going to be an every Friday thing, but I figure it'll happen often enough to where it deserves a pretty graphic. It might happen every Friday for a bit, but who knows. I'm really just flying by the seat of my pants here.

I'm excited to share today's blog post. I mean share it again. I originally wrote this blog post way back in 2010. I'm not going to just cut and paste the original post though.

I've learned a few things in the years between then and now, so I'm going to spruce it up, and regift it to you guys.

12/05/2013

Pillow Talk

12/05/2013 0 Comments
I don't know why some projects take so long to complete, because when you get right down to it they're so stupid simple that the 5 minutes it takes to actually get them done should inspire you to just get them done. Ha! Not so.

I had a pillow project for Reagan that should have gotten done months ago, but I got 90% done and then stopped. The last 10% only took 5 minutes, but it took 3 months to spend those 5 minutes to get it done.

On Reagan's window seat, I had (have) several pillow ideas planned, and I had two 12-inch pillow forms lying around, so you'd think I'd at least get those 2 pillows onto her seat before she got here. Nope! You'd be wrong. I decided to wait until the wee hours of the morning one day after feeding her to get the one pillow done. The other pillow did take some time, because I only had 5% of it done for the longest time.

So the first pillow I made for her is a simple blue chevron print with some crocheted flowers on it. Super simple. The flower pattern I used is {HERE}. I simply changed hook sizes to get the various sized flowers for the pillow.


The second pillow was inspired by a monogram I saw somewhere and I can't for the life of my find the blog post that inspired me. I designed the monogram and then drew it out on the pink fabric. Then several satin stitch sessions later, I had this really pretty outlined monogram. Another 5 minutes to sew up the pillow and VOILA! 2nd pillow is done.


I have more pillows I want to make for this window seat, but for now these 2 will have to suffice. At least until after Christmas. :)

Heather

11/15/2011

Got Wood Grain?

11/15/2011 3 Comments
I have been in love with wood grain texture for a long time.

The problem?

I couldn't find the perfect grain texture for my house, or if I did the perfection was too expensive. Sadness.

Yesterday, I mentioned that I cut up a random curtain for pillows. Well the pillow today was the other pillow made from that curtain.

This pillow takes some {drying} time and courage to do. Well - courage on my part. So here's what I made, then I'll get to how I had to just jump in to do it.

So this is the first version. My next version was a better evolution, but I do love the exploded views of the wood grain on this pillow.

All I did was cut the squares for my pillow, then I taped all of the edges of one of the squares to my cutting mat. I used masking tape.

Then I had some images of  different wood grain textures in front of me, for inspiration, and I really then just dove in. It was scary as hell. I don't do freehand. Not unless I can undo it. There's no undoing this. I actually started off with the knot that is somewhat off-center and it really just evolved from there.
I used metallic gold paint for this pillow. I love the sparkle and shine it adds to the organic movement of this pillow.

For the next pillow, I used a metallic copper and watered it down, and I was able to achieve a finer line with thinner consistency.
You can seen in the above picture how the copper one is a more complex, but my dear friend, Lauren, took this pillow home. I may have to do another wood grain pillow for the basement. I am so in love with this look.

So here's my new beaut sitting next to the Van Halen (as the hubs is calling it) pillow. :)
Isn't the gold  the right amount of shine to the sea of camel and green? Best part?

This pillow is washable. Oh yea.... :)

See you guys tomorrow!
Heather

11/14/2011

Wintry Tree Pillow

11/14/2011 2 Comments
Even though the weather here in NoVA is pretty nice. You don’t even need a jacket today. It has not stopped me from dreaming about cooler weather.

It doesn’t hurt that I’m also super excited for Thanksgiving to hurry up and get done, because I can’t wait to put up Christmas!

But seeing as how I still have to wait, and I get a little sad that Christmas comes down. I miss the glitter and glitz.

So I have created a pillow that will solve my dilemma. It might be a little soon to have it out, but I’m not too worried about it.

This pillow is super simple to do.
This pillow actually started out as a curtain, but I didn't need the curtain anymore so I cut it up, because it was a nice weight for  pillows. I ended up getting two 16" pillows  out of it.

I found a tree silhouette that I liked in my Photoshop shapes. I don’t know where I got it. I downloaded it a while ago. I sized this shape to fit my paper, then saved it as a jpeg.

I opened up Silhouette Studio and imported my tree jpeg and then traced it and cut it out. Now, I just cut it out on regular paper, but you could certainly use freezer paper.

After I had my stencil, I took my fabric marker (the kind that disappears after a bit) and traced inside each of my cut sections on my pillow square.

I watered down some matte Tulip fabric paint in chocolate brown.  I thinned it down so that it was a bit like ink. Might have been slightly more watery than that and then with a careful hand and a small paintbrush I filled in each of my tracings. Let the paint dry.

After the tree was dry, I pulled out the Tulip glitter bond.  I took another paintbrush and kind of dabbed/ dragged the paintbrush over the tops of some of the boughs of the tree. Then I dumped glitter all over that. I did this until I was  happy with the effect. I then put all my glitter back into its bottle, and prayed that I didn’t dump it all over myself.

Then I let the glue dry for a couple of hours.

Now I’m enjoying my oh-so-pretty pillow. I love how understated she is. I am also loving that I can leave her out through January.

What do you guys think?

11/07/2011

7-Minute Pillow

11/07/2011 0 Comments
Have you guys ever seen something and said - Oh, I can do that, and for a lot cheaper?

Of course you have. We all have.

How many times do we actually do it? In a timely fashion?

Well I'm 1 and 1.

Not to shabby. Not bowl eligible, but still - it could be 0 and 2. :)

So anyways a while ago I saw some pillows that were stupid simple. They were randomly adorned with twill tape.

How simple is that? It's simple and quick. Lay down the twill tape over your square of fabric, sew the tape down and then finish the pillow like you normally would. Easy peasy lemon squeezy!

So here's my version.

 Look how shiny the twill tape is. Its not really, but there is a bit of a shine. I think the tape against the duck will hold up just fine against the boys. The poor pillow I had to replace did not stand up. The taffeta shredded beneath the boys antics. Le sigh.

Here's my new beaut hanging out with my poor tired hubby. At least they look nice and relaxed. :)

What do you guys think?
Heather

6/01/2011

More Dahling Dahlias!

6/01/2011 12 Comments
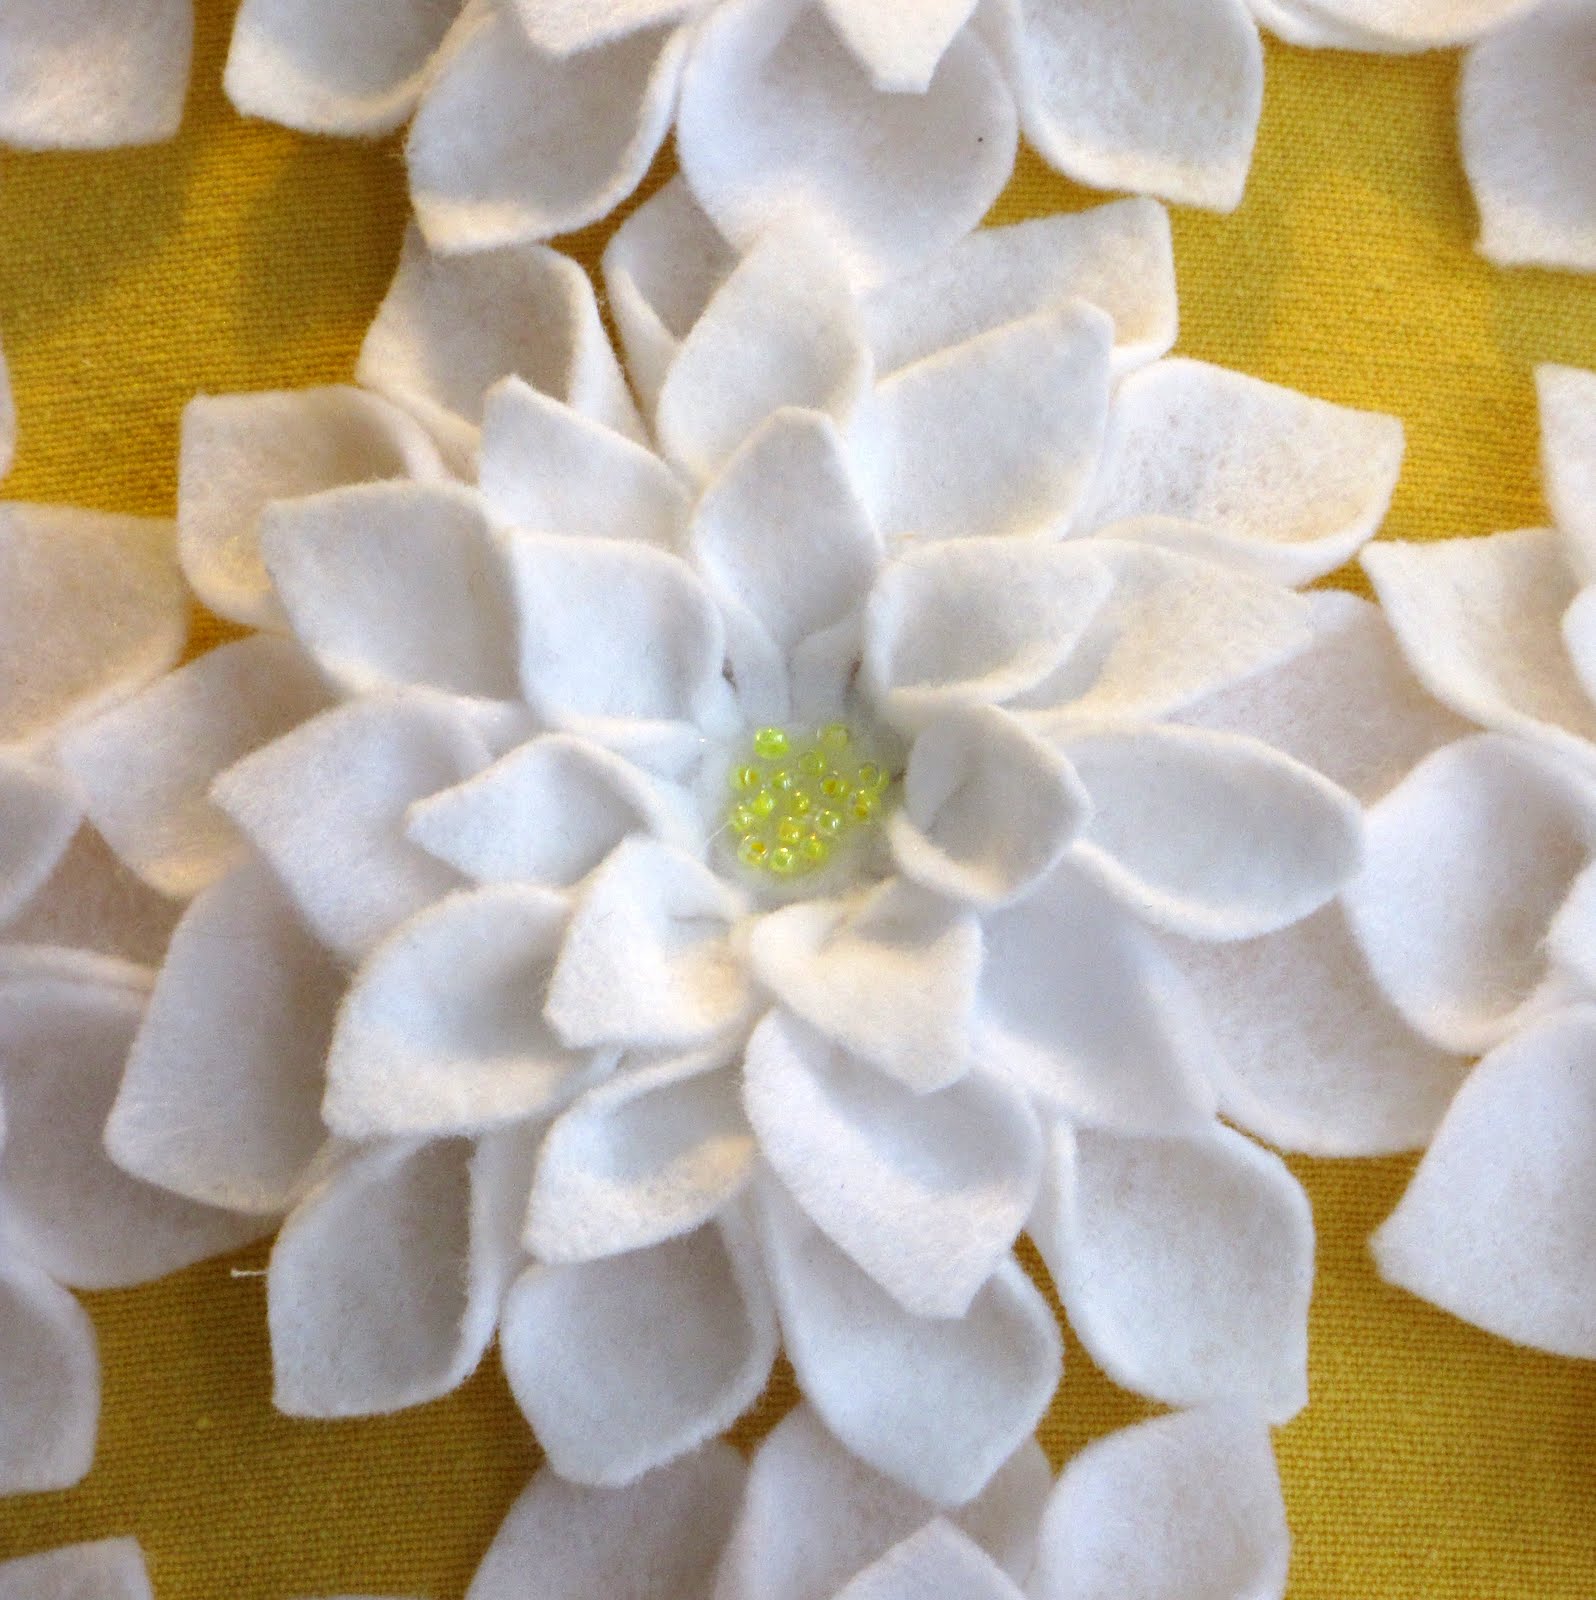
I'm at it again. I cannot get enough of these felt dahlias, of course now I want to add flowers to everything, but so far I've been able to restrain myself. Almost.

I may have gotten my fix. About 9 times over.

So you guys remember when I made my Dahling Headband?

Yep these are the same dahlias.

I just added some yellow seed beads to center. I just added a drop of hot glue to the centers, and then poured the seed beads over the hot glue. When the glue had cooled a bit, I pressed the beads down into it, and then just shook off the excess.

Then I let all 9 flowers sit for about a month while my sewing room got ravamped, but last night I decided it was time to finish this project.

I had gotten some pretty  yellow linen from Ikea a while back and it'd even been all washed up. Saves me time. :) So I cut out two 15" squares and then sewed up 3.25 of the seams. Why the quarter, because on that 4th side I sewed about 2" in from each corner, just so the corner would be nice and finished. :)

After turning the pillow I folded it in half, and then ironed a line down the center, then I brought each edge to my ironed middle line and ironed 2 more lines. I rotated the pillow 90 degrees and then did it again. So I ended up with a nice grid that had 9 intersections of ironed lines.

I stuffed a small cardboard square into the pillow, because I did not want to accidentally glue the two side together. The fabri-tac was then whipped out and I proceeded to paint the bottoms of the dahlias with glue and then stuck them on to the pillow at the ironed intersections. I made sure to press each one down, and then as I was working another project I would place the stuff I was working with on the pillow to add some weight and help those flowers stick. Not that I was worried, because fabri-tac bonds everything nice and tight, but you know - the boys.

The boys likes to play- hard, and my darling pillow may not be able to stand up to their type of playing.

So after the glue was dry, and I had a nice night's sleep, I removed the cardboard, and shoved my pillow form into the linen and then sewed up the opening.
Isn't she precious? She's going in my bedroom, which is going to get a summer makeover just as soon as I wash the sheets. Which maybe should be sometime in the near future, hopefully. ;-)

Have a great day guys!
Heather

5/10/2011

A Pair of Silhouettes

5/10/2011 8 Comments
Don't you love facebook? I do. It has allowed a lot of us to reconnect with people we would have otherwise lost touch with, whether by choice, time or just because things happen. 

This is the case with today's post.

A while ago, and I don't remember who friended who, but facebook reconnected a classmate and I.  Well we got the talking and then about a week ago she asked me about making a couple of silhouette pillows for her mother.  She snagged a couple silhouettes, scanned them and I then I turned them into pillows.

And without sounding to proud of myself - I did a pretty good job. :) I'm the epitome of humility, aren't I?  ;-)

So here are a few pictures. I even managed to remember to take a few during the process. :) 
The pillows are 18" square and made of muslin.  We were going to add embellishments, but decided after the first picture was taken that they were perfect as is. What do you guys think? Did we get it right? 
It doesn't really matter, because the pillows were met with rave reviews and my friend's mother loved them, and that's all that really mattered. :) 

Well I'm super excited about tomorrow's post. I'm showing off some identical shorts {outfits} for the boys, and the super adorable pictures that another friend took of the boys. 

I'm also excited to share with you guys, that Dev asked me to teach him how to sew, so we are almost finished with that project. I ran out of fiber-fil. Sadness. 

I'll see you guys tomorrow! 
~Heather