Follow Us @SewHalfCrazy

11/13/2017

The Long and Short of Run the Parks 10k!

11/13/2017 0 Comments

Well, my official 2017 race season has come to an end, and it was perfect if I do say so myself.

Sunday was Run the Parks 10k put on by PR Racing, and as expected it was everything I wanted it to be. It was rainy (drizzly?) and cool, but perfect.

There was an 80-minute time limit, which I was nervous about because my foot is still acting up, but getting better, and really my times haven't been fast.

The Prince William Half was run at a 12:36 pace, which I was and am still quite pleased with, but that was too slow for an 80-minute time limit for the 10K.

The last couple of runs I've had have been ~12:20 m:m, which is also not terrible, but that didn't stop me from fretting.

So the hubs and the littles decided to join me at the race, and I was a little nervous because of the weather and the kids, but it all turned out great. They visited some monuments while I was running, but they did see me off!

Apparently, I was concentrating on something at the start of the race, because that is some fierce resting bitch face.


The race was gorgeous like always, the rain added a nice bit of solemnity to the course, and the leaves were in full color. You could barely see across the river, but you could hear the planes taking off from Reagan. It was peaceful, and there is something to be said to be running at the back of the pack. It's not crowded. 

The leader of the race passed me about a mile and a half in. He was hauling, and I cheered all of the leaders on! 

My foot was doing ok, not great, but not bad. I was just enjoying being out on Haines' Point. I tried calling my sister, but she was sleeping. *rolls eyes* 

I listened to my music until the halfway point. I got water, and then made the turn to head on back. My foot did not like the turn. Not. At. All. 

So then I called Dana again and this time woke her up. She could chat with me for the last half of the race. She and I nattered on about this and that, and then I kept hearing water running or lapping, and I couldn't figure out where it was coming from. Turns out the Potomac was running over the shore of the point. I mention this to Dae, and she said that she had heard the water too, which tells you how loud it was, or how good my mic is. The rest of the race was low key, peaceful, and beautiful. The perfect fall run. 

Then I got to about a mile from the finish and there was the photographer so how could I not pose? The photographer even asked if that was the pose I wanted, and I very enthusiastically said I did! 


Dana stayed on the line until I crossed the finish line. She cheered me on as I started increasing my speed towards the end. My crew was just on the other side of the finish line, and Dana cheering in my ear. There really wasn't a better finish to be had. I picked up the pace and finished nice and strong. My official finish time was 1:16:39, right on pace for where I've been running. 

During the race, the hubs took the littles around to the various monuments, and they got to take in some of the sights. I was not the least bit surprised when my jacket was returned to me with wet sleeves. 


As usual, I highly recommend this race not only for its scenery, but it's well run and on the smaller side. 

Thanks so much for reading!

11/08/2017

Derby Worthy Cowboy Hat

11/08/2017 0 Comments

When the County Fair theme was decided on for Gold Cup, I knew that I wanted to make a Derby-inspired cowboy hat.

The first step was to find a cowboy hat that wasn't too expensive, in case I screwed it up. Amazon to the rescue! I found this hat {HERE} and it was perfect.
So after ordering the hat, it was time to take advantage of the massive sale at Michael's. All of their fall foliage was 70% off! Sweet! Now, what to do?

I turned to the internet and did some searches, but a lot of the derby hat styles are similar. I wanted something a little fun, but still nice looking. Etsy ended up being a great source of inspiration.

This hat, in particular, I really loved.
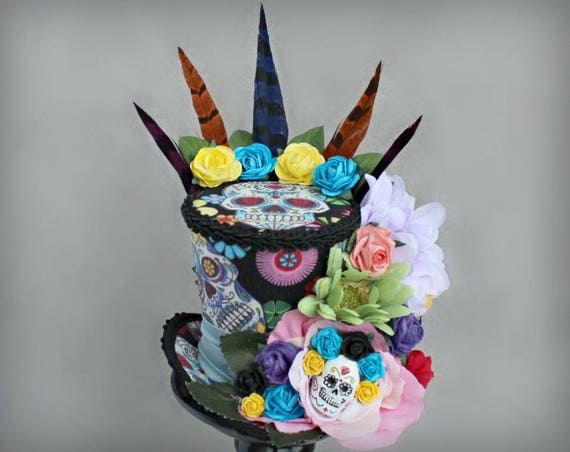
Day of the Dead Mini Top Hat from Little Miss Hattitude
 I love how colorful and fun this hat is, and so with this inspiration knocking around my head, I bought a bunch of stuff from Michael's. I hoped that I would throw everything I'd bought at it and something would stick.

I ended up spending about ~$40 on the supplies for the hat, and thankfully everything I bought made the cut. I had one golden fern bunch, a variegated green daisy bunch, a large purple peony bunch, a feather pick, 2 bundles of pretty teal/green feathers, and a whole bunch of hope. I managed to find the balsa wood horseshoes at Jo-Ann's in Culpeper.

I separated all of the fern leaves and started at the back of my hat. I wanted to great the look of a plume of feathers, but with ferns, so I created a waterfall effect of ferns by placing the shortest ferns at the base of the back of the hat, right against the brim and working towards the crown of the hat, using the longest ferns at the very top. I shaped each of the leaves to gently curve down. There may have been some glue gun burns and I may have glued one or two of my fingers to my hat.

So after getting my waterfall of ferns attached it was time to start with the purple peonies. I placed a row of peonies along the brim of the hat, forming a U-shape around the sides and back of the hat, and then I added a few more peonies to the left side of the hat, to create a nice asymmetrical look. I added a few up the crown of the hat on this side for more interest. Then I went back and filled in with the daisies. I created a small crown of daisies at the back of the crown, also hiding the base of the ferns a bit, and filling in where I thought there were holes. The feathers were next. I placed the pick of feathers towards the front of the hat to accent where the horseshoes were going to go, and then I gently glued each of the individual feathers into the fern waterfall, adding color, texture, and interest.

The final step of the hat was to add the horseshoes after my eldest and I had fun coloring them with some metallic wax, I glued them a little off kilter to each other. I was a little inspired by the Mad Hatter in Alice in Wonderland.

So that's how my hat came to be, and this little dear won best "Race-Inspired Hat" in the hat contest! Yay!


11/06/2017

Pattern Review - Butterick 6380

11/06/2017 0 Comments
A post shared by Northern Virginia Magazine (@northernvirginiamag) on

Hello all! Welcome to another pattern review. We have officially entered the season of sewing. Between Gold Cup, Christmas, and gifts there will be some sewing happening. So today I'm going to be reviewing another Pattern by Gertie.


Gold Cup was at the end of October, and I needed an outfit that would be versatile enough for the ever-changing weather. Our crew decided on doing a County Fair theme for our tailgate, and I instantly knew what I wanted to do. With October's mercurial weather, I knew I needed a dress that would pair well with a jean jacket, cowboy boots, and hat. I also knew that a 50's inspired frock would be just the ticket. Oh, and what is a county fair without eyelet? I found a gorgeous kelly green with a modern circle pattern at Jo-Ann's. Thank you 50% off coupons.

I actually had to decide between two of Gertie's patterns, but this one won out because of the sleeves and the fact that it was already designed to be fully lined.

Before Alterations
The dress is fairly straightforward, although the neckline did prove to be a bit of a pain because of the point,  but nothing I hadn't dealt with before. I did alter how the zipper was put in because I prefer invisible zippers as opposed to traditional zippers, but installing the invisible zipper was easy because I attached the zipper before sewing up the back seam. Easy peasy. I also went a step further, in order to avoid hand stitching, which we all know I hate, by treating the zipper as a trim and stitching inside the seam allowance to attach and finish the lining opening in the back. The technique produces a nicely finished interior with no exposed seam allowances and no hand stitching! While this technique is not difficult, if you mess it up then it would be noticeable.

Final Outfit
When I first got the dress finished enough to try on, I was less than impressed with how much room I had in the waist. I did make the pattern according to my measurements but could've gone a size smaller in the waist. I ended up having to take in 3" from the underarm seam to the waist seam. My French curve helped greatly with this. I positioned the curve a finger's width below the underarm seam and then lined it up with the mark for how deep I needed to take it in, and then back to the waist seam. I could've gone 4" taken in, but 3" was that much more comfortable. 4" would've meant not overeating and drinking and no slouching! Not that I did slouch because that hurts my back.

So after I got all of my alterations done, I was more than impressed with my creation, not to mention it looked pretty fabulous with my boots and jacket. Thank you Target! The boots are several years old and the jacket was on clearance in the days leading up to Gold Cup.

I would say this pattern would be ideal for an intermediate sewer, maybe someone who has mastered the basics of sewing and is looking for something just a bit more difficult. The pattern sews up very quickly, and the guide sheet gives very good direction. Make sure you get all of the pattern markings transferred though. There are a lot!

I paired my outfit with navy blue jewelry from Charming Charlie's, who was running a BOGO sale on their clearance items. Score again!

Then there was the hat. The hat is going to get its own post. Look for it in the next few days!