Follow Us @SewHalfCrazy

Showing posts with label bathroom. Show all posts

7/19/2018

Basement Bathroom Update

7/19/2018 0 Comments

In the 9 years we've lived here there's one room that has never been painted and it was our basement bathroom, which our oldest now shares. The latter bit of information threw a wrench into my plans, because don't you know that he has an opinion on what he'd like the bathroom to look like?!

I mean he is my son, so it stands to reason that he'd have an opinion, and in my mad dash to get projects done before surgery his bathroom was on the list.

I've known for a while that I wanted to do this buffalo plaid paint treatment that I saw on BH&G {HERE}. They did theirs in a calm set of colors, but I had no such plans. A few years back, Big Guy and I agreed on a rug and this rug was not allowed to be removed in the update. Big Guy really likes this rug, or maybe, and more likely, he hates change. So inside this rug was a lovely dark red, and that was going to be the color for my plaid wall treatment. The rug also included several greens, which would be the Big Guy's fave color.

So I started on this project by taping 6" stripes all around the walls. This took far more time than I figured it would, but I knew it was going to be great. I marked each stripe that I was going to paint with a small "x" inside it. Otherwise, I would be getting confused with all of the lines going on.
Then it was time for paint. I didn't follow the directions that BH&G had. My glaze to paint ratio was 2:1. I bought a pint of glaze and then got a sample size of my paint color, and it only cost me $15. I was very excited about this economical paint treatment. It'd probably cost a lot more if I was doing a larger room, but this itty bitty bathroom did not have a lot of wall space. There is a bit of a technique when working with glazed paint, but I didn't take me long to get it. Using a roller probably would have been the better choice, but I'd already committed to my brush so that's what I continued to use.
You can see where I drew the very faint vertical 6" stripes over my horizontal stripes. I let the horizontal stripes dry overnight before embarking on the vertical stripes, but I have to say I was really worried about my decision at this point. I hated the stripes. Big Guy really liked them. It was too late to back down now, the vertical stripes needed to go on so I could get a good picture of just what I'd done.
After I got the vertical stripes done, and pulled the tape off I was in love! Big Guy liked it, but he kept calling it a tablecloth. Hubs was not as sure, but I was really happy, and I even managed to match up some of my stripes with the grout lines in the tile. I'm just that good (I'm not... it was a coincidence). I could not wait to get the bathroom accessorized!

Unfortunately, accessories would be where the child and I disagreed. I wanted the bathroom organized, but the boy likes things the way he likes things. He's also picky and opinionated. There may have been more than one argument about how to organize his counter clutter. Not that what he had on the counter wasn't needed, it absolutely was, but it doesn't need to be spread out all over the entire counter. Luckily a trip to Walmart saved the day. Sorry Target, you know I love you, but you didn't have anything that he liked.
The macrame glass containers were just the thing to solve our argument. The glass soapdish was something that we had upstairs in our bathroom, but I was more than willing to donate it to hold all of his various things for his braces and their care. I'm still looking for a towel holder for the hand towel, and none of the artwork is back up, but I figure those are things that I can do as I get stronger. Gives me a goal. We also got a new shower curtain that had all of our colors, and new towels.
I'm happy that my boy likes his bathroom, and I'm extra happy that I won't be embarrassed over the basement bathroom anymore.

Thanks so much for stopping by!

7/09/2018

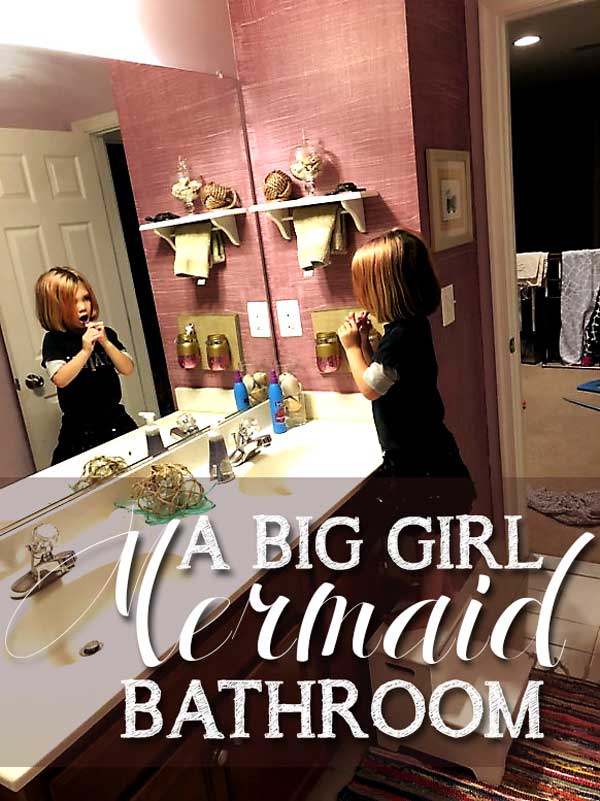
A Big Girl's Mermaid Bathroom

7/09/2018 0 Comments

So my girl is turning 5 this year, and as we've done with both of her brothers, 5 is the year they get their "Big" bedroom. Baby Girl is no different. We've been working on her room, and converting it to her Big Girl room for a few weeks now, but she also wanted to do her bathroom, so I gave her carte blanche with her bathroom.

She told me she wanted a mermaid bathroom, so we hopped on Pinterest and start looking at various renditions of mermaid bathrooms. Most of them are blue or green, but my girl wants a pink/purple bathroom. Of course, she does. You know fate is on your side when you're at Lowe's and the mistints are on sale, AND you find the perfect shade of pink for your girl's bathroom. $5 for an entire gallon of paint. That's a steal!

So we had the paint, and we'd just painted the family room, so all the paint supplies were still out and what better time to paint than when everything is out and about?

The hubs helped me take everything down in the bathroom, and then it was time to slap some paint on the walls. Painting it went pretty easily, you know on a bum knee and everything. The hubs wasn't overly happy that I was doing so much, but I am nothing if not foolish and full of blind determination.


Once the paint dried, Baby Girl and I started putting her bathroom back together, but there was something missing. The linen closet creates an almost perfect accent wall in the bathroom, and another quick Pinterest search solves my dilemma.


After buying a quart of the perfect purple, Plum Dandy for those of you wondering, I mixed it with some glaze that I had. It ended up being a 1:1 ratio paint to glaze, and then I rolled it onto the wall. I did one side and then drug my small corn husk broom through it. Vertically then horizontally. I then did the same thing on the adjacent wall. It's not perfect, but I love it and for my first attempt I'm really happy with the whole effect.


Baby Girl decided that she wanted to change up her toothbrush holder. We'd seen on Pinterest some glittered mason jars, and she wanted to do that for her mason jars. So that's what we did. The hubs is not a fan of the glitter, but this was important to the girl.

So then it was just finishing touches, and now my Baby Girl has her big girl mermaid bathroom.


This was in the bathroom when it was originally Small Fry's bathroom. I decided to keep it in there because it's so dang cute, and nostalgia purposes. 
 We found this starfish dish while at Home Goods, and it was on clearance for $3! Baby Girl gingerly carried it around the entire store. She loved that she could pick something out for her bathroom. We added the bag of baubles which I got from Pottery Barn years ago.


We used the old towel rack and turned it into a fun lantern wall. I still need to add fairy lights to it, but I figure when she's older and wants to take a nice relaxing soak, the fairy lights will add a nice ambiance. I kind of want a lantern wall in my bathroom, if I'm being honest.


I'm really happy that she's happy, and that another project is off the list. I'm also happy to report that she's taking care of her new bathroom the way a big girl should take care of her bathroom. I mean there are still towels on the floor, but the days of painting the cabinets in toothpaste seem to be behind us. She takes a lot of care to make sure things are put away, at least on the counter.

3/12/2012

So Far......

3/12/2012 0 Comments
Last week I showed you the completed medicine cabinet, and I still can't accurately describe how much I love the addition of that wall storage.

So today I figured I'd show you the rest of what I've done to the bathroom. Its not done yet. There are still projects  to do, but Dana comes in on Wednesday and I'm hoping that I can get her help with some of them. :)

So here's the view of our bathroom from  the door. The sink and mirror are to the right of the door. Don't you just love our pink and blue loofahs? :)

This poster is from World  Market. I wanted to find a peacock print that I liked, but when I went out I found this charming print and it had all the right colors so I got it instead. Better yet, I had the frames so all I had to do was add some Silver Rub n Buff to the frames to antique them a bit and then add the poster.

I still can't get a good picture of the bathtub corner. It looks so nice in the morning, because those windows let in so much light. I hung up some wasp catchers from the ceiling and then added  some yellow poppy bushes from AC Moore and some white grass/filler flower to the center to kind of obscure the chain that's holding them. I really love the bright yellow of the flowers against the green. I  guess when I'm all done I'll have to take some pictures at night so that you can actually see that corner.

And of course, here's the sink and mirror area. Apparently I didn't take a picture of the hub's sink, but it looks just like mine, with a razor in the corner. :)
I can't wait to finish the bathroom, because I love how its turning out. I just need to buckle down and get  the remaining projects done.

Thanks for stopping by today guys!

Heather

3/09/2012

Who knew?!?

3/09/2012 0 Comments
Who knew that putting holes in your bathroom wall would be so much fun?

Who knew that this would make me so happy?

Not me. I was scared. Then I did it and it was a lot of fun. :)

Then the hole got a little too big. Then the hubs had to get involved.

Cue normal home dec/repair argument here.

Then the hole got fixed and the hubs and I are thoroughly enjoying the new $60 medicine cabinet that I got on clearance at our local Lowe's.

Love! So here's the process and the finished product!
 So there's the starter hole, just to figure out how much space was between the joists, and there's the first hole, and my helper.

 There's the hole right before I cut it all the way open between the studs, to make it simpler for framing. The medicine cabinet is fairly large. 25" x 19" with two adjustable shelves. Love!
 There's the framing and the drywall (fitted into place). I was chomping at the bit by this step because we were so close to being done!

 There's the mud and some sanding done. Isn't that the prettiest box you've ever seen?

And here's the finished product with somewhat wet paint. I was impatient. I love this cabinet. My counters have never looked so organized!

Oh and here's a little helper I had while I was cutting said holes
Isn't he goofy?

Tomorrow I think I'm going to share with you guys what the bathroom looks like right now. I have more projects, but this poor bathroom has come a ways from what it started out as. :)

Heather

1/31/2012

Splash of color

1/31/2012 1 Comments
So I don't know if you all remember my master bathroom debacle.

I couldn't decide what color to paint this poor room. It's the last room to be painted in our upstairs, and to make matters worse I wanted it to flow from our bedroom so the color had to work with some existing colors as well. No small task.

Let's add in some more obstacles, shall we?

First this room gets a lot of light. Tons of it. It's so bright that of I decide to take a nap during the day that I have to close the door to this room because of how much light tips room lets in.

Second is that the light source shifts so much that the color paint will need to adapt from extremely light to dusk and evening light and then adjust to incandescent lighting. All of these lights affect how a color is perceived. See those huge windows? Pains in the butts.

So 4 or 5 samples went up on the wall and they may or may not have stayed up on the walls for close to a year. Ugh.

Then I bought paint towards the end of summer - and it sat in the bathroom for months. You see I hate to paint bathrooms. Almost as much as I hate painting kitchens. There is just so much cutting in. Hate. It.

Cue probably the worst time ever to start painting a bathroom - while your hubs is recovering from surgery. While this may not seem like an ideal time to paint it was just what I needed, because it distracted me from everything that was going on, and it provided me time. Win!

So here's the newly painted master bath!

The color is called Homestead Resort Pale Olive by Valspar. I used the paint and primer in one and only used 1/2 a gallon of paint for the entire room. Not to shabby.

The vases are where they are to give an idea of my color scheme. I love how the yellow really pops off the wall.

So that is where I am now. I still need to thoroughly clean this bathroom and finish putting stuff in their spots, but I really love the change of the color so far.

I can't wait to get everything else done!

So what do you guys think?

1/17/2011

Its buggin' me.....

1/17/2011 0 Comments
I have something bothering me. I have debated whether or not to tell all of you, my faithful readers, but I feel like its now the white elephant in the room. At least for me. My friends and family know about this issue. I talk about it, but I'm really kind of stuck. I will have to attack this issue in steps, but I am getting ahead of myself.

My issue is our master bathroom. It looks worse than it did when we moved in, because the walls have been scuffed from cars racing on them to our first hamper. I have several issues with our bathroom. All of which we did not notice while building our house, but now that we've lived here for 18 months....well, they're quite glaring and they're buggin' me.

I'm not ready to show you my bathroom because 1- its filthy, 2- our 2nd hamper imploded, and now some of my laundry is sitting on the floor waiting for its turn in the wash, and 3 - its filthy. I know I repeated myself, but Stephen and I really hate to clean bathrooms. I mean really hate. H.A.T.E. Its truly awful, and we should be better. The boys bathrooms stay clean because we manage to clean as we go and just clean in bursts. It seems to work, but for our bathroom. Not so much. It also doesn't help that our house has 5 bathrooms. Five bathrooms for a couple who hates to clean bathrooms. We used to have a cleaning service come in and clean our house every month, but we stopped that service because of its seemingly frivolous expense,  but I'd sell my kidneys to have them come back. Even once every 6 weeks.


So back to the plan I am having to adopt for this bathroom. Like I said we've been in our house for 18 months so in order to appease Stephen, because while he's usually very easy going with all of my decorating antics some of them he's not so open to, I have had to haggle with him about a 5-year plan for this bathroom.

So let me explain my plan. The first part of this plan is hopefully only 2 to 3 months out, because really....I'm gong kind of insane with this bathroom. I may even try to push it to 1 month, but we'll see. Remember I'm trying to pace myself with projects. I want to paint this bathroom. I want to have it painted like last month. I'd also like to add a medicine cabinet or just a cabinet of some sort to the bathroom, because I want very little on the counters. I'd also like to update the mirror and the light fixtures. I also need to update the rugs, because I spilled hair dye on one, and the other has a weird pepto pink stain from something or other.  I also need more towel storage. I don't think this is too tall of an order, and even if I can't get it all done in a weekend. I still think that given the 2 to 3 months I can do it. I'm also hoping to not spend more than $300 on it. The lights I think I've found will be about $140 and the mirror update about $60. So that leaves me about $100 for rugs and the towel storage. I might be cutting myself a bit short, but even if I go slightly over budget, I'm hoping that the updating will provide Stephen and I with the added energy to want to keep the bathroom in showroom order. It has helped with our bedroom, so I'm very hopeful.

The 5-year part of the plan involves the faucets (there are 4 total) and the vanity. I'm 6' 2" and Stephen is 5' 8" and our vanity is 36" tall. I would really like it to be 42" and Stephen has agreed. I do spend more time in there than he does. :) I would also like to add vessel sinks. So that would be a big change, and thus the 5-year time line.

What I'm hoping to evoke with this bathroom is a clean, romantic, functional feel. I don't want a whole lot of fuss, but enough touches to make it look elegant, and hotel-esque. Similar to our bedroom. Seeing a pattern? :)

So here are some inspiration images, and hopefully in the next few days I can show you guys what I'm working with and what I'm hoping it will be. Time to brush up on the Photoshop skills. :)
{source}
What I like about this bathroom is the furniture feel of the sink and the glitzy sconces. I love the crystals and the pink! What I don't like about this bathroom are all the colors. I feel like the floor is competing with the stripes and there is a lot going on on that back wall.
{source}
There are so many things I love about this bathroom. I love the rich, dark dramatic color of the walls especially paired with the crisp white trim. I am in love with chandy over the tub. I want to do this, and Stephen agrees with me......just need to find the right piece. I also love that the tub is in that nook which is further enhanced by the fabric curtains. I had this idea for my bathroom as well.....but I am not sure how to accomplish it because my tub butts right up against my shower. I am still loving this idea though. I also love the small pops of color in the room with the yellow, and how clean it all is.
{source}
I want my bathroom to be this impressive if you were just to poke your head in. I love the elegance this bathroom exudes at first glance. I really am loving the mirrors along with the simplicity of the art work. I do not care for the vanity. Its too much for my taste. I seem to prefer cleaner look, which I find odd because I do usually like fret work and filigree, but not here. The wall color is also not doing much for me. I like the warm browns and creams but the green is just a bit to wimpy.
{source}
Pink! Any of my boys will tell you I have a soft spot for pink, but I never rarely ever use it in my decorating. I love the small pops of color here tho! I also really, really, really like the damask shower curtain. Again....its uncluttered and clean. :)

I know this was a lot post for me, but I hope everyone is enjoying their holiday. I will be shopping with my Mom at Hancock, taking advantage of their MLK Sale. Maybe I'll even get lucky and find some fabric for our bathroom. Have a terrific day everyone!

Heather

8/10/2010

Monkey Shine? No, Monkey's Fist!

8/10/2010 6 Comments
So we've all seen them. Some of us have made them, and you can do a Google search on how to make them, but I still wanted to add my $.02 to the pile. I am, of course, talking about the monkey fist knot. Originally used in sailing so that there was something substantial to grab a hold of at the end of a rope, it is now commonly used in home decorating.

Unlike some people, I don't really follow video instruction very well. Written instructions and I get along much better. So when I found this site on how to construct a monkey's fist I was ecstatic. I decided to take some  pictures along the way of the making of my knot, which was quite hard to do as one hand was constantly holding the knot for a bit. :) Oh and this was a pajama day craft.....


So let's make sure we have all of our supplies:
milk - check
pajamas - check
bed head - check
sisal rope and tennis ball - check & check

Ok let's go!

I've seen other blogs have found 5/8" sisal rope, but I could not find any. I ended up having to add more loops to the knot, but it's all the same in the end. I also cut my rope to about 15 feet long. 

Hey Look!  there are my feet....how'd this get in here?

Trusty glass of milk. Next to coffee.....this is my favorite drink. Friends and family stock up on the stuff when I come to visit. I have a problem, but I'm learning to make everyone deal with it. :) 

And there I am....about 20 minutes out of bed. Curly hair is good for something.....not looking totally heinous right out of bed. :) 

So hopefully you looked at the site I linked up....but if not...this is how we start the knot. 

Wrapping it around your hand as many times as you think is needed to go around your tennis ball or whatever you shove into the center of the knot. I ended up going around 5 times. 

Up wait. I'm calling a mulligan....we need to make the loops around the hand looser so that you can actually get the ball inside it. 

So heres you can see that I'm starting to wrap the rope around itself. It helps to have the rope slack around the loops so that its easy for you to manipulate it later. Go around the first set of loops as many times as you did your hand. 

Here are the five loops around the first 5 loops. The knot my eat my hand, but this is also where you'll start the third set of loops by wrapping around the set of loops you just made while keeping the new set of loops inside the first set of loops you made. 

Just another shot of starting the third set of loops. you can see how this knot is coming together. 

I think that may be my elbow......I hope it is. :) Anyways. Another shot of the third set of loops after getting more of them completed.

and here's where I ran out of rope, but look at all of that slack. 

So lets shove the ball inside and start tightening up this knot. I have loops to finish. I made sure to keep the loops loose enough still to fit the rope through them so I could finish my knot. I also made sure that the other end of the rope was being held down by at least two set of loops, so that it didn't come loose. 

We're getting there! Just one more and we're done! 

Ok, so let's finish tightening this thing! You can see the starter end of my rope off to the left. I shoved that under the closest two perpendicular loops, and then tightened it as much as I could. I continued to tighten each loop as I got to them until the end.

Here's the completed knot. I shoved the tail of the knot into an intersection of loops and then pulled tightly, but you could also just cut the end off and have a nice paper weight. You know....I don't like the color of the sisal.

A shot of the intersection where I shoved the end of the rope into the ball, to finish it off. 

Just another shot. 

So that's how I made the knot, but I don't like the color, so out came the stain. I just took a foam brush and painted and blotted the stain into all the nooks and crannies, and let it dry for about two days. It took forever to dry!  So here's the finished product...

I'm in love with them. I think I need a third. That and I'm waiting for some night when Stephen finally notices that they're there and comes out with some joke. :) They accent the towel rack in Harrison's bathroom perfectly though, don't they? :)

Sorry for the delay today, but I had to drop our car off at the shop for some new boots, fluid change and state inspection. Oh the joys of being a car owner. :) Oh and in case you're wondering.....Monkey Shine is my mom's nickname for me and Dev. :)

Have a wonderful day and enjoy!
Heather