Unlike some people, I don't really follow video instruction very well. Written instructions and I get along much better. So when I found this site on how to construct a monkey's fist I was ecstatic. I decided to take some pictures along the way of the making of my knot, which was quite hard to do as one hand was constantly holding the knot for a bit. :) Oh and this was a pajama day craft.....
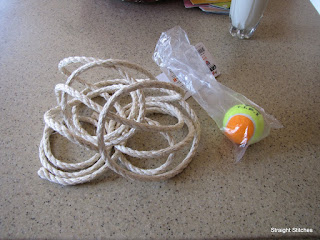
So let's make sure we have all of our supplies:
milk - check
pajamas - check
bed head - check
sisal rope and tennis ball - check & check
Ok let's go!
I've seen other blogs have found 5/8" sisal rope, but I could not find any. I ended up having to add more loops to the knot, but it's all the same in the end. I also cut my rope to about 15 feet long.
Hey Look! there are my feet....how'd this get in here?
Trusty glass of milk. Next to coffee.....this is my favorite drink. Friends and family stock up on the stuff when I come to visit. I have a problem, but I'm learning to make everyone deal with it. :)
And there I am....about 20 minutes out of bed. Curly hair is good for something.....not looking totally heinous right out of bed. :)
So hopefully you looked at the site I linked up....but if not...this is how we start the knot.
Wrapping it around your hand as many times as you think is needed to go around your tennis ball or whatever you shove into the center of the knot. I ended up going around 5 times.
Up wait. I'm calling a mulligan....we need to make the loops around the hand looser so that you can actually get the ball inside it.
So heres you can see that I'm starting to wrap the rope around itself. It helps to have the rope slack around the loops so that its easy for you to manipulate it later. Go around the first set of loops as many times as you did your hand.
Here are the five loops around the first 5 loops. The knot my eat my hand, but this is also where you'll start the third set of loops by wrapping around the set of loops you just made while keeping the new set of loops inside the first set of loops you made.
Just another shot of starting the third set of loops. you can see how this knot is coming together.
I think that may be my elbow......I hope it is. :) Anyways. Another shot of the third set of loops after getting more of them completed.
and here's where I ran out of rope, but look at all of that slack.
So lets shove the ball inside and start tightening up this knot. I have loops to finish. I made sure to keep the loops loose enough still to fit the rope through them so I could finish my knot. I also made sure that the other end of the rope was being held down by at least two set of loops, so that it didn't come loose.
We're getting there! Just one more and we're done!
Ok, so let's finish tightening this thing! You can see the starter end of my rope off to the left. I shoved that under the closest two perpendicular loops, and then tightened it as much as I could. I continued to tighten each loop as I got to them until the end.
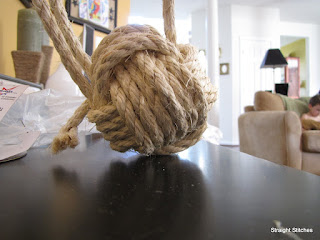
Here's the completed knot. I shoved the tail of the knot into an intersection of loops and then pulled tightly, but you could also just cut the end off and have a nice paper weight. You know....I don't like the color of the sisal.
A shot of the intersection where I shoved the end of the rope into the ball, to finish it off.
Just another shot.
So that's how I made the knot, but I don't like the color, so out came the stain. I just took a foam brush and painted and blotted the stain into all the nooks and crannies, and let it dry for about two days. It took forever to dry! So here's the finished product...
I'm in love with them. I think I need a third. That and I'm waiting for some night when Stephen finally notices that they're there and comes out with some joke. :) They accent the towel rack in Harrison's bathroom perfectly though, don't they? :)
Sorry for the delay today, but I had to drop our car off at the shop for some new boots, fluid change and state inspection. Oh the joys of being a car owner. :) Oh and in case you're wondering.....Monkey Shine is my mom's nickname for me and Dev. :)
Have a wonderful day and enjoy!


so cute! I'm a milk addict too. My in-laws only have milk when they know I'm coming!
ReplyDeleteThis is so cute! I have never even heard of using this in decor but I love it!!
ReplyDeleteMy son sails so I want to use these as curtain tie-backs in his bedroom. Thanks for showing how to make them!
ReplyDeleteI’m hosting a new link party “Cheap Thrills Thursday”. It’s for creative ideas that cost under $20. If you have a project you’d like to share, I’d love for you to stop by and join in Thursday!
Kat
www.BlackKatsDesign.blogspot.com
Hi Heather. I just found you via Remodelaholics and have to tell you how much I enjoyed your post. You really right a great tutorial. Gotta love a sense of humor. Love the knot. Now if I could only get the guts up to try it.
ReplyDeleteHave a great weekend. Hugs...Tracy :)
P.S. I'm having a giveaway ~ hope you'll come enter.
That is sooo cool. I am going to try this!!
ReplyDeleteThank you gals for the wonderful comments. The knots are a lot of fun to make. Unfortunately, H's bathroom is the only place where I've got anything nautical going on. :(
ReplyDelete