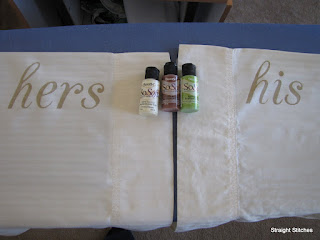
This was my first adventure in freezer paper stenciling and I am hooked. I have two more projects in the wings for this in the immediate future. This was also one of the first projects for our master bedroom revamp, and it was silly simple and free. Score! So on to the show!
Stuff I used:
2 pillowcases
fabric paint (I used DecoArt So Soft)
freezer paper
brushes
cardboard
What I did:
I ironed my pillowcases, and then let them cool as I hopped on the computer and designed 6" tall his and hers words, and then cut them out on the freezer paper with my wishblade (yes, the original blue one). :)
I did tons of research on what setting to set my iron to, and didn't find anything helpful other than do not use steam. I set my iron to 3 and let it heat up, or cool down as the case may be. While it was getting to temp I played with some locations of the words on the pillows. Luckily, my pillows already had a striped pattern on them so I used that pattern as a way to line up and straighten the stencils.
I pressed the iron down and very carefully pressed it down again. I did not want to muss the edges, but it was all for naught because the edges came out fine, even though I did forget to press, and did start sweeping side to side.
I wanted to match one of the paint colors from the room, so with the chip next to me, I mixed some of my paint colors. I ended up having to add a lot more buttercream to the mix and just a bit more green, but I think I ended up pretty durn close to the paint chip.
I made sure to add some cardboard in between the pillowcase layers, because I was afraid the paint would leak through. Then I just gently brushed the paint on. Once I had let it dry for a few minutes, I gently pulled the freezer paper off and went had a snack.
After my snack, I gently pressed the ink with the iron still on the 3 setting. The instructions didn't say to, but I wanted to use the pillows that night and didn't want anything to mess up these masterpieces.
I stuffed our poor dilapidated pillows back into the cases and then made the bed. :) I think they all look very pretty.
I was going to put our monograms on the pillows, but this seemed more fun, and since hubby and I have very different pillows, this will make it quite easy to know whose who's.
I'm linking up to these parties!
I hope you guys enjoy, and I'm sorry about not having any new pics of the bedroom for this project, but like I said...it was one of the first. I'm hoping to have the bedroom done this weekend. It's a tight time schedule and it's a big if, but I'm gonna try!


Great idea I need to do this I always get the pillows mixed up and my husband sleeps on his differently and is not comfortable to me.
ReplyDeletevery elegant looking :D
ReplyDeleteI was actually kind of worried that he'd think they were too 'fru fru' but he likes them, and the one time that our pillows did get switched, he and I were aching for a week, because that's how long it took for us to say, "hey I wonder if it's our pillows" :) I have another set to do still, but I'd like to get the rest of the bedroom projects done first. :) Thanks for stopping by gals!
ReplyDeleteoh this is soooo cute! I like that you used complimentary colors. I've been wanting to do a stencil for a while and now you've given me the inspiration!
ReplyDeleteI love the his and hers! I have a bunch of stuff with our monogram but nothing with his and hers...this is such a great project! Thanks for sharing.
ReplyDeleteWhat a cute idea! I am with Kelli - I love how you used "his" and "hers." Different from anything I've seen!
ReplyDeleteHave a terrific Mothers' Day!
Amy
Super fun! I want to try this... thanks for sharing at the POPP.
ReplyDeleteVery cute! Love the font what is it? Thanks
ReplyDeleteVery sweet! I love the idea! I could really get into his and hers ideas. Thanks for sharing...I've posted a link. If you have any other great ideas, please perma-link them at childmade.com.
ReplyDeleteThese are really beautiful, classy, classic and yet modern. Thanks for lining up to the DIY Club.
ReplyDeleteI can not wait to see this bedroomcome together - You have done some amazing projects! These are simple and elegant - great job! Thanks so much for joining The DIY Club this month! We greatly appreciate it! ~ Stephanie Lynn
ReplyDelete