Follow Us @SewHalfCrazy

11/29/2012

Who knew?!?!

11/29/2012 0 Comments
So all of the big Christmas trees are up and projects are getting knocked out, but who knew that putting up Christmas this year would also lead to a massive purge of stuff?

Since it has led to this massive purge things are taking a little longer to get put together and back to rights. I promise I'll be back and sharing tons of projects with you guys, but first I need to get my house back to rights.


Heather

11/23/2012

For the Love of Mince Pies

11/23/2012 0 Comments

Someone tell me why mince pies aren't as big a thing here as they are in the UK.  They're delicious  handheld (the wee versions I've always seen in England are anyway), and did I mention delicious?  As I said, though, they're not really a thing here in the US so much, though I have heard they can be found in the northeast.  Too bad I live nowhere near the northeast.  Therefore, I have two choices.  I can pay $10 for a box of six at World Market, or I can make them myself for Thanksgiving.  Guess which one I chose. :-)

Okay, so to start, I used Alton Brown's mincemeat pie recipe...with some variations.  First of all, I used bacon fat instead of beef suet 1) because I'm southern and 2) because that's what I have.  Second of all, I had to make the crust gluten-free, so I got creative.  More on that later.


So here's the initial ingredient lineup...with a few missing things.  I actually forgot to take a picture of everything first, so my apples, among a few other items, were already gone when I remembered to take a picture.


The filling mix couldn't be easier to do.  You basically throw everything into your food processor and let 'er rip.  Take note, everything together will more than likely completely fill your processor unless you have a really big one.  Then, once it's all mixed up, it just needs to sit in the fridge for a few days.

Note: I have had "luxury"mince pies with booze in the filling.  I don't love it; the flavor is a bit strong, so I used apple cider instead of liquor.

Three Day Later..


Okay, now that our filling has had a chance to soak for a good long while, it's time to make the pastry.  This is where things got interesting.  Like I said, I had to make it gluten free, so I used gluten free flour. I also used almond meal instead of cornmeal because I like it and because I had it on hand.  I read once that you can add a lot of flavor to pie/pastry crust by using almond meal for half the flour, so I kind of did.  I actually ended up using about 8 ounces almond meal to about 6 ounces GF flour.  I am also pretty innovative (see: Lazy) I buzzed that with the sugar - I think I want to use brown sugar next time - to get it integrated first.  Above is a before and after picture.


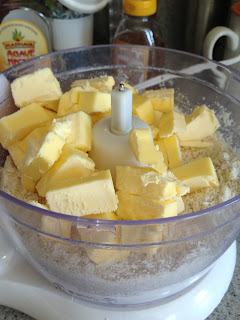
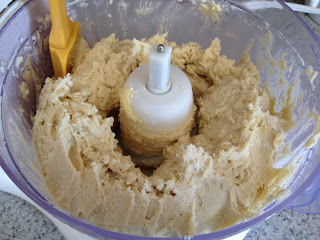
That is a lot of butter.  Then again, this is a shortcrust type of pastry dough.  Anyhoo, I let my butter sit in the freezer for a few minutes before adding it to the flour mixture just to be sure it was really good and cold.  Again, here is a before and after picture.  This is the point where I kind of wonder how I could have done things differently to make my crust turn out differently.  I looked at a different Alton Brown recipe, one for pocket pies found here, and he does his shortcrust dough very differently here.  I think I could have forgone the water at first as well and just mixed everything up with a bit of cider to begin with, as my dough ended up being very wet and sticky.


See?  Definitely should have left the water out. :-(  I added a bit more flour to dry it out a bit, but it still ended up being sticky.


Okay, chill the dough for about 30 minutes...check!  During that time, I oiled the sides and bottom of the cups to prevent sticking.  This is where I had to get creative as well.  I decided to par-bake the shells before adding the filling, so I had to make them the right shape, but my fingers weren't up to the task...for a really stupid reason...my nails are too long.  So I tried using the top of my food processor blade covered with plastic wrap.  The plastic wrap kept on getting stuck to the dough and pulling.  -.-  Then I tried a skinny highball glass I have, which I dipped in GF flour to make it not stick.  That worked the best, but it wasn't ideal.  I have a silicone cupcake pan I should have/could have used as well...maybe next time.  At least I'm always willing to learn.


And into the oven at 400 degrees for ten minutes just to firm up the crust.


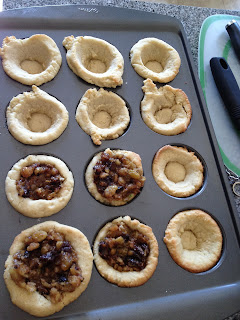
What happened?!  My shells puffed up like puff pastry!  I think using the food processor aerated the mixture, which made it puff up in the oven.  Hmmmm, something interesting to keep in mind.  I may have discovered a way to make easy GF puff pastry!  More experimentation to follow...


I stuffed the pastry cups as full as I could, pressing the puffiness back down, and put the pies back in for another 20 minutes.


Tadaa!  All brown and slightly crispy.  What's that?  They don't look all perfect and uniform.  That's okay, they're rustic!  The crust, despite all the surprises is slightly sweet and crumbly.

So how did they turn out overall?  Well, I liked them, my dad liked them, and Mike's brother Pete ate some for dessert last night and for breakfast, so I think that's a win!  I also have more filling left to make more later. :-)  Finally!  I can bring a little more of England into my life here in TN.  That's something to be thankful for!


Simple Wrapped Ball

11/23/2012 0 Comments
What do you get when you combine $2 ball garland, a styrofoam ball and some hot glue?

This!!!!
Isn't she pretty?!?! I love how simple and quick she was to make too! I have some more ideas for the wrapping of beaded garland around styrofoam balls, but this is the only one I've made so far!

Heather

11/21/2012

More Paper Woven Stars....

11/21/2012 1 Comments
Yesterday, I shared the wood veneer and fabric woven stars - today I'm sharing some more of the paper woven stars.


I was going to leave them like this for a while, but then figured with the crocheted snowflakes, it might just be a little too much snowflake going on on my Christmas tree.


Heather

11/20/2012

What to do?

11/20/2012 0 Comments
Have you ever had a grand idea?

Has that grand idea not panned out? I have!

I had a wonderful idea that involved wood veneer! Then it didn't pan out.

So I was left with two packages of wood veneer that I didn't know what to do with. Enter the woven snowflakes from House Revivals!

Now I know I made these last year, but this year I'm revisiting them with some red oak wood veneer, iridescent taffeta and maybe some glitter, maybe not. Still haven't decided on that one.

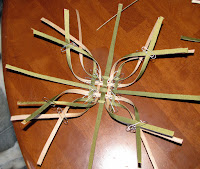
So anyways, if you pop on over to House Revivals you'll see that she does a wonderful job of detailing how to make these pretties. I followed her instructions after some prep  work with the veneer.
So there's the edging. I got it from Lowe's (shocker) and figured that I could adhere it to fabric so that I didn't have to paint the underside of the edging (again. Different story, different post).

I knew I had some left over taffeta and figured what could it hurt to try and iron the veneer to it. Well thank my lucky stars it  worked.

I cut my pieces of veneer into about 12" long strips. Then I cut them all in half lengthwise, and then again and again. Each strip will garner 8 strips of wood and fabric.
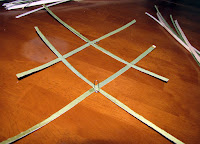
After I had my strips, I just followed the instructions for the original paper stars.


 Paper clips are your friends for this step. Also wood glue works better than white glue. It takes longer to dry, but you'll thank me. Trust me.

So here's the finished product. I haven't yet decided if I'm going to add some sparkle to the star, but I probably will. If only to hide some of the overlap. I love the effect though of the woven colors. Just think of all the possibilities, and you could even stain the wood.


Heather

Linking up to:

Today's Creative Blogshabby creek cottage

11/19/2012

Learning to Crochet......

11/19/2012 1 Comments
This week is Thanksgiving. What better week to introduce a whole bunch of ornaments I've made!

So while perusing Ms. Martha's site, I found some super cute crocheted snowflakes and really liked them. The problem? I don't  didn't know how to crochet.

Its one of the few crafts that up until recently I really had no desire to learn. But then I had to learn, because I need these little crocheted snowflakes for my Christmas decor. So on a trip with Mom to Walmart, we got my necessary tools. One crochet hook, and a thingy of crochet thread. Thingy is a technical term.

Want to see my first crocheted snowflake?
He reminds me of the Charlie Brown Christmas tree. He's not quite right, but there's something endearing about him. So I'm going to keep him.

Here are some of my later (and better) snowflake creations from Ms. Martha's site.

Starching and blocking is still not my favorite thing, but I am able to whip out 2 or so snowflakes in the time it takes me to catch up on two TV shows, so I'm thinking that I should be able to whip up enough of these beauts for the tree and maybe a garland or a stocking embellishment or two.

Anyone have any tips on starching and blocking? I'm all ears.

Heather

Linking up to:
  Makingmaking monday marvelous linky party

11/15/2012

Thanksgiving Mantle

11/15/2012 0 Comments
I'm getting back into the swing of things here at home, and I'm excited to share my Thanksgiving mantle with all of you guys.

Its more toned down version of what I usually do, but I'm finding myself trending back towards a more uncluttered look.
 I am really loving how simplistic the whole thing is. I am also loving the little touches here and there of color.

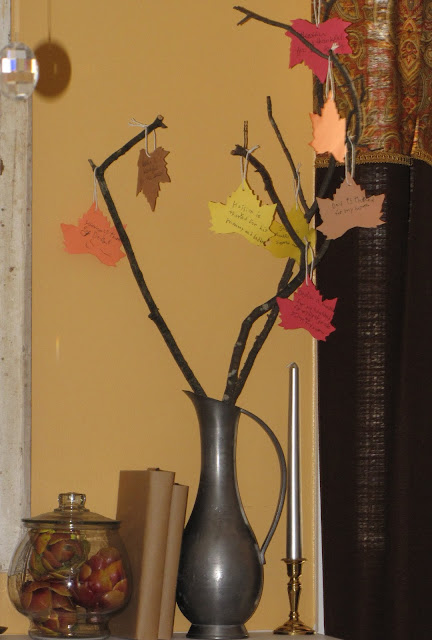
 I really love this. I saw the idea on BHG.com and its a Thanksgiving tree (cause you know I'm a sucker for anything tree). We cut out some leaves and each wrote what we're thankful for. Devlin elected himself as Harrison's honorary writer, and here are some of our leaves. Ok, they're all the boys' leaves, but I love this! It was fun taking them out last week after Sandy came through to find the perfect branches.

Here's another change: I brought back these curtains. If you recall I changed these curtains out just after Christmas of last year, and now they're back. I'm so glad I kept them, because they lend a warmer feel to the room than the other curtains.

Here's my little guy again, cheesing it up for the camera. Seriously, I have to stop pulling out the camera when he's awake, because every time he sees it he tries to bogart it and repeatedly says, "cheese!", until I take his picture. Its cute at first. Then its just annoying. He does take a nice picture though. :)


Heather