Follow Us @SewHalfCrazy

2/23/2013

The Soup That Mike Forgot

2/23/2013 0 Comments

I don't know how this happens.  I'm not even sure it's ever happened to me, but have you ever had a meal, loved it, and then forgotten about it?  Mike totally did that with this week's recipe, so I had to remind him how much he enjoyed it.

I found the recipe on Pinterest (of course), and the original link is here.

Tomato Basil Parmesan Soup
Makes about 2 quarts (about 8 servings)

Crock Pot Version
2 (14 oz) cans diced tomatoes, with juice
1 cup finely diced celery
1 cup finely diced carrots
1 cup finely diced onions
1 tsp dried oregano or 1 T fresh oregano
1 T dried basil or 1/4 cup fresh basil
4 cups chicken broth
½ bay leaf
½ cup flour
1 cup Parmesan cheese
½ cup butter
2 cups half and half, warmed (or skim milk if you’re trying to cut some calories)
1 tsp salt
¼ tsp black pepper

Add tomatoes, celery, carrots, chicken broth, onions, oregano, basil, and bay leaf to a large slow cooker.  Cover and cook on LOW for 5-7 hours, until flavors are blended and vegetables are soft.

About 30 minutes before serving prepare a roux. Melt butter over low heat in a skillet and add flour. Stir constantly with a whisk for 5-7 minutes. Slowly stir in 1 cup hot soup. Add another 3 cups and stir until smooth. Add all back into the slow cooker. Stir and add the Parmesan cheese, warmed half and half, salt and pepper. Add additional basil and oregano if needed (the slow cooker does a number on spices and they get bland over time, so don’t be afraid to always season to taste at the end).

Cover and cook on LOW for another 30 minutes or so until ready to serve.


Stove-Top Version
3 cups diced tomatoes with juice (you can use canned)
1 cup finely diced celery
1 cup finely diced carrots
1 Tbsp fresh oregano or 1 tsp dried
4 cups chicken broth
1/2 cup flour
1 cup Parmesan cheese, freshly grated
1/4 tsp black pepper
1/4 cup vegetable oil
1 cup finely diced onions
4 Tbsp fresh basil or 1 Tbsp dried
1/2 bay leaf
1/2 cup butter
2 cups half and half, warmed (if you want you can use whole milk, evaporated milk instead…or even skim if you want to skinny it up)
1 tsp salt

Heat oil in 4 quart soup pot. Add celery, onions and carrots. Saute 5 minutes. Add basil, oregano, bay leaf, tomatoes, and chicken broth. Bring it to a boil, reduce heat and simmer until carrots are tender (15 minutes).

While soup simmers, prepare a roux. Melt butter over low heat, add flour and cook, stirring constantly, 5-7 minutes. Slowly stir in 1 cup hot soup. Add another 3 cups and stir until smooth. Add back into soup pot.

Simmer, stirring constantly, until soup begins to thicken. Add Parmesan cheese and whisk to blend. Stir warmed half and half, salt and pepper. Simmer over low heat 15-20 minutes, stirring occasionally.


Personally, I did the crock pot version because there is no better feeling than knowing dinner is taking care of itself and then smelling that delicious goodness when you walk in after a long day of work.  Crock pot meals are my jam!


Assemble the team!  I actually started the night before so I wouldn't have to get up early to chop vegetables.


When everything was done, I just tipped it all into a bowl and covered with plastic to sit in the fridge overnight.  I tend to chop my veggies a bit larger than a dice, as I like a chunkier, more rustic soup, but either way works well.


Next day, nearly everything goes into the pot to cook while I work.  I actually came home at lunch to do this, but you could start it up in the morning.


And here's the soup after adding the roux.  We're almost there!


Tadaa!  To top it off, we toasted some extra hot dog buns we had on hand and rubbed them with garlic and butter to dip.  Awwwwww yeeeeeeah...

And that's all there is to it.  So easy and amazing.  This soup is rustic and comforting and makes you feel good about even the worst day.  Best of all, as soon as Mike took his first bite, he remembered it and why he loved it so much.  I like to think he won't forget again. :-)  


2/18/2013

What Cardio Looks Like

2/18/2013 0 Comments
So after I completed my first cardio 3-4 session, I decided  to show the hubs what I looked like.

Yep, its blurry cause my hands were shaking, and that's a whole lot of red and sweat. This is before abs, during the cool down. I got more sweaty in the after bloom of working out, but I really enjoyed the challenge of the cardio in 3-4.

I do not like the  push-ups in Sculpt 3-4. I'm still struggling with those. Push-up stands are in my future.

So that's my check-in. :)

Pampering Me!

2/18/2013 0 Comments
So I've got projects in the works, but nothing is quite done yet. So I figured I'd show off something I did for myself the other day!


My hands look rough but the manicure is pretty!!!  I just used a nude colored base and then a sparkly blue, which is named 'Hottie', to top it off!


Heather

2/17/2013

Homemade Pasta

2/17/2013 0 Comments


That's right, I said it!  Homemade pasta.  As in, I made it...at home...myself.  Okay, you get the point.  Pretty amazing, right?  Mike was not as impressed as I thought he should be.  I told him that was because he was spoiled.  Had I done this six years ago, he would have been all like, "No way!  No one has ever done that ever!  You must be magic!"  Nah, none of that.  Instead he just said, "Of course you did."  Not really sure how to feel about this.  Anyway, how did I do it?  Especially gluten free?  It's way easier than you would think.  This is based on a recipe by Annalise Roberts.

GF Homemade Pasta
-*1 cup all-purpose GF flour (make sure to use a variety that doesn't have a binder such as xanthan gum or guar gum pre-included), more for rolling
-1/2 tsp xanthan gum
-2 large eggs (I ended up having to use 3)

*The GF flour recipe Annalise Roberts uses is 2 parts brown rice flour, 2/3 parts potato starch, and 1/3 part tapioca flour.  Nothing else.  That is what I use as well.

Combine the flour and xanthan gum the bowl of you mixer using the dough hook on low speed.  Once those two are mixed, add the eggs, stir until just combined, and then beat on medium speed for two minutes until the dough forms a ball.  Then divide in half, roll out, cut, and cook.

According to the book, your pasta, cut or uncut, can be left out on the counter (covered with a tea towel to prevent drying out) for up to two hours.  It can also be run through a pasta machine.


See, there's my dough.  Not too sticky, but it will leave some residue on your hands.


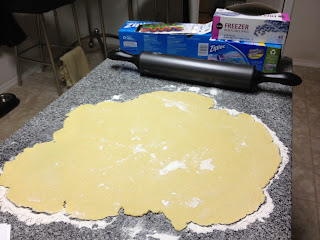
There's my dough all rolled out.  Now, if you've actually done this before, which I hadn't, you might notice something wrong here.  Yeah, that dough should be about half that thickness.  Again, it was my first time.  It's a learning process.


I don't have any fancy pasta cutters or anything and I didn't want to risk scratching my granite island-top, so I got creative with my cutting implements.  Yup, a plastic knife.  I don't care what anyone has to say about this because it worked and that's the only thing that matters.


See?  Not bad, huh?  Like I said, I know it's not perfect.  My lines aren't straight, the dough is too thick, but it works!  I'm getting better.


Me: "Mike!  Look!  I'm all done?"
Mike: "Already?  I'm not ready to eat just yet.
All of this had really only taken me about 30 minutes.  Good thing the recipe said it could be preserved in a tea towel for a while, so we did that.


When Mike was finally ready to eat, we cooked the pasta in boiling, salted water, which only took about 6 minutes at most.  Meanwhile, we also browned up some sausages and zapped some jarred sauce...what?  I freaking made the pasta from scratch!  I can phone it in on the sauce if I want!  Besides, it's really good sauce.  Marinara from Trader Joe's.  Haha, what did I say about the dough not being thin enough.  You can see here how thick it got when it cooked.  You can also see us struggling to mix everything without making a grand mess because I am really bad at judging volumetric proportions.


Tadaa!  And there is the finished...oh, wait.  I was too slow in taking the picture.  It all got eaten up too fast.  Oh well. :-)

I'm still working on learning to use the pasta machine I bought now.  It's not quite as easy as using a microwave, but I'm learning.  I'm really excited about this new culinary weapon, however, because I can now make flavored pasta.  Do you get what I am saying?  Cracked black pepper, garlic, tomato, spinach, herbs.  As I have said many times before, I LOVE pasta, and I've just been given the secret-key-sword-password-power to this most happy-making of foods.  Look out, world!  I'm unstoppable!


2/14/2013

Measuring Up!!!

2/14/2013 2 Comments
HAPPY HEART DAY EVERYONE!!!!!

I made you all some cookies!!!!
See??!?!? Aren't I sweet? Yea.....they're not really for you guys. They're for my boys, the little ones, because they asked nicely and now the small one is asleep on the floor. Its going to make working out interesting. He's right next to where I usually get my work out on. Fun times.

So anyways, on to the real post. I've had this project done for a little bit, and I'm still lovin' on it. :)
 I made a gigantic ruler!!!! Love it!!!

The best part was the it was stupid simple to make. Just take an 8' board and stain, paint, do whatever you want to it, and then stencil on some numbers, make your hash marks and then let dry! I used Rustoleum's Sun Bleached stain and just some black acrylic paint.

Believe  it or not, but the ruler is actually hung just about right. Its like 1/4" off or something like that, which is perfect for getting a fairly good idea of measurements for the boys!
,
 There are my two sweeties' measurements! Its only a small gap. :)

I decided to hang the ruler right near our front door and two-story foyer, because, well, there was room, and it showcases just how tall our ceilings are. I am really loving the stain color too! I may need to find more things to use this stain on.

I hope you guys having a rockin' V-day and come back to see what Dana's whipping up this week!
Heather

Linking up to:

2/13/2013

Power 90: 3-4

2/13/2013 0 Comments
Today, I started segment 3-4 of Power 90 and I'm kind of scared by the fact that my fears were almost spot on. Its longer (not a big deal), its harder (forgone conclusion), its going to  kill me with all of its push-ups and if that doesn't do me in then the squats will definitely be the trigger.

I don't know if I've mentioned before my loathing of push-ups, but I'm going to rehash that particular hang up. I DON'T LIKE THEM! I'm not very good at them, they make my lower back hurt (I know I should work on strengthening that too), I feel like my left elbow is going to dislocate after about 8 of them, which makes the max push-up segment TERRIBLE.

14 years ago, I was in a fairly bad car wreck and broke my left arm into a bunch of pieces about 1/2" above my elbow and right next to a nerve cluster. When my arm was set (a week after the wreck) my elbow was twisted and I lost some range of motion and fine motor control. Through PT and healing, I was eventually able to do everything I had done, but I had to relearn it. Shooting free throws after the accident hurt my elbow, so I had to learn  to shoot them so that my elbow didn't hurt and pop every time. For someone who loves to play basketball, this sucked. This also affects push-ups, which are the devil, and how much my elbow hates me after doing a few. I need to do some research about alternate push-up positions. I already do the knees down ones, but seriously, besides getting a brace for that elbow (it'll go nicely with my knee brace) I need to figure something out.

Anyways, yesterday I showed off some comparison pictures on the book of faces, so I figured I could share them here too. :)
I really didn't think there'd be that much of a change in 30 days, but I was wrong. I'm really excited about what the next 30 days bring, except for those darn push-ups.

2/12/2013

Valentine's Day Skulls!

2/12/2013 1 Comments
So hearts aren't something my boys wear a lot of, which is ok because I'm not a 'heart' person.

But then I saw some super cute boy valentine skull shirts so I decided that my boys needed some too!

Here's what I came up with!!!
Harrison's shirt just has some white knit fabric stitched down in a cute skull pattern.  The eye patch was drawn on with a red sharpie (the 'stained' kind)

Dev's shirt is another take on the skull and crossbones.
I wish I had made his skull larger, but oh well. He likes it. :) His image was just drawn on with some of the Stained Sharpie markers.

So there are my boys' valentine's day shirts. :)

Heather

Linking up to:

So I Married A Craft Blogger

2/07/2013

Valentine's Day Mantle

2/07/2013 0 Comments
The Winter mantle has come down and hopefully Spring is right around the corner, but right  now Valentine's Day is up!

There's not much to say, so I'll just show it off!


 There are a couple of other V-Day touches around the house as well. :)


\


Well there are my little touches!

Heather

2/04/2013

Making you think

2/04/2013 0 Comments
As I think over and review my journey so far, I am amazed at some of the transformations, and I'm not just talking about the physical ones. I'm talking about the changes that have occurred with my thinking and basic outlook.

It has become second nature to make healthier food choices. It has also come to pass that if I start to falter on my workout routine that I literally start feeling sluggish, even if its only been a few days. I've become an endorphin junky, but that's ok because I'm also happier more often and not just the I'm content happy, the I'm grinning for no reason happy.

People, even people I don't know but see on a semi-regular basis, have complimented and told me how much I've changed and it makes me feel wonderful but it also stirs up feelings of wanting to spread the wealth. I want the people I love to have this same euphoric feeling. So I start nudging and prodding and enticing some of them to exercise and make healthier choices.

It's not been an easy road. There has been resistance and some instances of strife, but on the whole I've managed to influence a few and its wonderful feeling! Their triumphs inspire me to keep going and to keep pushing. Their hesitation and trepidation inspire me to want to reassure them and cheer them and lift them up. Their lows enable me to help them see the changes that have already occurred and remind them why what they've already accomplished is so amazing.

By helping someone else, I'm only furthering my resolve and devotion to a healthier lifestyle. Now to say that when I come upon some insurmountable resistance I'm not taken down a few notches and angered by it would be a lie, but I have to remind myself that not everybody is ready to make this enormous change.

Looking back, the hardest thing to do was to drag myself to the understanding that I was unhappy with myself and the only person that could do anything about it was standing in the mirror. Once I got over my fear failing and committed myself to the gym I was paying; easing into the lifestyle was easy. I met new people and some of those people have become dear friends, respected teachers or fellow gym mates that sweat alongside you.

This weekend I was privileged enough to witness the first leaps of faith by none other than my mom. She attended her first Zumba class with me and despite being the "new" girl, she rocked the class with everything she had to give. She was tired and sweaty, but she accomplished something so amazing that I was on a high from her accomplishment.

There are not words for how proud and humbled I am by my mother. She has mapped out a plan, but more importantly she's accomplished that first terrifying step. It's not that walking 3 miles with me every Saturday is not an accomplishment, because it is, but more so that she got up in front of 30+ people and danced her way into a hot, sweaty mess and enjoyed it.

I am so excited for the future and what it holds for all of the people I hold dear but I have to say I'm a little more ecstatic about the changes I know some of them will see because of their decision to get active and get healthy.

2/03/2013

The Best Birthday Cake Ever!

2/03/2013 0 Comments

I've posted before about my unbridled forays into making cheesecake.  If you remember from the post I just linked to, I was really excited about finally succeeding.  And why shouldn't I be?  Well, don't you know Mike's not the only man in my life that loves cheesecake.  My dad does too.  That's why I went ahead and made him one on Thanksgiving.  And don't you know it melted...splooged...whatever you want to call it.  It didn't hold its shape the way it was supposed to, which was very disappointing for me.  I was so proud because I thought I had finally hit upon a great, easy, no-fail recipe.  Not the case apparently; back to the drawing board.

Side Note: Heather made an incredibly successful cheesecake for Christmas Eve, which I think Mike ate half of.  Score one for Heather.

January 16th, 2013: Mike's 30th birthday.  Whoa...the big 3-0...that's a big deal, right?  You're darn right it was a big deal!  I had a night of surprises planned for Mike, and I wasn't about to let a few little past failures keep me from making his favorite dessert successfully.

Pop quiz: What dessert item makes anyone and everyone happy?  I'll give you a hint, they're gotten very trendy over the past few years, so mich so that there are even "war" shows about them on TV.  If you answered cupcakes, you're correct!  If you didn't, you fail at life.  Seriously, have you ever met anyone that said "I really don't like cupcakes"?  Of course not!  Because everyone loves cupcakes.  If they don't, they fail at life and probably got the pop quiz question wrong.  Maybe you people should really think about getting your priorities straight.

Anyhoo!  Back to Mike's birthday dessert.  So cheesecake and cupcakaes...can such an incredible, mind-blowing act of culinary magic happen?  You bet it can!  See, I get a recipe of the day email from Taste of Home everyday.  Imagine my excitement when I got one for jam-topped mini cheesecakes.  Let's do this!

Jam-Topped Mini Cheesecakes
Courtesy of Taste of Home

1 cup graham cracker crumbs
3 tablespoons butter, melted
1 package (8 ounces) cream cheese, softened
1/3 cup sugar
1 teaspoon vanilla extract
1 egg, lightly beaten
Assorted jams, warmed

In a small bowl, combine graham cracker crumbs and butter. Press gently onto the bottom of 12 paper-lined muffin cups. In another small bowl, beat the cream cheese, sugar and vanilla until smooth. Add egg; beat on low speed just until combined. Spoon over crusts.

Bake at 350° for 15-16 minutes or until centers are set. Cool for 10 minutes before removing from pan to a wire rack to cool completely. Refrigerate for at least 1 hour.

Remove paper liners; top each cheesecake with 1 teaspoon jam. Yield: 1 dozen.


First things first, prepare your crusts.  I used GF gingersnaps and pulverized them in my food processor with the butter, which I melted first.  I then used my skinny little highball glass to tamp it down.  Very successful.


Next, the filling.  This really couldn't be easier.  Cream cheese, sugar, vanilla extract, and egg.  I bet you could even use a different extract (orange, lemon, almond, etc.) if you wanted a different flavor.  Of you could get really fancy and use some zest from a lime or a grapefruit.  Get creative!


Then it's just a matter of filling them up and popping them into the oven.  Wait, that's it?  Yup, that's it!


Look at how beautiful these turned out.  Let's look at some more pictures of them!


And vogue, vogue, vogue...


I made 24 of these babies (a double batch) and had to keep them a secret until after we came back from dinner, so I put together an ingenious contraption...


I placed my cake stand on a plate and then wrapped plastic around the edge so that none of the cheese-cup-cakes on the bottom would absorb any funky flavors in my fridge.  I'm pretty proud of this.


Then I covered the whole thing in a tea towel so Mike couldn't see it.  I barred him from going in the fridge anyway, but I wanted to make sure I took every precaution.

So how did they go over?  Magnificently!  Everyone at Mike's surprise birthday party liked them - some people ate three - and Mike ate the rest over the course of just a few days.  He also really likes the easy serve-ability and portion sizes of these.  I have since made this recipe again with the same exact success even though I switched it up a bit.  For the second time around, I made a double batch again, but did three times the amount of filling instead of two, which I think creates the perfect crust-to-filling-ratio.  Balance is everything.  I even cooked those for as long as 20 minutes without any issues.  I also created another contraption for the second time, wherein I stacked a ramekin on the center of a plate, topped that with another plate, and repeated until I had four tiers, six cupcakes to a tier.  It just needed to be moved with care.

I am beyond pleased with this new recipe.  Finally!  The most perfect cheesecake recipe ever!  Enjoy!


Like my writing?  I have a book!  $.99 on iBooks, KindleNook, and Smashwords.