

When I started kicking around the idea of redoing our room, I knew that I wanted my vanity to have a bolder presence in the room and that meant finding the right big color for it.
My original plan was to paint the vanity the color that ended up on the walls, because I wasn't going to paint the room again. When the hubs said that we could paint the room, well that was a game changer, and I knew the exact color that the vanity would be painted - a bright emerald green, Luscious Green, to be exact.
Finding the color wasn't at all difficult, a quick trip to Lowe's and I had the chip, and then when I found the lamps and needed to paint them, the paint color was also a spray paint color! That's fate right there. I wish finding fabric with a strong green was as easy a task. That's a story for another day though.
So I had refinished the vanity back when we first did the room, and it was shy and retiring. She also needed a lot of work. The original post is {HERE}, but here are a few shots of just how she started.

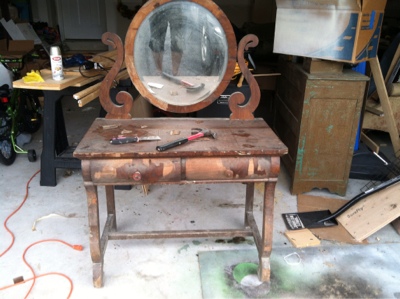
This piece had lived in my grandparent's shed for several years and the outdoors was not nice to her. I won't go into the details of what I did to save her. You can visit the above post for that, if you're so inclined. So for 5 years the vanity sat finished in a shabby chic yellow and white paint job that I didn't really love after a while.

She really just kind of melted into the wall color. Not what I envisioned. Luckily, repainting her was super easy. I mixed up a bit of chalk paint, using the same recipe I used on several other pieces in the house. You can find those posts {HERE}, {HERE}, {HERE}, and {HERE}. The recipe I use is {HERE}.
Usually I seal the furniture with a matte polyurethane, but this time I used a high gloss poly, because I wanted the piece to almost look like it was lacquered, and I'm very happy with how it all came out.


There are still defects in the wood, but I like them. This piece has a history and there was no point in trying to hide it. I will say that the chalk paint did fill in some of the more shallow defects rather nicely, so that was an added bonus. I found the simple acrylic and brass knobs at Target. Their understated beauty was the perfect addition to the drawers.

I love how this side of the room has come together. All that's left to do is replace that terrible chair. The perfect replacement will come along, and when I find it I'm going to snatch it up!
My partner in crime didn't want to be left out, so we had a little photo session at the end. Here's my baby girl hamming it up.


Thanks for visiting today and I hope to maybe start writing posts a little more regularly. I have material, I just need to sit at the computer and get it done.
Cheers!


No comments:
Post a Comment