Follow Us @SewHalfCrazy

Showing posts with label birthday. Show all posts

7/18/2016

New Book, New Blog, New Recipe!

7/18/2016 0 Comments
Hello, dear readers!  Dana here with some exciting news!  Do you like books and reading and going on adventures without leaving the comfort of your favorite chair?  Well, that's great because I have started an author blog that appeals to all those things.  You can find my website {HERE} or just plug www.wordsbydana.com into your address bar.  My blog is there, in which I discuss life as an independent author and review books I'm currently reading.  The site also shares news about upcoming books, like this one:
^^^ Shameless plug ^^^
Coming in October 2016!
Not to worry, though.  I'll still be guest blogging here about food...delicious, magical, awesome food.  Speaking of, time for a recipe review!

So here's the scenario: a friend of mine is having a birthday this week.  Said friend loves madeleines.  Like, not just enjoys them, loves them and cannot control herself around them.  I was going to make her a butter cake for her birthday, but then I stumbled across a recipe for madeleines in the process and decided that would be better.

For those of you not up on your ultra-specific French food studies, madeleines are little, spongy, shell shaped butter cookies.
Traditional madeleines.  Cute, aren't they?
I have a fantastic idea for all of you.  Next time you have to bring something for a cookie swap, bring these babies.  If you go the extra mile and spring for a proper madeleine pan, everyone will be super impressed!  They are so classy and lovely.

Now, going against what I just said, despite my best efforts, I was not able to find a madeleine pan on short notice, so I had to improvise.  I used a mini-muffin pan and then 13 slots in my mini-scone pan.  I am a little disappointed by this because the little shells do make such a lovely presentation.  Well, you do you best with what you have.  And now the part you've all been waiting for, the recipe!

I used one from Martha Stewart's website here.  Say what you will about her ethics, the woman has some good recipes.  Some of the other recipes I saw were more fussy, which is why I eschewed them for Martha's in the end.  This one is pretty hands off.  Those of you who know mine is a celiac household might be wondering how I dealt with the whole gluten in traditional flour issue.  Thankfully, there are numerous brands of cup-for-cup, all-purpose, gluten-free flours available.  I happened to have used Cup4Cup, but only because I happen to have it on hand.  Honestly, (and I've said this before in a previous post about Victoria sponge) I find that Cup4Cup performs as well as other brands like Domata and King Arthur, but it's much more expensive, so I will likely not buy it again.  Nevertheless, it performed beautifully in this application.  And here's the great thing about GF baking: because there's no gluten, you don't have to worry about over developing it while mixing.  Which is why when my folding technique was failing to do the job, I was able to whack my bowl back under the stand mixer and let it do the work for me.  Then it was just a matter of scooping it into the little pans and baking it.

Quick question: Does anyone know how to keep a sponge from deflating?  Because I've never been able to get that.  I've read that some people drop their pan onto the floor, but that seems a little extreme.  Ideas?  Anyone?

Here they are!  Not the prettiest, little maddies, but lovely and soft!
Of course the big question is whether or not the birthday girl liked her gift.  After all, some people claim that GF baked goods are not as good as the "real thing", can never be as good.  Well, let me put it this way.  Of the twenty-one madeleines I made, she ate twelve.  Twelve!  She could not stop herself from going back for more.  That's what I call a roaring success.

Thank you all for reading, and I do hope you'll pop by and visit my author blog as well.  Until then, cheers!

10/06/2015

Blast From the Past - A Seussian First Birthday

10/06/2015 0 Comments
Small Fry's 6th birthday was this past weekend, and we celebrated it by taking a camping trip. It was cold and rainy, but a good time was had by all, eventually.

 I figure what better time to bring back one of the most popular posts from Straight Stitches. For his first birthday, we threw him a Dr. Seuss party! So here are the highlights from that post 5 years ago.

1/10/2013

Hey Ferb, I know what we're going to do today.....

1/10/2013 0 Comments
So how many of us know Phineas and Ferb?  I do! I do! I do!

Actually I may like the show as much if not more than the boys do. It reminds me of the awesome cartoons that I used  to watch as a kid. BTW, total disney freak. Loved Darkwing Duck, Duck Tales, Tale Spin, Chip  & Dale Rescue Rangers, TMNT (the original cartoon series), GI Joe, etc.....

So when these new cartoons started coming on, well, I just couldn't stand them. Until Phineas and Ferb. I love Candace and I actually really love Dr. D and all the songs.

Harrison and  Dev decided  that they both wanted Phineas and Ferb birthday parties, but definitely not the same party. So Harrison had  Phineas and Ferb, Devlin had an Agent P party, but being as I decided to have his party 3 days before Christmas, I did not go all out like I usually do. I did make some pretty awesome birthday invites, and we had cookies for our goodie bags, and a neopolitan birthday cake. :)

I googled some birthday invite ideas and this is what I came up with:
It was pretty simple and I could fit 2 of these invites on a 4x6 photo, so it was pretty cost effective to print out as well.

Then it was time to make the cookies for the goodie bags.
 I used a box sugar cookie mix and just made a whole bunch of circle sugar cookies that I then decorated with royal icing. I think they turned out pretty well. :)
The cake was another matter. Dev wanted neopolitan cupcakes for his class when I brought in cupcakes, well I had enough batter left over from those that I was able to get a cake out of it as well.
I know that it says, Happy Dev, but when we brought out the cake at the party, we had a candle that said 7, so it really said Happy 7, Dev!  Hey, it works in a half-ass kind of way.

The  cake was gobbled up and really that's all that matters.

Here are some pictures of things we saw on Dev's actual birthday. The boy wanted to head back to the Natural History Museum at the Smithsonian, so that where we spent the day.
 These are butterflies from the live butterfly exhibit in the insect wing.
 that's a big mammoth from the ice age exhibit
There's Dana with the boys in front of a triceratops skeleton!

I'll be back with more stuff that we did on Christmas break later!
Heather

12/27/2011

12:01 AM

12/27/2011 1 Comments
At 12:01 AM I was going into labor - 6 years ago.

It was my due date, but I didn't think I'd actually be giving birth. It was another false labor, just like the other 4 or 5 times. They send me home around 3:30 or 4. I'm effaced enough but not dilated enough.

They tell me to get some sleep and go to my OB in the AM. Sleep eludes me. I finally give up around 6.

I waddle out to our living room and sit in my favorite chair. I watch the sun rise. My contractions are getting worse, but I don't want to wake anyone. It was a long night for them too. If I only knew.

18 hours of labor is what I was in. You, big guy, decided to grace us with your presence at 6:30 on the dot.

Happy 6th Birthday D!

I can't believe how you've grown.


Happy Birthday Big Guy! We love you so much and we're so blessed to have you in our lives.

Heather

10/04/2011

Toodles Decoration

10/04/2011 0 Comments
So I told you guys yesterday that making the Toodles decorations was super simple.

What's even better is that the can be made with stuff you might have around the house. I had all of this stuff around the house so at one time it cost me something, but I'm going to ring it up at $0 since none of this stuff was actually bought for this decoration. :)

So I started off with two pot lids, poster board, a pencil, scissors and some red paint.
I used the pot lids as the basis for the Toodles template. I really just eyeballed the design and then traced. Once I had one done and cut out, I used the template to create all the rest. Its that easy!
After they were all cut out - the red paint comes out. Luckily it dries really quickly so I didn't have to wait too long before being able to paint the other side.
Then I just hung them up with curling ribbon and then added some more curling ribbon to the end and called it a day. :)

See super simple!

Heather

10/03/2011

Hey "Two"ddles!!!!

10/03/2011 0 Comments
So last week I shared a bunch of Mickey Mouse themed ideas for birthday parties, and here's why!

My little guy turned 2 this weekend. I can't believe that he's already this old. How did this happen? Sheesh, time does fly, but I'll tell you what - we've had a blast.

So here's our Mickey Mouse Clubhouse party for Harrison. :)

So here's the balloon wreath that I made a while back. I love how it brightens up the front door.

This is what our guests saw when they walked in. I made the sign and I think it turned out pretty durn well.
 This was the dining room, which most of the adults used, which was just fine, because I didn't go to crazy in here.
 My adventures in crepe paper have not ended. I ordered extra crepe paper just for the party. Good thing Dev's party will also use primary colors.
 Here's the table. Like I said I kept it simple, and I'm glad I did, because the adults had fun playing with the confetti, which was a surprise.
 Here's the rest of the house as they come further into the house. I went a little more crazy with the crepe paper and balloons. I found Mickey Mouse character balloons at Walmart, which I paired with the rest of the balloons that came in my party kit.
 Here's a close-up of the sofa table, and I had fun with this. I made the toodles head the night before the party while watching, Secretariat, with my mother-in-law, but I'm going to share those tomorrow, because they're super simple to make. I didn't even use a template.
 If you guys read my post from last week, you'll have seen a similar subway art as inspiration. I really loved that idea, so I put my spin on it for Harrison, but then I went a little further. I have had these glitter chipboard letters for FOREVER, and I needed to add more sparkle, cause I'm a girl and I like sparkle, but I do think that the letters add some more fun flair to the otherwise very boring frame.
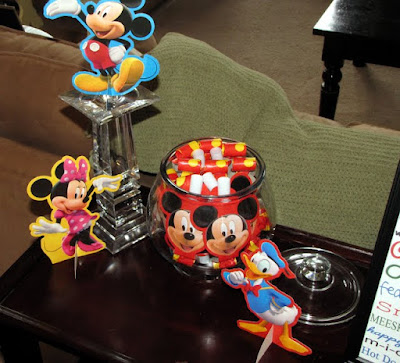
 I received this short squatty jar from Dana a few Christmases ago. I killed the plant that had been in it and since thing it's be added to the rotation of apothecary jars. I didn't really want to put these out on the table for the kids, since I was cramming 12 little butts at a table built for 6, so the jar was the perfect solution and helped fill in the empty space of my table. You'll also see some more Mickey Mouse characters scattered around. I'll tell you what - just having all these characters sprinkled throughout the house really lent to the fun Mickey theme of the party.
 I had all of the treat sacks for the kids stashed in a banana leaf basket in the family room, unfortunately only about half got given out, because I forgot about them {again}. I do not seem to have good luck with handing out these favor bags at the kids' parties.
 Here's the mantle! Finally we're to some more of the fun decorating! I made the banner out of stuff that I had lying around. I also did a Google search on free digital scrapbook page Mickey Mouse and found a nice kit. Unfortunately I don't  remember where I found it, but thank you to whomever made it, because it really saved my butt! I also found some more Mickey chipboard letters to put on the banner. Devlin graciously donated all those Mickey's for the mantle. They're all his, and one of the small ones was even Stephen's Mickey when he was small. It was such a touching gesture when he came downstairs with them and told us to use them in the decor. He's such an AWESOME big brother.


 Here's the main event! The kitchen table where I fit 12 little butts at a table made for 6. Thank god for the bench I made for a coffee table a while back, because that thing held 4 of the kids right off the bat! You can see I went and decorated  the chandelier again, and I love the outcome. This was also the first thing I decorated when I started the whole process, and the kids loved that 1) I had started and 2) that the chandelier was so fun, and they could try and find which characters I had put up there. :)


So here's a close-up of the kitchen table, and I love the wonderful chaotic mess of this table. I told Stephen when I was setting it, that it was like I was flipping the silly switch and this was the perfect interpretation of it. I then got told that I'd been watching Mickey Mouse Clubhouse too much. Ah well - it is Harrison's favorite TV show. :)

Here are the rest of my Toodles. I taped one to the lampshade on the sofa table, and then decided to hang the rest of them over the island and the food for a fun touch. I really like that there's a transparency to these decorations, but there's also the whimsy. And they are super easy to make. I'm going to share the easy peasy steps tomorrow. :)

Here's the cake! Remember all those cakes I put up as inspiration? This is what Stephen came up with and I think he nailed it! He made marshmallow fondant and then went to down on the cake. My only contributions to the cake were the candles and the white piped icing between the layers.

Here is my cake contribution to the party. These are spice cake cupcakes with cream cheese frosting, because I don't so super sweet cakes, and there were like 36 people at the party and we had maybe 6 cupcakes and 1 layer of the cake left over for us. Not too shabby I think.

Here are the cookies I made. My boys actually like cookies better than cake, so I had to accommodate them. BTW - black frosting is possibly the best idea for a toddler's birthday party, NOT! None of it got on clothes, but the faces of kids - well there were lots of wet cloths pulled out to clean those faces. :)
We also had corn dog nuggets for the kids, along with various dips, chips and veggies. Not surprisingly none of the children hit up the veggie tray.

And last but not least......

Here's my birthday boy! He had a lot of fun with all of the kids and the tissue paper from the gifts. Luckily he did get into the gifts the next day after all the excitement had died down, but during the party he really liked that tissue paper.
Thanks for visiting today guys and thank you so much sharing my little guy's special day! I had a lot of fun doing this for him, and I had so much fun looking at everyone's ideas for Mickey Mouse birthday parties!

Heather

9/28/2011

Getting Ready

9/28/2011 0 Comments
I can't believe that I completely forgot to post yesterday! I've been so busy getting ready for H's party that I almost forgot that it was my anniversary yesterday. Almost. :)

The hubs and I had a nice dinner, alone, and then came home and relaxed. It was really quite lovely, except for the laundry folding part. :)

So anyways, here's what I've been doing today. Well some of what I've been doing today. :)

Luckily, I'm not making a whole lot of these. Only enough for the kiddos that are coming to the party. See - I'm saving myself some work, and well, you  know there were a few casualties so they had to get eaten.

They were good. :)  I'll see you guys later, I do believe Dana is going to be posting tomorrow.

Heather

9/21/2011

Let's Brainstorm!!!

9/21/2011 0 Comments
So having a Mickey Mouse themed birthday is not new, and there are tons of ideas floating out there, but here are a few of my favorite ideas that I've pinned recently, plus one blog post that I'm absolutely in love with. :)

So here are some of my ideas that I've pinned - We'll start with the cake ideas. :)
{source}
I am in love with this cake topper. I love how festive it is! Although Harrison is a very long name to fit on stars at the top of a cake. :)

{source}
Look how nice and simplistic this is. I like the marbling that the fondant has, and I love Toodles on the top. :)

{source}
{source}
 These two cakes are equal on the love scale. I love  the colors in both. I love the relatively simplistic nature of the both of them. And I love that I could easily do them. :)

{source}
The hubs is in love with this one, and I have to say I am too. I love the dimension and depth to it. Now all we have to figure out is how to combine all the awesomeness of these cakes into one cake. Wish us luck. :)

On to decorating. :)
{source}
Isn't this a great idea as the entrance to the party? I may have to do something on a different scale for H's party, but this has got the wheels churning. :)

So I also mentioned a blog post. I found this on through Tip Junkie. Its from Life with Lulu and Junebug... and Carter too! - Oh "Two"dles! It's Carter's Mickey Mouse Birthday Party!

I have to be honest here and say if I could copy everything from this party - I would. ESPECIALLY this birthday banner. Her mom made it. How amazingly great is that?
Seriously!?!?! This banner makes me want to have a Mickey Mouse birthday party.

I am also going to flat out copy this topiary. I already bought the black tissue paper too.

Suffice to say - I'm going to have a blast decorating for H's party, and a run to the $1 Store is being planned as we speak for tonight.

I hope you guys have enjoyed this idea-filled post, and I can't wait to show you guys the final result - On the first blog post of October. :) I'm making you guys wait. I'm so sweet, aren't I?
Heather