Follow Us @SewHalfCrazy

1/29/2018

Mason Jar Lattes: Coco-Mocha!

1/29/2018 0 Comments
Hey everyone! Dana here. So Heather and I were talking about one of our shared loves: coffee. *cue floating hearts here* Since we love creating new coffee-based drinks, we've decided to make it a monthly feature! Yay! So expect to see a lot more coffee recipes. :D

I love winter. Not as much as I love fall, but winter does have its own special appeal. For one thing, snow! And you still get to wear boots and chunky sweaters and all that snuggly stuff. Look at these pretty Instagram pictures I got to take the other week!
Don't get too weirded out by the bloody one. It's just pomegranate juice. The photo challenge prompt was "stabby stabby kill kill kill." I think I nailed it. ;) Anyway, much as I love the snow, when it melts, everything gets a bit soggy and grey, so I wanted a warm, happy coffee to contrast the icky atmosphere outside. It helps that I had just done a recipe which required only 2/3 of a can of coconut milk. What to do with the leftovers? I know!

Coco-Mocha

  • 1/2 cup coconut milk (light or full fat, your choice)
  • 1/2 cup coffee
  • 1 packet hot cocoa mix
Shcaff everything into your favorite coffee mug and zap in the microwave for 1 1/2 to 2 minutes, depending on your microwave's power and how hot your coffee starts out (see notes below). Alternatively, you can combine everything in a small saucepan and heat on medium heat until it all comes together, about 10 or 15 minutes.
Honestly, this recipe could not be easier. There are advantages and disadvantages to both methods, which I'll cover in a minute. I am fairly lazy time-thrifty, so I prefer to make a pot of coffee at the beginning of the week and save what I don't drink that first day in a large mason jar for later use. Thus why I have a jar of coffee in my picture.
I also prefer to pour in my hot cocoa mix either before I add any liquid or between liquid additions. I think it just integrates better that way since cocoa mix floats. Have you guys noticed the theme with my background book? It's island-y! I own very few books that take place in tropical locales, but this one is part of one of my favorite series: Septimus Heap.
Right, back to the recipe! So coconut milk has a few quirks that makes it different from working with cow's milk. Firstly, the amount of oil in it. I prefer to use light coconut milk, but even that has a good bit of oil. Or is it fat? What's the difference? Is there one? Anyway, in case you haven't heard, coconuts have a lot of oil in them, and people tend to make a big dang deal about it. I am not the person to address the questions surrounding the health benefits of said oil. Google has lots of different information about that if you're curious.

Moving on, because a single 14-ish oz. can of coconut milk has enough in it for three of this recipe, you want to make sure the oil is pretty evenly distributed between uses and not, say, all in one coffee cup. I mean, you can see from the picture above how much we're dealing with. Before you open the can, you can shake it vigorously--I mean, really vigorously. Shake it like you wish you could do with that insanely irritating person at work. That, or you could just use a spoon or butter knife to break up the solidified layer of oil on top and then stir really good before pouring out your half cup.

Then again, if you're tripling this recipe for the family or brunch guests, the stovetop method might be better. The oil will melt, but it will still float to the top, so be sure to stir before serving. Let's say you're just making the one serving for yourself, though, and you're lazy time-thrifty like me. In that case, the microwave is just plain less work... save for one little thing.


 Have you ever made oatmeal or anything else with starch in the microwave and walked away, only to come back and dangit?! It boiled over, and now you have a mess to clean up. Guh. :/ I feel your pain. So you gotta keep an eye on this baby if you do it in the microwave. Like I said, there are advantages and disadvantages to both methods. Please be careful if you use one of those mugs that get really hot in the microwave too. You don't want to have ensured non-boil-over-age just to accidentally burn yourself and possibly make a mess anyway. Why do they even make coffee cups like that? We have the technology! Use it!

So there you have it. A chocolatey, tropical latte to pour some sunlight into your life. Oh, and one more thing. If you're using an extra-large mug (like my snakey one below) and don't increase the cocoa mix accordingly, it's still very nice, just not as rich. In the same way, if you're using a normal sized coffee mug and don't want quite as sweet a drink, only use half the cocoa pack. It's your coffee! Dress it up the way you want! Give this one a try and let us know what you think in the comments.


Thanks for reading!

1/23/2018

Roman Blinds - A Tale of Two Blinds

1/23/2018 0 Comments

So Dana wanted to title this post "Blinded by the Light," I just wasn't feeling it even if I did laugh out loud at her song rendition.

Roman blinds from mini-blinds are not new. Not by a long shot and there are a plethora of tutorials out there, so I am not going rehash the steps I took to make these blinds. I am going to offer my tips and tricks because I built my two blinds differently.


I didn't mean to build them differently, it just sort of happened, but I'm getting ahead of myself again because I tried to make roman blinds a few years ago, but I used way to heavy of a cotton duck, and the glue just didn't hold. So in my frustration of that failure, I stowed the other 3 mini-blinds away until last week. The blinds in the living room were starting to fall apart, and I was just a little tired of them so it was time to replace them. A trip to Ikea with Mom a few weeks ago netted me some fun tone on tone wood grain curtains. I was going to line my curtains with some muslin, but I ended up not having enough to do both blinds, so I didn't line these babies because I wanted them done now. Unwavering impatience, remember?

So the two blogs I referenced the most for this project were from Reality Daydream and Honestly WTF. From there I kind of just made adjustments as I needed.

My windows are super tall, coming in at 75.5" long and 32.75" wide. My $4 mini-blinds were 31" wide, so when I cut and hemmed the curtains I made sure that the panel would fit snugly inside my window frame. I added 3" to the width of my windows, and 2" to the length of my windows for the cutting measurements. I decided to utilize the finished hem of the curtain panel for one of my end hems, which why I only added the 2" to the length. On the nonfinished end, I did a double 1" hem. The long edges had a .75" double hem. While I was ironing the hems, I pressed the rest of the curtain because it was really badly creased from the packaging.


So the first blind I did, I followed {mostly} the directions from Reality Daydream. I placed the blinds 8" apart and then had a 3.5" section of curtain that hung down below the end of the blind because my blinds were only 72" long and my window is 75.5" tall. I could've added string to the end of my blinds and lengthened them, but I couldn't be bothered, and having the bit hang down look nice. I did try placing stitch to hold the blinds down, but in the end, glued them down using Beacon's Fabri-Tac.  That glue is no joke. Its like superglue for fabric. It smells terrible but works wonderfully.

So after the curtain had dried overnight, which hindsight it didn't really need, I tackled stringing the blinds, the biggest hurdle was trying to figure out the proper orientation of the top rail. Since my curtain panel was a bit longer than my actual blinds, I didn't glue the last inch or so of the rail to the curtains, so that I could slide the rail into the hanging brackets. I also had a bit of a faff with the turning thing for the blinds. None of the tutorials mentioned removing the turning thing for the blinds. They only mention the lift cords, which while helpful was not helpful. So I ended up placing the top rail with the turning thing and the lift cords at the back of the blind.

For the other blind, I attached the blind skeleton as one step. I didn't restring the blinds, and either way was fine. One way was not better than the other, and luckily placing that top rail was faster, because I'd already figured out how the hanging bracket attached to the blind and so forth.

Hanging up the blinds was super easy and would've been without incident if I hadn't found not one, but two nails in the top casing of my windows, so I did have to adjust my brackets a little, but nothing that was swear-worthy.


I did need to go back and glue a bit of the top of the blind to the top rail, because I left a bit more space than I needed for the hanging brackets but better to much space than too little, and that glue did the job really quick.

After I put in the front stop of the bracket, I arranged the curtain edge over the bracket and along the side of my window.

Then it was time to adjust my folds and raise the blinds to where I wanted them. I don't like to have the windows fully blocked, but there is so much window, and there are 4 of these buggers on the front of the house. I just don't like people being able to see so far into my house, not to mention the house faces southwest, so in the afternoon and evening that sun is brutal. I need to have them low enough to where I feel like our privacy isn't invaded, but the sun can still come through. The nice thing about not lining these blinds is that they diffuse the light rather than block it like the other blinds I had up.


I am so happy with how these blinds turned out. I still have the dining room's windows to do, but sometimes it's better to just tackle a project piecemeal.

Oh, I did want to have a moment of truth here. I had to clear out some bins and things from the living room so that it would be picture worthy, so I piled it up into our dining room. After which I had the great idea to show you the difference in brightness between the two sets of blinds. You can also see how my little office area is set up in the living room. These were taken at the same time, and you can see how dark the dining room is compared to the living room now. I love that I don't need to adjust the blinds or turn on a light to see.


Thank so much for stopping by!

Cheers,

1/18/2018

DIY Drop Zone!

1/18/2018 0 Comments

Days before Christmas seems like the best time to undertake a small construction project, doesn't it?

I thought so too! Nevermind that I had 19 people coming to dinner on Christmas Eve. What's a little sawdust, drywall dust, and paint?

This new drop zone had actually been in the plans since Thanksgiving, but I kept getting told that I needed to wait, because there was a couch to get rid of before I could implement my plan. Once that couch was gone though! It took a day or 2 to get the furniture moved and the space for the new drop zone cleared out.

I'm getting ahead of myself, let me tell you how this evolved. I bought an entire set of furniture for the family room after Thanksgiving, which meant that all the furniture that was currently in the family room would need to move downstairs to the basement, which further meant that I needed to get rid of 2 pieces of furniture. Luckily, my dad took the big red couch. The chair still needs to go to the dump. The kids have destroyed it.

So with all of that changing, I started looking at another spot in the house that wasn't working anymore. That spot was the itty bitty coat rack that held their coats and backpacks (sometimes), but more often than not, the chair in the living room would hold the oldest's backpack, the shoes would get thrown somewhere near the sofa table, and the two littles......well their crap just got strewn from the living room towards the kitchen. It drove the hubs and me crazy. So I started coming up with plans for a new and improved drop zone. The original plan was to build lockers over on the wall against the stairs in the living room, but that required work. Not that I'm afraid of work, but it would've had to wait until after the new year, and as my husband so eloquently called my unwavering impatience, it just wasn't gonna happen.

So I started really looking at spots and things we had on hand, and then an idea grew. What if I transformed my little office space into the new drop zone?


My area could move into the living room and we'd just use it as more of a parlor. At least then the room would be seeing regular use!

So now I have the perfect space for the drop zone, but how to implement it? I could still do lockers, but again that meant waiting. No, go. Then I remembered that I built a bench eons ago, and it was going to be homeless when the new furniture came in. Why not use it? It was a custom built bench to go over the laundry baskets we used as toy bins when the boys were small. It'd certainly work for a bench to put on shoes and house shoe baskets.


So I moved it and the memo board over to the new spot. Small Fry approves of this!  He and Baby Girl immediately jumped on the shoe basket idea, and it's been so great not tripping over their shoes. Big Guy took a little longer to come around, actually, we still have to remind him to put his shoes away.

I am loving this change so far, and it's not even done!

Next, I had to make sure I had the lumber. We've got loads of scraps in the garage from various projects, so I was fairly certain that I could find everything I needed, and I was right. I managed to scrounge together all the wood I would need for the wall. I even found the builder's paint!

I called my dad and asked him if he wanted to take a break from painting his basement to help me build some wainscotting for the area. I also told him I'd pay him by providing lunch and coffee. He's cheap, but good labor.

I drew up some cursory pictures, and texted them over to him, explaining what exactly I wanted. We went back and forth a bit over what he would bring over and what I had. In the end, the plans were set! He would come over the next day and build me the wall I wanted. Squeeeee!

Construction went exactly as you figured it would. It was a straightforward plan with nothing to really complicate it, except or the dang outlet. Oh well. The outlet is behind the bench so ending the wood a bit above it worked out well.


The only real hitch came when I was touch up the wall where the hallway color is. My sample can was a different shade completely! So I went back to Lowe's and discovered that they'd changed the name of the paint I had used (it's now called Wild Mushroom), but if I had the code then they could mix it up. Of course, I don't remember the code, that's why I remembered the name! Google search to the rescue! The paint is still a shade darker, but to be fair this paint has been on the wall for ~5 years, so some lightening is to be expected. I will be repainting parts of the hallway at some point so that you can't see all my touch-ups. Home improvement projects never go exactly to plan, do they?


You can see the terrible touch-ups in the picture, but look how nice the whole area looks! I love that the kids are using it and that the only shoes I've tripped over lately, are the hubs. I mean I don't love that, but it's so much better than dodging several pairs on my trek from the front door to the kitchen.


So there's the new drop zone, and I gotta say I love it a little more that it didn't cost me a penny, not including the $13 for the new paint for the walls. I love how simple and easy it came together and how much nicer it is now to walk in our front door and not see piles of kid crap everywhere. Who knew that such a simple change would bring so much peace?

Thank so much stopping by!

Cheers,

12/11/2017

DIY Christmas Wreath

12/11/2017 0 Comments

I meant to write this post a while ago, but man December is flying by! Christmas is two weeks away!

Well maybe you don't have a Christmas wreath up yet, or maybe this wreath will inspire you to make another wreath. That's what happened with me. I saw a fall wreath and I liked it, so I said I want to do something like that for Christmas.

I dismantled {THIS} wreath not too long ago and decided that I would reuse the rope wrapped wreath. I also decided that I would repurpose it as my Christmas wreath. Of course, I had no plan beyond that at the time.

Then while perusing Michael's app on my phone for ideas, I came across this fall wreath and I was smitten.
{Project Page}

So the first order of business was to actually get the supplies, so I took Small Fry out with me to Michael's because I had a 20% off your total purchase coupon and as luck would have it, Christmas picks were the doorbuster deal that day and they were 60% off! Score!

Then we spent the next 45 minutes or so looking at the same picks and decorations until we both agreed on something. I wanted something a little rustic and simple. Small Fry had his own ideas. Somehow we met in the middle.

So once we got home, all of the decorations sat until after Thanksgiving. I was really on the ball that way. So once I finally got around to making the wreath, I was on the phone with my sister and she got to help me lay everything out.

Thank goodness for technology. I'm talking to her on the phone and sending her pictures of the progress for her feedback. Teamwork!

I started with the rope wreath that I'd taken apart and then followed the directions for the wreath on the project page, and the wreath slowly came together.


I think the whole time I said I wasn't sure about the icy branch garland, but in the end, I'm glad Dana talked me into it.


Small Fry insisted on the star, and I wanted the owl. I love them both and it's simplistic and rustic enough for me.


I really love that owl!

Thanks so much for stopping by!


12/08/2017

Pattern Review - Simplicity 8448

12/08/2017 3 Comments

When we got the invitation to the hubs' Christmas party, I knew exactly what I wanted to wear. I'd seen this pattern while looking for Gold Cup patterns, and figured it was time that I made myself another sheath dress. 

I generally dislike sheath dresses, but because I always have to alter them since I am not a one-size-fits-all girl. This pattern was no different and definitely the most difficult dress I have ever made. The sheer number of darts in this pattern was enough to make me groan, but then there was all the rest of it. Once you got past the bust instructions the dress went together just like any other dress, but that bust section. I'm still recovering from it. 

It's not even that the bust is inherently hard, but with the straps crossing over like they do, it just means you're finagling a straight and flat piece of fabric around an area that is decidedly not straight or flat. I think there were 8 darts in the bust area alone. 

The pattern's guide sheet does a good job of explaining everything and showing you how to construct it all, which is a bonus. Like I said above, once you get past the bust construction the dress goes together like any other. The pattern calls for a standard zipper, I decided to use an invisible zipper because I couldn't find a standard zipper that matched my fabric. Like the model on the pattern, I went with a magenta dupioni although mine was a polyester dupioni. Thank goodness for coupons at Jo-Ann's. 

Before I could even cut out the dress, I had to completely remake three of the pattern pieces. Thank goodness for reference lines. And French curves. Thank you really to all of my rulers - without you this dress never would have fit. Remaking the pattern pieces was fairly straightforward if you take into account that only one piece had all of the reference lines marked. So simple. It wasn't. I'm lying. I'm so glad I took a class on making your own patterns. If I didn't have that knowledge then I'd have been lost. 

Fitting the dress required help and that came in the form of my mom coming over and helping me place the straps. This was, of course, after I'd assembled most of the dress. I wish there'd been a good point during the construction of the front to do a fitting, but there just wasn't. By the time you get to the point where you're attaching the back, the dress is almost done. By the time we actually fitted the dress, it looked like I'd been poured into it. You could see everything. I was already wearing some body armor (read form sculpting undergarments), and we decided that taking out one set of darts in the back would help the overall fit of the dress. Mom was right on that call, and taking out the smaller set of darts in the back helped the dress loosen up a bit. She also got the straps placed and only stabbed me once. Yay Mom! 

The only change I'd make to this pattern is making it a fully lined dress. It would require making 3 new pattern pieces to fit below the facings and you would have to remember to add seam allowances to the bottom of the facings, but I think the lay of the dress over your person would be dramatically improved as the dress only allows for a 1-1/2" of ease.  

This dress is not for the faint of heart, and really should only be tackled by experienced sewers. 


So I paired this dress with my favorite Jessica Simpson pumps. They're several years old, but oh so fun. I also nabbed some clearance finds at Charming Charlie. The earrings and the headband are from Charlie's. The headband was originally a choker, but it matched my stuff perfectly so I removed the clasp and chain from the back, then used some small black hair ties and whipped myself up a headband. I've had the brooch for some time now, and forget where it's from, but I think the whole outfit came together wonderfully, and I especially love my new lipstick. Rebel Pink by Maybelline. 

I really need to get better at taking full-length pictures of myself, but I really can't end the post without sharing this fun goof. Please pay no mind to the stacks of laundry in my room. I promise I folded them all and put them away on Monday. 

Thanks so much for stopping by! 


11/13/2017

The Long and Short of Run the Parks 10k!

11/13/2017 0 Comments

Well, my official 2017 race season has come to an end, and it was perfect if I do say so myself.

Sunday was Run the Parks 10k put on by PR Racing, and as expected it was everything I wanted it to be. It was rainy (drizzly?) and cool, but perfect.

There was an 80-minute time limit, which I was nervous about because my foot is still acting up, but getting better, and really my times haven't been fast.

The Prince William Half was run at a 12:36 pace, which I was and am still quite pleased with, but that was too slow for an 80-minute time limit for the 10K.

The last couple of runs I've had have been ~12:20 m:m, which is also not terrible, but that didn't stop me from fretting.

So the hubs and the littles decided to join me at the race, and I was a little nervous because of the weather and the kids, but it all turned out great. They visited some monuments while I was running, but they did see me off!

Apparently, I was concentrating on something at the start of the race, because that is some fierce resting bitch face.


The race was gorgeous like always, the rain added a nice bit of solemnity to the course, and the leaves were in full color. You could barely see across the river, but you could hear the planes taking off from Reagan. It was peaceful, and there is something to be said to be running at the back of the pack. It's not crowded. 

The leader of the race passed me about a mile and a half in. He was hauling, and I cheered all of the leaders on! 

My foot was doing ok, not great, but not bad. I was just enjoying being out on Haines' Point. I tried calling my sister, but she was sleeping. *rolls eyes* 

I listened to my music until the halfway point. I got water, and then made the turn to head on back. My foot did not like the turn. Not. At. All. 

So then I called Dana again and this time woke her up. She could chat with me for the last half of the race. She and I nattered on about this and that, and then I kept hearing water running or lapping, and I couldn't figure out where it was coming from. Turns out the Potomac was running over the shore of the point. I mention this to Dae, and she said that she had heard the water too, which tells you how loud it was, or how good my mic is. The rest of the race was low key, peaceful, and beautiful. The perfect fall run. 

Then I got to about a mile from the finish and there was the photographer so how could I not pose? The photographer even asked if that was the pose I wanted, and I very enthusiastically said I did! 


Dana stayed on the line until I crossed the finish line. She cheered me on as I started increasing my speed towards the end. My crew was just on the other side of the finish line, and Dana cheering in my ear. There really wasn't a better finish to be had. I picked up the pace and finished nice and strong. My official finish time was 1:16:39, right on pace for where I've been running. 

During the race, the hubs took the littles around to the various monuments, and they got to take in some of the sights. I was not the least bit surprised when my jacket was returned to me with wet sleeves. 


As usual, I highly recommend this race not only for its scenery, but it's well run and on the smaller side. 

Thanks so much for reading!

11/08/2017

Derby Worthy Cowboy Hat

11/08/2017 1 Comments

When the County Fair theme was decided on for Gold Cup, I knew that I wanted to make a Derby-inspired cowboy hat.

The first step was to find a cowboy hat that wasn't too expensive, in case I screwed it up. Amazon to the rescue! I found this hat {HERE} and it was perfect.
So after ordering the hat, it was time to take advantage of the massive sale at Michael's. All of their fall foliage was 70% off! Sweet! Now, what to do?

I turned to the internet and did some searches, but a lot of the derby hat styles are similar. I wanted something a little fun, but still nice looking. Etsy ended up being a great source of inspiration.

This hat, in particular, I really loved.
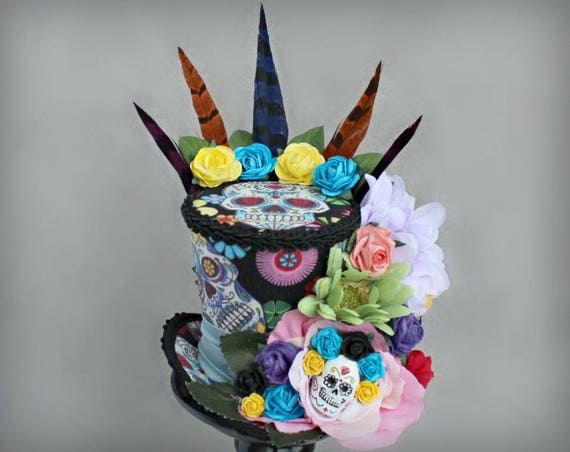
Day of the Dead Mini Top Hat from Little Miss Hattitude
 I love how colorful and fun this hat is, and so with this inspiration knocking around my head, I bought a bunch of stuff from Michael's. I hoped that I would throw everything I'd bought at it and something would stick.

I ended up spending about ~$40 on the supplies for the hat, and thankfully everything I bought made the cut. I had one golden fern bunch, a variegated green daisy bunch, a large purple peony bunch, a feather pick, 2 bundles of pretty teal/green feathers, and a whole bunch of hope. I managed to find the balsa wood horseshoes at Jo-Ann's in Culpeper.

I separated all of the fern leaves and started at the back of my hat. I wanted to great the look of a plume of feathers, but with ferns, so I created a waterfall effect of ferns by placing the shortest ferns at the base of the back of the hat, right against the brim and working towards the crown of the hat, using the longest ferns at the very top. I shaped each of the leaves to gently curve down. There may have been some glue gun burns and I may have glued one or two of my fingers to my hat.

So after getting my waterfall of ferns attached it was time to start with the purple peonies. I placed a row of peonies along the brim of the hat, forming a U-shape around the sides and back of the hat, and then I added a few more peonies to the left side of the hat, to create a nice asymmetrical look. I added a few up the crown of the hat on this side for more interest. Then I went back and filled in with the daisies. I created a small crown of daisies at the back of the crown, also hiding the base of the ferns a bit, and filling in where I thought there were holes. The feathers were next. I placed the pick of feathers towards the front of the hat to accent where the horseshoes were going to go, and then I gently glued each of the individual feathers into the fern waterfall, adding color, texture, and interest.

The final step of the hat was to add the horseshoes after my eldest and I had fun coloring them with some metallic wax, I glued them a little off kilter to each other. I was a little inspired by the Mad Hatter in Alice in Wonderland.

So that's how my hat came to be, and this little dear won best "Race-Inspired Hat" in the hat contest! Yay!


11/06/2017

Pattern Review - Butterick 6380

11/06/2017 1 Comments
A post shared by Northern Virginia Magazine (@northernvirginiamag) on

Hello all! Welcome to another pattern review. We have officially entered the season of sewing. Between Gold Cup, Christmas, and gifts there will be some sewing happening. So today I'm going to be reviewing another Pattern by Gertie.


Gold Cup was at the end of October, and I needed an outfit that would be versatile enough for the ever-changing weather. Our crew decided on doing a County Fair theme for our tailgate, and I instantly knew what I wanted to do. With October's mercurial weather, I knew I needed a dress that would pair well with a jean jacket, cowboy boots, and hat. I also knew that a 50's inspired frock would be just the ticket. Oh, and what is a county fair without eyelet? I found a gorgeous kelly green with a modern circle pattern at Jo-Ann's. Thank you 50% off coupons.

I actually had to decide between two of Gertie's patterns, but this one won out because of the sleeves and the fact that it was already designed to be fully lined.

Before Alterations
The dress is fairly straightforward, although the neckline did prove to be a bit of a pain because of the point,  but nothing I hadn't dealt with before. I did alter how the zipper was put in because I prefer invisible zippers as opposed to traditional zippers, but installing the invisible zipper was easy because I attached the zipper before sewing up the back seam. Easy peasy. I also went a step further, in order to avoid hand stitching, which we all know I hate, by treating the zipper as a trim and stitching inside the seam allowance to attach and finish the lining opening in the back. The technique produces a nicely finished interior with no exposed seam allowances and no hand stitching! While this technique is not difficult, if you mess it up then it would be noticeable.

Final Outfit
When I first got the dress finished enough to try on, I was less than impressed with how much room I had in the waist. I did make the pattern according to my measurements but could've gone a size smaller in the waist. I ended up having to take in 3" from the underarm seam to the waist seam. My French curve helped greatly with this. I positioned the curve a finger's width below the underarm seam and then lined it up with the mark for how deep I needed to take it in, and then back to the waist seam. I could've gone 4" taken in, but 3" was that much more comfortable. 4" would've meant not overeating and drinking and no slouching! Not that I did slouch because that hurts my back.

So after I got all of my alterations done, I was more than impressed with my creation, not to mention it looked pretty fabulous with my boots and jacket. Thank you Target! The boots are several years old and the jacket was on clearance in the days leading up to Gold Cup.
I would say this pattern would be ideal for an intermediate sewer, maybe someone who has mastered the basics of sewing and is looking for something just a bit more difficult. The pattern sews up very quickly, and the guide sheet gives very good direction. Make sure you get all of the pattern markings transferred though. There are a lot!

I paired my outfit with navy blue jewelry from Charming Charlie's, who was running a BOGO sale on their clearance items. Score again!

Then there was the hat. The hat is going to get its own post. Look for it in the next few days!