Follow Us @SewHalfCrazy

6/30/2017

DIY Patriotic Shirts

6/30/2017 0 Comments
Can you believe that Independence Day is next week?!?! What?!?!

Where the heck has the year gone?

Luckily, I was on the ball this year, and made our patriotic shirts early enough to actually wear on the 4th. Go me!

I did some searching on the googles, and found some patriotic phrases I liked for the fam and then set about drawing out the images for the shirts.

I created rough drafts and then final drafts on paper, and then used them as guides for the shirts. I lettered the shirts with a combination of sharpies and fabric paint. Each person got a personalized shirt to fit their interests or personalities.

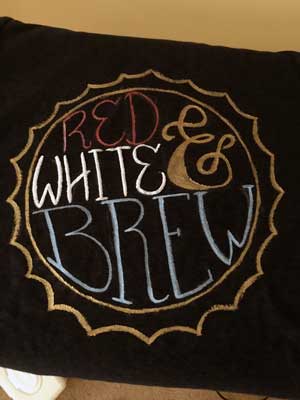
I must say I'm pretty proud of each of these creations, although the hubs shirt was a pain. Apparently his shirt was cut much smaller than the advertised size, and so needed a bit more customization, but I wasn't about to redo my artwork, so I cut out around my original artwork, staying about 1/4" away from the painted edge, and then stitched it down to a shirt that was in fact the same size as was advertised. So his shirt officially takes the cake as the most involved shirt.

My shirt was a close second, because I wanted to create a watercolor affect for the flag, and that took a bit of planning and prayer, but luckily it turned out well on the first try, from there it was just a matter of lettering everything with my trusty black sharpie.


The kids shirts were all fairly straightforward, the only one that had a bit more done to it was Baby Girl's because I sewed some star rhinestones to it to add a bit more sparkle. A girl can never have too much sparkle.

Thank so much for stopping by!

6/21/2017

Mason Jar Lattes - Gingered Dark Chocolate Mocha

6/21/2017 0 Comments

Dana here.  Time for another coffee recipe!  Because who doesn't like choices?  My gingered dark chocolate mocha is one of my all time favorites.  Mmmmm, it's dark and complicated and a little spicy...wait, am I talking about coffee or a fictional romantic interest?  Well, I did first feature this recipe on my own blog when I reviewed Hell's Teeth by James Fahy, and that description definitely fits a character in the book called Alessandro.  Spoiler alert: he's a vampire and he's as delicious as this drink. ðŸ˜ˆ

Gingered Dark Chocolate Syrup
1/4 cup cocoa powder
1/2 cup sugar
1/2 cup water
1/8 of a teaspoon salt
1/2 ounce ginger root, grated or sliced very thinly
1/2 teaspoon vanilla extract

Drop all the ingredients except the vanilla extract into a small saucepot.  Stir occasionally and cook over medium heat until it starts to bubble.  This shouldn't take more than about five or ten minutes.  Make sure all the sugar is dissolved and then remove from the heat.  Let sit for fifteen to twenty minutes to allow the flavor of the ginger to really infuse into the syrup.  Then add vanilla extract and stir to combine.  You can strain the mixture now if you want, but I leave my ginger bits in so that they can continue to give off flavor.  You'll just have to either avoid or deal with ginger bits down the road if you do this.  You can then use the syrup to flavor your coffee, make hot chocolate, drizzle over ice cream, eat it off the spoon...hey, no judgement.  What you do with your syrup is your business.  And it can be stored in a glass jar in the fridge for a couple of weeks.  Enjoy!


I only used half an ounce of ginger, which creates a syrup that has a undertone of gingery spiciness when I add just a tablespoon of it to my morning cuppa.  If you weren't paying attention, you might not notice it, so use more if you want a stronger flavor.

Also, I haven't tried this with ginger powder, so I'm afraid I don't know exactly how that conversion works.  A quick Google search, however, recommends about 1/2 teaspoon of ground ginger to 1 tablespoon of fresh.  I personally don't find that ground ginger has quite the same sharpness as fresh, but ground is certainly more convenient.  Give it a try and see what you think.


Why did I tell you to add the vanilla at the end?  In short, because too much heat will kill your vanilla flavor.  A lot of recipes will have you wait until the last possible moment to add extracts to your dish, batter, whatever because extracts are rather more delicate than other flavor-giving ingredients.  So don't get ahead of yourself when assembling your syrup.  As Alton Brown would say, your patience will be rewarded.


Mmmmm, look at that chocolatey goodness.  Don't mind the Dalek, he just wants his fix.  Like I said, I only do a tablespoon, but you do up your mocha however you want.  Oh, and for instructions on how to steam your milk in the microwave and the general latte recipe, you can find the original post here.

You can also find previous Mason Jar Latte recipes here:

So delicious!  If you decide to give this one a go, let us know what you think of it down in the comments section.  Enjoy and thanks for reading!

6/19/2017

The Monday Report - 1 week down, 16 to go

6/19/2017 0 Comments

What!?!? There's a Monday Report? There hasn't been one of these in ages, and part of that is because I seem to have misplaced my discipline. If my discipline were near the snacks, I'd be certain to find it, but it's not there. I've checked. Many times. 

So last Monday started a 16 week half training program that will hopefully keep my butt in gear and running. I even put it in my bujo, because that seems to help with my motivation. I like checking things off and coloring. I'm really not much older than my children. 

I adjusted the plan to my schedule, and moved my long runs to Friday so that I wouldn't have to juggle work schedules over the weekend. The first Friday went great. My oldest even gave me a little bit of flak over the length of it. I am going to have to share this conversation, because it's so telling about how my running has impacted my family. 
Big Guy - "Mom, you need to go running."
"I know. Do you see that I'm dressed. I'm going as soon as I wolf down this eggo PBJ."
"Mom. Go. For. Your. Run."
"I am. Thank you for being such a good bully. I'm going up and down Carver by the way."
"How long is your run today?"
"4 miles."
"Really? That's your long run? That'll take you what an hour?"
"I know it's not a 'long' run, but it's what the plan calls for, and yes, about an hour with cool down."
"Go run. Love you."
These types of conversations are fairly common with my family. They know running is an outlet for me, and that it's good for me, and I'm so thankful that I have their support, even when I may not want it. 

So the first week called for 13 miles with 1 day of cross training. No, cross training got done, but 10 miles of running with a 1.5 mile hike on Sunday got done. Overall, I felt pretty good on the runs. Summer has already descended on us, so they were hot and slowish runs, but I got out there and did them. The hike was a lot of fun, because I took out the Big Guy and Baby Girl, and we walked the Stone Bridge Loop at Manassas Battlefield. For it being in the low 90's, my kids were awesome, and really didn't complain. I also didn't have to carry the small one, and her only complaint was when rocks made it into her shoes. 

I am trying to not focus on the times of my runs, and how I feel, and how my body is reacting. The first takeaway from this week is that I need to get back into a better sleep schedule! Summer is not a reason to let my sleep habits suffer. If only Baby Girl would get that memo. 

Here's to a great 2nd week, and thanks for stopping by!

6/12/2017

Peacocks and Flamingos

6/12/2017 0 Comments
You know how there are just some phrases that stick with you? I saw this quote while surfing the interwebs for inspirational quotes for girls, and it really struck a note. Not because it's true, because it's totally true, but it applies to everyone.

So the inspiration was this image. I'm sorry that I don't have the proper web credit, but it was a google image search. I could totally do the text, but I'm no good at watercolors, even though I love them. So how could I achieve the same effect as this gorgeous inspiration piece?

Go tribal. I knew that there were tons of examples of tribal peacocks so I found one that would work and then used that as my guide, but what about the flamingo? I couldn't find any tribal flamingos that I liked or thought that I could draw, so I ended up drawing that flamingo from scratch.

I think it worked out pretty well, and after many, many, many sketches I was finally to a place where I liked my pencil drawing.

Then I sat on it. I didn't do anything with the sketch for a few days. Then I decided that Baby Girl needed a new shirt, but I also wanted a hard copy of my art. So I decided that I'd work on the hard copy of the art first. The hard copy still isn't done to my liking. Moving on.

Next was Baby Girl's  new shirt. Target has some really adorable plain white tee's for the kids right now. The sleeves are cuffed and it's got a cute silhouette. I like this shirt so much that I bought another shirt for her 4th of July shirt.

So I started with my sharpies. Love my sharpies! I gently outlined all the text and the main bits of the birds. I used a light hand so that the sharpie didn't snag on the material of the shirt. I then went back and added thicker strokes to the first lines I'd made. I was definitely following the "You can always add more" rule.

So after the sharpie was on and I was happy with it, I heat set it with the iron. I turned my iron up to the wool setting and then using a press cloth ran over the drawing for about 30ish seconds.

Next I prepped my paint. I wanted to water down my paints to create a watercolor effect with my fabric paint. I added a bit of water to each color until it looked right. I then gently went over each line of the birds, adding color as I saw fit. I finished up the birds with some hits of glitter or pearl paint. The bits of glitter are just the thing to make each bird stand out.

You can see that how the color spread on the dry shirt, creating this kind of abstract watercolor effect. I really like how it all came together, and Baby Girl was very happy with her new shirt!

Thanks so much for stopping by!

6/09/2017

Gilded French Provincial Dressers

6/09/2017 0 Comments
You know how you have those projects that you will get to someday? And you just make do with what you have until someday arrives? I am so excited to say that I've knocked another project off my 'someday' list!

Man, it feels so good to say that. These dressers have been on the someday list for 7 years. 7 YEARS! Since I first decorated our room, I've known that I wanted to paint or change our very traditional and ugly dressers.

Now there's nothing wrong with their styling. We found these dressers in a consignment shop up in Jersey years ago, and it was love at first sight. I loved their curves and details, but I have always hated their color. Ugh. it was a tired and old looking pecan-ish color.

So when the hubs was out of town last week, it was time to make them pretty. I had a great plan. A grand plan. I had an incomplete plan, and it became a problem when I got the bodies of the dressers painted and then didn't know how to finish.

If y'all follow me on Instagram, then you maybe remember seeing this:
Yep, I got almost done, and then didn't know where to go from there. Luckily Pinterest was there to save the day. I spent an hour or so combing through their treasure troves, and then I finally knew what I was going to do.

Let  me back up a bit, because, as usual, I'm getting ahead of myself. I painted the bodies of the dressers in Arctic White by Valspar, and I used my fave DIY Chalk paint recipe {HERE}. I actually bought the quart of white back when we painted our room in January. The one part of my plan was that I knew the dressers were going to go white. With our room being such a strong, dark blue, I wanted the dressers to stand out, and what better way of making that happen than with a stark contrast.

So I haven't been quite honest, I did have a plan, but I was afraid it would look awful. Scouring pinterest really just reassured me that my plan might look good good. I'm going to veer a little off course here, because the following story just needs to be shared.

I head to Target, because I know they have gold paint. Target sells Devine Paint by Valspar, and they have some lovely and trendy colors. The gold I picked up was $20 for the quart, and called karat. Its an old looking gold, that looked to be just about the shade I'd used in my room for some of the other accents. I wasn't thrilled about the price tag, but the color was right, and if I found a better deal somewhere else then I could always return it.

Next on my trip was Lowe's, and I figure that while I'm there I'll ask about their gold paint. So after I pick up some kilz primer, sand paper, and chip brushes, I head over to the paint counter to ask about gold paint. The gent behind the counter is nice and asks what I'm doing. I tell him I'm painting the drawer fronts on my dressers and I'd like them to have a gilded look. He asks if I have gold paint already. I say that I do, but I wanted to check out what they have. The gent looks me dead in the eye and says that the gold paint that Valspar makes is only sold by the gallon and it's quite expensive, so that if I already have my paint and I'm happy with it, then I should stick with it. Well alrighty then. I thank the gent for his honesty and input and then continue on to the checkouts. I never did find out how much that other paint was.

So I sand and prime the drawer fronts. Then I roll on the first coat of the gold paint. I've made a mistake. I know I've made a mistake. This is not going to look like I want it to at all. I will not be deterred so easily though so at 11:30 pm on Friday, I decide to brush on the next coat of gold paint, and it is everything I hoped it be and more!

The paint is so thick. Almost like it's got glue in it, and it doesn't spread well. I'm putting on a heavier coat than I normally would simply because of how thick this paint is, but OHMIGOSH it looks fabulous. I don't know if its just the fact that its the 2nd coat, or that it's the fact that I'm brushing it on. I finish the 2nd coat on all the drawer fronts about 12:30 am, and I can't wait to wake up and see the morning sun hit my gloriously beautiful drawers.

I was not disappointed. This was the view of my dresser when I woke up. I wasn't done, with them, but the finish line was in sight. I still needed to paint all of the handles. So many handles between our two dressers, and I needed to clean up the top row of drawers on my dresser. Stupid faux double drawers. Do you know how hard it is to paint a clean line with chalk paint and a chip brush!? It's difficult.

I enlisted the kids to help me with the handles. They helped me carry them all down and arrange them on the drop cloth. Then they very happily told me when I missed a spot. So helpful. After getting all 24 handles painted in a similar, if a little lighter color gold, these beauties were done!


 I am so happy with how this project turned out. The 7 years it took me to decide on what to do with them was almost totally worth it. Completing this project also bring my master bedroom one step closer to being perfect!

Thanks so much for stopping by!