Follow Us @SewHalfCrazy

5/27/2010

The Completion of Week 1!

5/27/2010 1 Comments
I haven't posted in a couple days - so here's a quick update on this week so far and completing my first week (7 days) doing P90:

Tues and Weds were days 6 and 7 for me. I'm still feeling really good about the workouts and have noticed that I'm sleeping much better at night. It's still hard getting out of bed when the alarm first goes off, but I'm noticing that the "wake up" process goes more quickly for me now. Instead of it taking an hour to feel like I'm really awake and functioning, it only takes about 10-15 mins. That is a huge difference!

I'm still really looking forward to the workouts everyday. I did notice that after doing BOTH cardio and sculpt on Monday, it was really hard to get through cardio on Tuesday - I felt a bit sluggish after the first 10 or 15 minutes. We'll see if I feel the same way tonight. I'm hoping it'll be a bit easier since I had that cardio "break" yesterday.

I noticed a really big difference doing sculpt last night - I felt like I was barely working at all. For a little while there I was getting a little paranoid that I wasn't burning the calories I normally would, pretty much the only thing that "proved" to me that my body was getting a work-out was the sweat pouring down my face. I really wasn't expecting it to seem so "easy", but it was really exciting to feel those kind of results in just one week!

On a different note - I have to say I'm a little disappointed because I had this entirely fantastical and unrealistic expectation that I would have lost at least some fraction of inches and/or at least a pound or two after this first week - which I have not. But, having been an off-and-on gym rat for quite some time, I know that just because the scale and the measuring tape aren't reflecting results yet doesn't mean results aren't happening! I also know that with all the resistance training and muscle conditioning I'll probably GAIN weight before I lose it -- muscle weighs more than fat, as we all know, and you build muscle a lot quicker than you burn fat. It's as simple as that.

Some results I have seen so far: My arms are much more tone, and I've lost a good deal of fat from them already - which is perfect for this hot weather we've been having and the tank-tops coming back out of the closet. My legs are toning up nicely too, though the evil cellulite hasn't started to disappear yet - especially getting some good definition in my calves, which I've never been able to accomplish before. And then, of course, the higher energy and the better sleep/wake-up time I mentioned above. I haven't noticed much a difference in my belly region - which is what I want to get rid of the most. But I know that is usually the last thing to go, so I'm trying not to focus on that so much right now.

I'm looking forward to these next couple weeks and really hoping I have some visible results by the 30 day mark seeing as swimming pool season is upon us!

Being a Baseball Widow

5/27/2010 8 Comments
I know some of you gals will sympathize with me about being a baseball widow, but I'm not just a baseball widow....I'm a red sox widow. *sigh* I know that Papi has hit 8 home runs recently despite early-in-the-season talk that he was in a slump. I know that Jacoby Ellsbury just came off the injured list after breaking some ribs. I don't know these things because I want to know them. I know them because my husband told me, because like any good wife I have learned enough about his interest to be able to have a conversation with him. I'm sure you all can empathize.


Harrison was born in October of last year. I got told that I could not give birth on a day that there was a game if they made it to the post-season. He was joking {I think}.

Its a little early for father's day, but I have decided that I'm going to do a baseball-themed father's day for Steve. This is the first project of this theme.  Don't ya'll find it a little easier to do gifts for someone if you have a theme? I do. :)

So it's another freezer paper creation, and it was TIME consuming, but worth it. :)


 Personally I think the chair wears the shirt better than the couch. :) I can't wait to get all of his gifts done. He's seen this one already, but he still has to wait. :) 

Here are some links to PNG images I made for you guys in case you all have a baseball fanatic or a Red Sox fanatic in your household. These would look lovely as a transfer instead of being painted on {and a lot simpler}. Just remember to mirror the image, because I didn't do that. Sorry. :) You could copy the definition and change baseball to any sport or anything else you might be fanatic about. :)

Photobucket

Photobucket

I hope you guys have a wonderful day!

5/26/2010

Slackerfying It.....

5/26/2010 0 Comments
Steve and I have been bad.....very, very bad. we have not worked out since last Friday. We were supposed to have our day of rest on Sunday, but with all the goings-on on Saturday we didn't get a chance to work out. Then Monday, I was exhausted. Tuesday....well Tuesday didn't happen either because we got a late start to bedtimes and it was 10 before we were both downstairs and it just  didn't happen. Today we will workout and it'll be a double-load. Fun, but its for a cause.

I just wanted to let you all know what's been up.

A Super Mario Bros. Art Project!

5/26/2010 5 Comments
So I've been hankering to do this project for a while now, but because I wanted to get the bedroom done...I put it off, until now!

Subway art is super easy and chic right now, and I wanted to make some, but for who? Devlin! The boy loves the Super Mario Bros.! So I made him some art using all of the characters and then some from Super Mario Bros. I asked him which ones he wanted included and then went about laying it all out in Photoshop.


Stuff you'll need:


11x14 Canvas
Spray Paint
Spray Adhesive
Craft Knife
Image
Patience
Some Time

What you'll do:

After I got the image the way I wanted, I printed it out on 11x17 paper. I made sure to check the box that said fit document to paper. I sprayed the back of the paper with the adhesive and then centered it on the canvas.

Here's the time consuming part. Carefully cut out around each letter and remove the center and the outside paper. You will be leaving the paper letters on the canvas to act as your stencil. I had thought about using my cutter to do this, but I figured this might be simpler. I have no idea if I'm right not. I sat down and watched the Grey's Anatomy finale and then some.

After you've removed all the excess paper, make sure your letters are pressed down all the way. Then take your canvas outside and spray paint her. Some of my letters lifted while I was  painting her, but I still think she looks good! Let dry for a few. I think I waited a 1/2 hour, because it was muggy here.

gently remove your letters and admire your work, then hang!
There's the pile of letters, and my ever-faithful cup of coffee. :) 

Pretty simple! Do you see where I forgot to remove part of a letter? Oh well....its custom! :)

I have included two  PDF's for ya'll to make your own art. One is outlined so that you can follow what I did above and the other is just in block form.

For the block one you could get some transfer medium gel (omni transfer gel medium is sold at Michael's) but you'll need to print it out on a laser printer or something that uses heat and toner, not an inkjet! Paint the medium over the entire page. Paint horizontally first and let dry, then paint vertically and let dry, and lastly paint diagonally and then let that dry. When it is fully dry, place the entire piece into water and let it soak for about 20 minutes. Gently rub  the paper off the back. The medium will have adhered to the toner leaving only your image behind. Paint your canvas a light or bright color or leave it white, after it has dried center your gel image over the canvas and use more medium to use as glue. You can trim the image if need be with scissors. Let dry, then hang and enjoy!

I  hope you guys enjoyed this post, because I had  a lot of fun making it. I will be doing another subway art piece for Dev in the future but I think I'm going to change it up a bit. :)
Outlined Super Mario Bros. Art
Block Super Mario Bros. Art

*note - some of the outlined words may be filled in with red for some reason, but when you download it, it will just be black and white....no red filling. :)

Linking up to:
Photobucket

Have a wonderful day!

5/25/2010

Days 4 and 5

5/25/2010 0 Comments
So yesterday I did Days 4 AND 5 since I couldn't find the time to do my cardio Saturday morning. It was a little insane, I have to admit.

I did cardio/abs around 6pm - took 15 mins to drink some water and cool down and then went right into sculpt with Mike at 7pm. Man, I felt PUMPED afterward! The endorphines were high and so was the heart rate! I burned an estimated 950 calories during the workout - wiping out almost my entire caloric intake for the day. Insanity. I was starving after a few minutes, and may have not made the best food decision in ordering chinese... but damn was it good. And I got kung pao shrimp - which is full of celery, water chestnuts and peanuts plus the high protein shrimp - so certainly not the WORST thing I could have ordered.

I was feeling pretty awesome and had some good energy going until about 9:30pm when I started to crash a bit. A wave of exhaustion hit me head on. I headed up to bed for some tv before sleep.. and did I ever sleep! I slept HARD. I don't think I've slept so deep in months. It was great.

Looking forward to another round of cardio tonight!

Saturday Shenanigans!

5/25/2010 7 Comments
So Saturday was uber-busy for us, but I want to tell you about it anyway. As most of bloggy-land knows Saturday was the day of the Luckett's Spring Fair and I was going. Come hell or high water. Despite the fact that at 1 o'clock Dev had a game and at 4 o'clock we were having a pot-luck of finger foods with about 22 of our friends and family. I figured that if Mom and I got out of the house by 8 (Lucketts is about 45 minutes from me) then we'd have plenty of time to get there, browse and then be home by noon, because Dev's game was in Manassas and it'd take me at least 20 minutes to get there.

Yea, none of that plan happened. I didn't wake up early, because H decided that he'd sleep till 7, but we still made it out of the house by 9....I still figured we could have some fun. So up Rt. 15 we went. We got sidetracked though. By a pink and black polka-dotted silo and a handwritten poster board sign that said antiques. I stopped. I couldn't help myself. :) We never did  make it to the Spring Fair at Luckett's. We drove by saw the crowd and said....ehhhh, not gonna happen. We got sidetracked on the way home by Michael's and Dev missed his game, because I didn't get home until 1. Ooooops. :)

Here's the take I ended up with:


All told I spent about $70 on this. The chair had no price tag, but the nice lady said $20 and I said sold. We bartered a bit on the table's price. She originally wanted $60, I said $45 and she said Ok. The window was supposed to be $14, I would have given her $10 if she hadn't said $8 first. :) The nice thing about this lady and her shop was that they offered free repainting of any of their pieces. On-site painting. She had brought her spray gun and paints. What a lady! I am looking forward to going back to see her and the pink silo, because the main shop of this little venue had GOR.GE.OUS chandeliers inside and I'm thinking my dining room needs  some sparkle.

The window didn't last an hour in my house before I had her spiffed up with some vinyl and sittin' pretty in my laundry room. I know its not centered, but meh....you can't tell and if you can, then back up :)


 The chair immediately got put to use during the party, as did the table. The table may get a coat of black and then distressed, but I'm not certain yet. I had been thinking about a coat of olive, but I'm not sure I could handle any color furniture other than black in my family room. I just had lightening strike....about a red undercoat! ;-) I'm also thinking of a gold and black distressed finish on the chair. What do ya'll think?

I also wanted to let you guys know that I tried another variation on the cake balls from Bakerella. I made up some spice cake with chocolate frosting and then dipped in dark chocolate and they were de.lish! Although, I need to reread her directions on how to get them to be cake pops instead of cake balls, because my cake did not like staying on the lollipop sticks. Sadness, but they were still yummy!
Such a delicious, gooey mess! 
They looked so pretty in the fridge! 
There were 5 left of the 50 that I had set out. I think Dev ate about 20 of them. Just kidding, I hope! 

I hope all of you had as much fun on Saturday as I did. Enjoy your day!

5/24/2010

Pictures as promised!

5/24/2010 0 Comments


Here are my "before" pictures -- it took forever to get Mike to actually take my "front-ways" one because he got all distracted the other night when I tried to get him to do it... we got the side and the back and then... the xbox was calling his name I guess. *eye roll* Hence the two different sports bras!

You can get a bit of a peak at my new haircut too... and some lovely cardio-induced sweat stains on my Hokie orange bra... yum! ;) Also, I feel like the "front-ways" pic shows off the bizarre phenomenon that I like to call my "flabs" -- I have wonderful abdominal definition, but unfortunately the muscle causing it is hidden under a bunch of FAT! But not for too much longer!!!

Begin Again

5/24/2010 0 Comments
My plans for working out on Saturday completely fell through -- having to take care of a child can do that to your workout routine sometimes. And then, of course, we headed out to Steve and Heather's dinner party. I pigged out a little bit the whole weekend - but still didn't break my 2'000 calorie limit Saturday or Sunday even with all the snacking.

Tonight Mike will start P90 again with me - probably sans push-ups for a while, as his shoulder is still hurting him.

Looking forward to it! Just gotta make it through the work day... ugh...

Sunday Dinner with Less!

5/24/2010 0 Comments
So it was my weekend again for the family dinner, and I had planned on having Peach Pie, Apple-Stuffed Chicken, Cabbage and Potatoes of some sort. I go to pull out the makings for the chicken and guess what?!?! I have no chicken stuffing, and its pouring. Cats.And.Dogs.Raining. Yea....there's not enough money in the world that would get me to go out in that mess. So off to the cook book I go.

I find a recipe for Glazed Cornish Hens, and I have everything for that, except the Cornish Hens, but I have a chicken, so I'll adapt it. :) I then continue on with my original plan. So here's the goods!
I only cooked my bird for 2-1/2 hours.
Parts of it had to be nuked,
because I  had a time limit. We needed to be
done by Lost's Finale. :) 


Glazed Chicken


active time: 30ish minutes/ total time: 3 hours 30 minutes / serves: 6 - 8


Ingredients:
6-7 pound roaster chicken
1 medium tart apple, quartered
1 medium onion, quartered
1/4 cup butter, melted
1/4 cup soy sauce

Steps:

  1. Lightly stuff chicken with onion and apple. Place in shallow roasting pan. 
  2. Combine butter and soy sauce and brush over chicken. Use remaining liquid as basting liquid. 
  3. Bake, covered at 350 degrees for 1-1/2 hours. Basting every 30 minutes. Uncover and bake for an additional 30 to 60 minutes longer or until meat thermometer reads 180 degrees.
  4. Remove from oven and let rest for 10-20 minutes before carving. 

Steamed Cabbage


active time: 10 minutes / total time: 30 minutes / serves: 6 - 8 people 

Ingredients:
Head or half a head of cabbage, depending on how many you need to serve.
*a head of cabbage will feed 6 - 8 people, whereas half a head will feed 4 - 6
1 tsp sugar
dash or two of red pepper flakes
2 tbs butter

Steps:

  1. Rinse and remove the core of the cabbage, then roughly chop. 
  2. Place cabbage in a steamer basket over boiling water and cook for 20 minutes or until tender. 
  3. Remove cabbage from basket and place in a dish. Add butter, pepper and sugar to the cabbage and gently toss. 

I didn't keep my cut-outs, but the pie
still looked nice. :) 

Peach Pie


active time: 15 - 20 minutes / total time: 1 hour 10 minutes / serves: 6 to 8

Ingredients:
6 cups peaches, about 6 medium peaches, sliced.  *I use frozen
2 9" pie crusts
1 cup sugar
1/4 cup corn starch
1/8 tsp almond extract
1/2 tsp nutmeg
1/2 tsp orange peel
2 tsp lemon juice
2 tbs butter, sliced
milk, optional
tapioca, optional

Steps:

  1. Line the bottom of a pie plate with one of the pie crusts. Trim the edge of the crust even with the pie plate. 
  2. Mix the sugar, corn starch, nutmeg, orange peel, almost extract and lemon juice together. Add the peaches to the mixture and gently mix. Optional: depending on the wetness of the mixture, you may want to add some tapioca. I would not add more than a spoonful of tapioca. 
  3. Pour the peach mixture into the pie crust and top with butter. 
  4. Unroll the remaining pie crust and cut out a design. Save the cut-outs. Place the pie crust on top of the peach mixture. Seal, trim and flute the pie crust. Brush milk onto the back of the cut-outs and place on the top of  the pie. Brush milk over the top of the pie. 
  5. Cover the edges with foil, and bake for 40 minutes at 400 degrees. Remove the foil and bake for additional 10-15 minutes. Let cool on a wire rack and refrigerate after serving. 

If you guys are wondering about my potato dish, then I'm going to have to admit that I made up some instant garlic mashed potatoes. I ran out of gusto, but the meal was still delicious. :)

I hope you guys enjoyed the recipes today. We did.
I hope you guys have a wonderful day!

5/23/2010

Aaaaand Now.......

5/23/2010 12 Comments
The event you've all been waiting for! My bedroom. She's done...except for those pillows that I didn't think I'd have any trouble getting done. I could not find trim that I liked for them....of course, I didn't go to Hancock so that could have been part of  my problem. I went to 2 Jo-Ann's and both had what I wanted, but not 6 yards of it. I just wanted an olive green lipped cord.....not hard. I know if I had gone to Hancock they would have had something. Hancock's home dec trim selection is soooo much larger. :)

Beware of a very picture infested post. :) So on to the show!


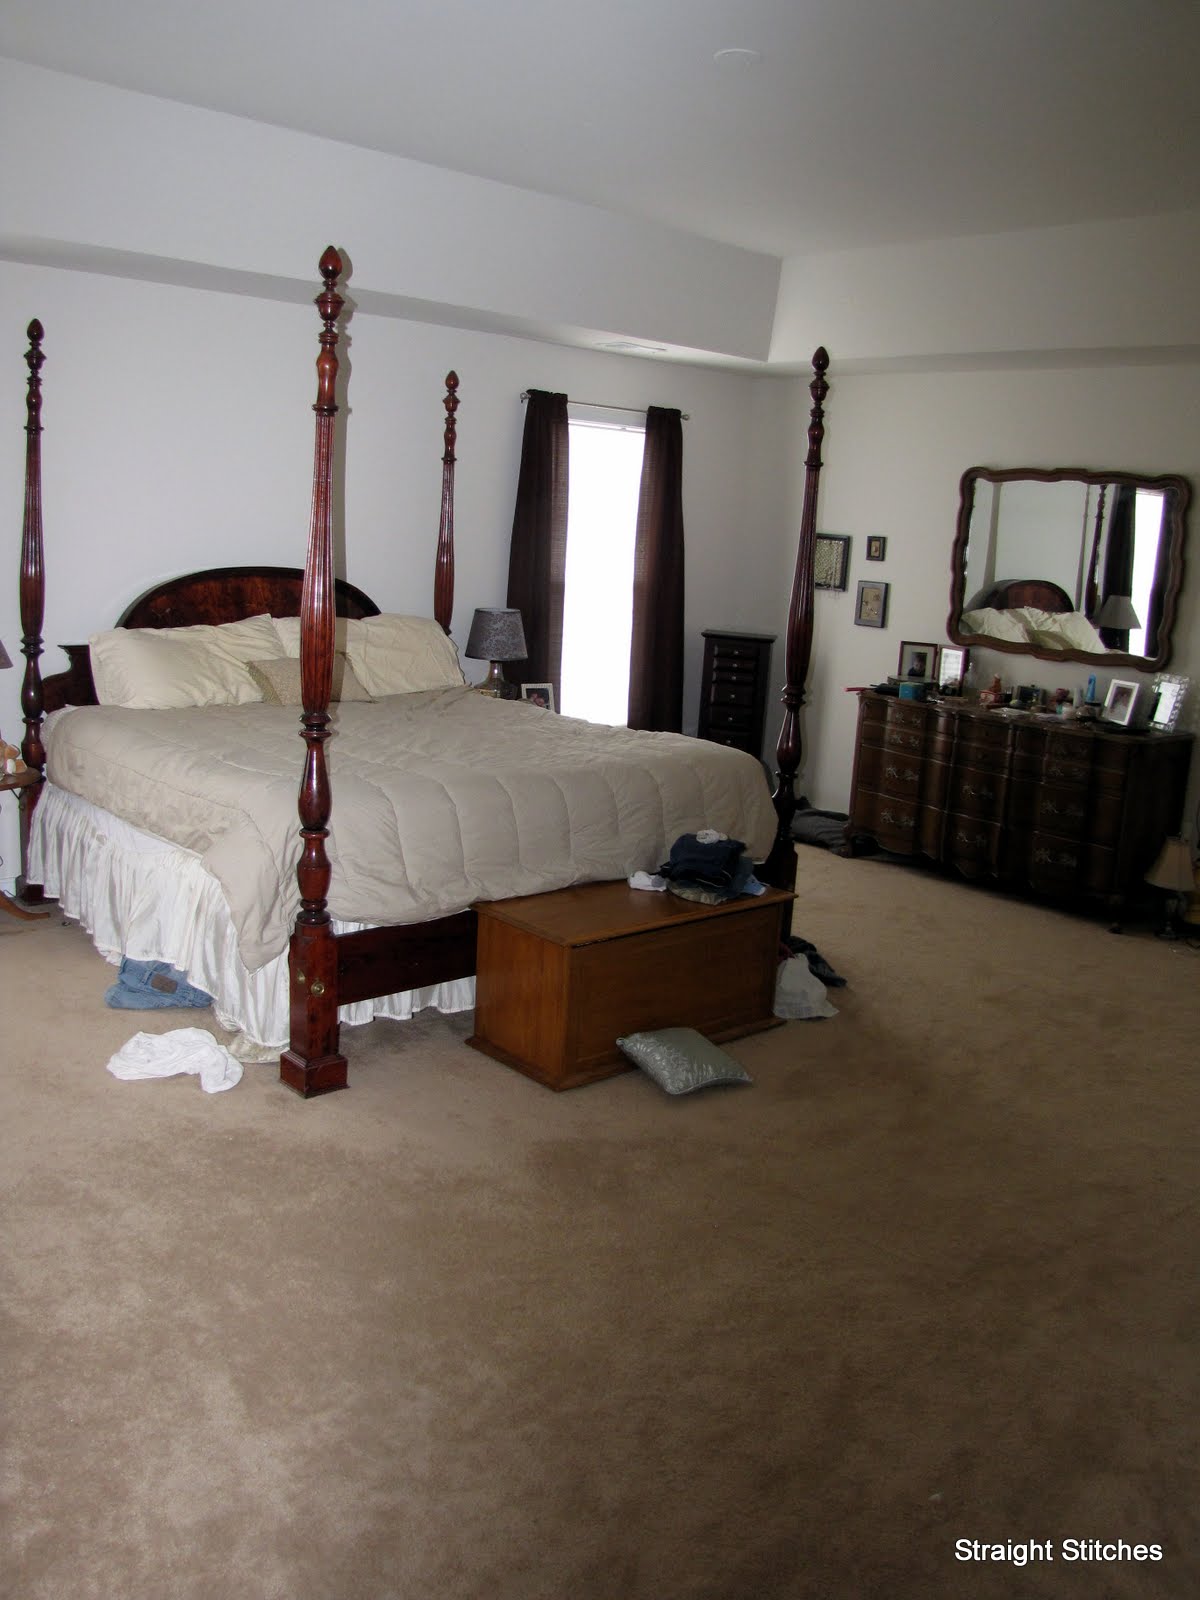
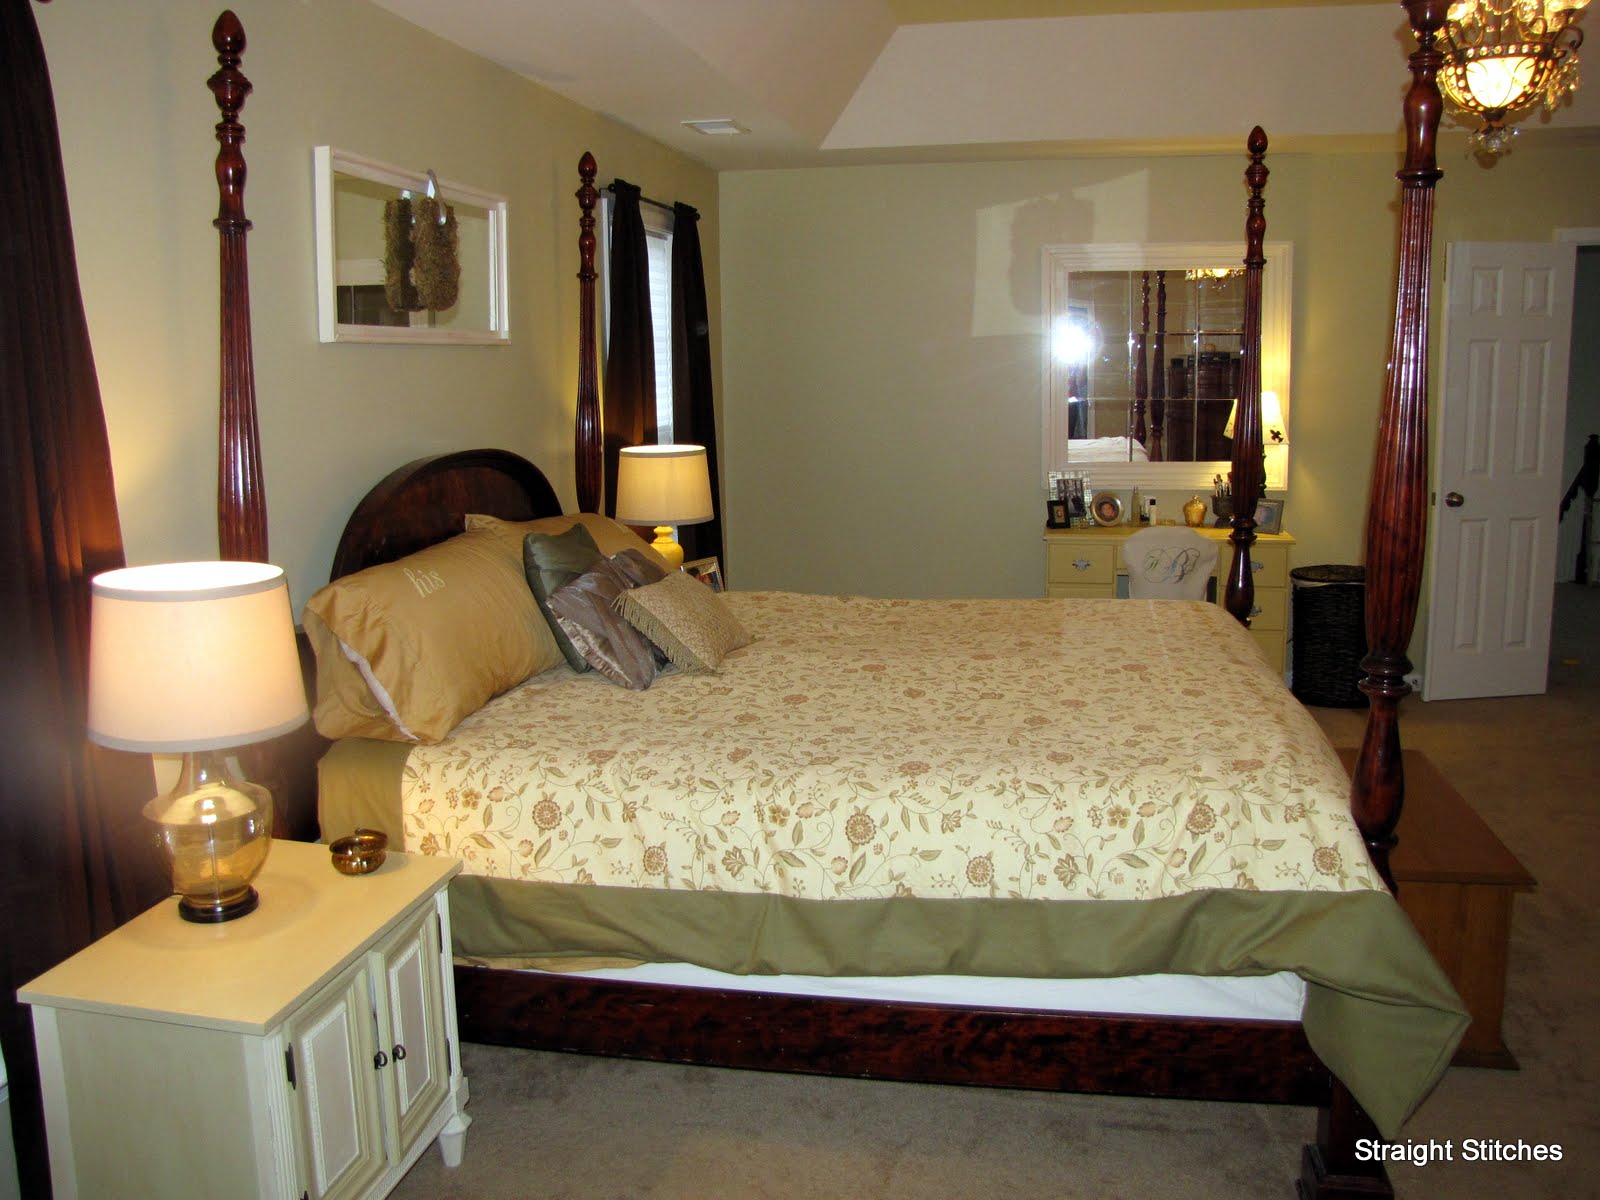
My bedroom is 17 x 22, and that's a lot of wall space to fill and paint, bur we did it! You'll have to forgive the darkness of some of the pictures, but its raining here today and the sun is not shining into our room like she normally does.

Don't mind the mess. I wanted candid before pictures. There was no reason to make our room pretty every day because it was unimpressive. 

This is looking into our room from the common area. 

This is my dresser, before and after. I uncluttered her. I still have all of the sentimental stuff that was on it, but it's now all  put away. 

Steve's dresser. His dresser never got very cluttered. :) You have to love my $2 yard sale mirror that I swiped from the basement! It's the perfect topper for his dresser. 

Our nightstands before, you know these....I moved them to guest bedroom. Ack, cords are everywhere! There is one outlet on the wall behind our bed. Cause that makes sense. 


I found these nightstands at the Salvation Army. I don't have a before picture of them, but they were an awful 70's wood color. I painted them with a shade darker and a shade lighter than the wall color. The darker color is called Epic...so my nightstands are now Epic! BTW, all of  the paint I used is Valspar. 

The doorway in the back there is into our closet. Its also on the list to be redone.

The before picture is the amount of light that streams in about noontime. It's usually much brighter in the early morning. You can see the difference in today's picture, because there is no sun, which is why every light is on. Oh and notice the massive duvet. I'm so glad it turned out nicely, because it didn't I may have just given up and cried. There is blood and sweat in that thing. I stabbed myself while working on it, and didn't realize it. I got confused when I saw red on the green border and it didn't wipe away. I got even more confused with another smear of red showed up just below where my hand had been. Then it dawned on me that....Oh, it's blood...I must be bleeding. I was and luckily, all of the blood cleaned out of my duvet with a little water. :) 


My grandfather made the bed. We inherited this bed when my Dad brought it home after helping move his Mom into an assisted-living facility, but he liked the bed that Mom and him have so I snatched it up, because I do not have many pieces that Bumpa made. You can see some of his sketches and what not on the slats. I did not know those drawings were there and I'm so glad we found them! 

Here's the room cleaned out and ready for paint.

Here's Stevie smiling over the size of that 18" roller. He was very happy when another customer at Lowe's pointed it out to him in the paint dept. That roller made quick work of the walls! 

Here's our frog taped ceiling. Frog tape works so much better than blue tape, IMO. I know it costs more, but I'd rather pay the extra in order to have crisp pretty lines. 

There's Stevie rolling and then completed paint around the room. The color is called Dakota Trail and it's very chameleon-like going from a soft taupe to a darker greeny-hued silt color. 


Here is my chandelier!!! We had a discussion conversation about what to put up. Fan or chandelier. I'm sure you all can guess what side of the fence I was on. :) Stephen didn't argue with me when I told  him I really wanted a chandelier because I wanted to walk into my own little hotel room, and he liked that idea. It certainly didn't hurt that when we went to Lowe's to get all of our paint and supplies they had this chandelier on clearance for $50! Score! 


The hope chest at the end of the bed was a wedding gift from my grandmother and grandfather. They built and finished it to match the queen bed we had when we got married. 

Here's the finishing and dressing area. What's that above the light? You can visit the vanity's post here and the mirror post here

Remember the stenciling project that didn't get completed? Here's the alternative that I came up with! I found a medallion stencil that I liked and framed out the chandelier with it. I can do a stencil with only 2 repeats, even if the stencil was 28" x 40" :) 


Here are just some artsy shots of the flower arrangement I came up with for my dresser. I'm in love with the color of those roses. :)  Also the pictures are the boys when Harrison was about 6 weeks old. My girlfriend, Tina Cole, took the  pictures and I love the job she did! 

Well I hope you guys enjoyed the tour of my room. I had a lot of fun doing some of the parts and not so much fun with some of it (taping) but I am over-joyed at the final result and I smile every time I walk into my room! Thankfully, I can get back to all the rest of my projects now! 

Here is a recap of the projects done for this room: 

I'm linking up to:
Visit thecsiproject.com


Enjoy your day!