Follow Us @SewHalfCrazy

8/25/2012

Frenchie-licious

8/25/2012 0 Comments

It's no secret I love French food.  I don't know why.  The French just seem to know how to make anything and everything amazing, including lentils.  Yes, lentils.  Those boring, little, dried up, pea-ish things that usually languish in your pantry.  Not anymore!  Take a gander at this recipe I tried for the first time this week.

French Lentils With Walnuts and Goat Cheese
Courtesy Laura Calder

1 cup/250 g du Puy lentils
1 bay leaf
1 fresh thyme sprig
2 Tbsp olive oil
1 lg red onion, diced
2 cloves garlic, minced
Splash balsamic vinegar, optional
Kosher salt and freshly ground pepper
2 ounces/55 g walnuts, toasted
4 ounces/100 g goat cheese, broken into pinches
Walnut oil, to taste

Put the lentils in a saucepan with the bay leaf and thyme. Pour over 1 1/3 cups/375 ml water, bring to a boil, then reduce the heat and simmer until tender, 30 to 40 minutes. All the liquid should be absorbed, if not simply drain off any excess.

Meanwhile, heat the olive oil in a sauté pan and fry the onion until soft. Add the garlic for 1 minute, then deglaze the pan with a splash of balsamic vinegar. Once the lentils are cooked, toss them with the onion mixture, season with salt and pepper and put them in a serving dish. Scatter over the nuts and pinches of cheese. Drizzle with walnut oil. Serve warm.


You all know me, I'll all about tweaking recipes to my own taste.  Above, you can see the lentils right after I added them to the water.  Number one, I just used French lentils (tiny and dark green) because there was no way I was going to spend time and money trying track down something that sounds as expensive and fancy-schmancy as "du Puy".  Number two, fresh herbs and I do not get along.  I don't know why, but, no matter how I store them, they always go brown and slimy on me before I use them. Therefore, I use dried, and there isn't anything wrong with that.  I used about a 1/2 tsp of dried thyme here.


You might notice a surplus of onions and garlic here.  That's because I love me some onions (caramelized, golden, and amazing, of course) and garlic.  That's how I roll. 


You may have also heard me say before that there's a fine line between laziness and genius.  Like Johnny Cash, I walk the line.  I really didn't feel like dirtying up a pan just to toast walnuts, so I made one out of tinfoil.  Don't worry, I recycle. :)


Anything that starts out like this is bound to be good.


Then we just finish it off with a bit of goat cheese and walnuts.

Wow!  So good!  There are so many great flavors in this--the tang of the goat cheese, the nuttiness of the walnuts, the meatiness of the lentils, the sweetness of the onions, and the heat from the garlic (if you add it at just the last minute like I did)--and they're all separate, yet compliment each other all at the same time.  Mmmmm, so, SO good!  And it's good for you, too!  Lentils are super-high in fiber and protein.  In fact, they only lack two essential amino acids, which the cheese and walnuts both have in them.

Here's another reason I like this dish: It cooks the lentils perfectly!  I have failed time and again with lentils, either over or under cooking them every time, but not this time!  I will say I lidded my pot when I brought it back to a simmer, which the directions don't tell you to do, but my instincts did.  My instincts were right.

Make this one dish meal and enjoy for lunch or dinner.  Oh, and have a glass of wine with it.  Because it's French!


8/20/2012

Adjusting

8/20/2012 0 Comments
So its been a bit since I've posted.

Its been busy in my neck of the woods.

New job (that I love), big changes.

My hubs is the stay-at-home-Dad now, and do you know how hard it is to hand over the reins? Very. Hard.

Not to say that the transition hasn't been without its bumps, but its hasn't been terrible either. Actually, its gone better than I thought it would.

I'm still 9-10 pounds from my goal of 225 by Labor day. I can't seem to get below 234.

I'm still banging out the Power 90 stuff (day 9 was today). I've had to adjust the schedule and do 3 days of workouts and then a day of rest. My knees (the left one especially) hates the kicks. I actually enjoy them, but the creaking and rubbing that I hear from my knees after a cardio episode is probably not good.  My knees will just have to hang on until my insurance kicks in.

Even though I'm not losing pounds, I am losing inches. Which is always nice.

I'm no longer relegated to wear a Woman's 18. Now I can fit into a straight 18! YAY!!!!

I'm creeping up on that size 20 in patterns too, which makes me super happy.

I'm going to have to figure out how to work in family time, craft time, and social time around my work schedule though. I'm kind of missing my friends and our girl and coffee time, but I'm sure after school starts it will be easier to hang out again, because we won't have to get ALL the kids together. It'll just be the small ones. :)

Ok so that's my check-in. Hope you guys missed me.

8/18/2012

The $3 Espresso Maker

8/18/2012 3 Comments

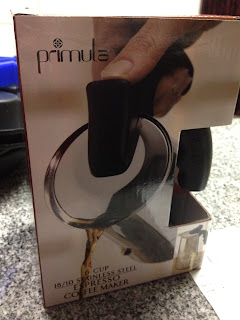
Yes, folks, that's right.  I got an espresso maker for $3.  Not quite as good as the cheap-as-free bread maker, but still pretty good.  But why did I do it?  Don't I love Starbucks and my local coffee shops?  Yes, I do love my local coffeeshops, but my relationship with SB has gotten a bit rocky.  And by "rocky" I mean, "I can do yummy coffee drinks at home for so much cheaper".  It's not you, SB, it's me.  Right back to the $3 espresso maker.  How did I accomplish such a thing?

Step 1: Receive a $25 Macy's birthday giftcard from your department because you work for the best department ever. :-)


Step 2: Research espresso machines online...because I'm neurotic like that.  This one had the best reviews of all the decently-priced stovetop models.

Step 3: Smile pretty at the teller and hope that she gives you a 15% coupon, which she did.


Result: $3 espresso maker.

I was immediately pleased with my purchase when I opened it up and found the instruction manual.


That's the whole thing.  Thank you, manual writers, for assuming that, since I've made it this far in life, I know better than to do crazy things like drink straight from the hot pot.

Next I just had to buy some coffee--which resulted in a very fun conversation with the coffee guy at Whole Foods.  Build relationships with your food sellers, people--and make some java!


Per the instructions, water to the safety valve, coffee in the container on top, screw on the top assembly and heat on low to medium heat.  Since using this, I haven't gone past medium-low just because I want to play it safe.


Here's the part that defies physics...in my mind anyway.  The coffee laughs in gravity's face and travels up the little tube and out into the top chamber.


Then you just measure it out with the appropriate tool.  :-)


Of course you must have proper accompaniments.  I bought this pretty, pretty cup specifically for my at-home coffee yumminess.  Also, did you know that the Special Dark syrup at Target is cheaper than the regular variety?  That's why I bought three bottles.  Don't judge me.


My first drink, a mocha (see below for recipe), got a delectable, free birthday scone from Panera to go with it.

Ho-ly cow, this was delicious.  Way better than SB.  I find that the really sweet drinks from there have a tendency to cause a really sticky mouthfeel.  This does not.  I did have to do some research on how many shots of espresso to use us and syrup and whatnot, so here are two recipes I developed this week.  There are no instructions because you basically just combine and stir.

Medium Mocha
Two shots of espresso
Four pumps of chocolate syrup
Milk, heated, enough to fill a medium (grande) sized cup

Medium Almond Honey Latte
Two shots of espresso
Four squidges of honey
Milk, heated, enough to fill a medium (grande) sized cup
1/2 teaspoon almond extract


8/16/2012

Swimsuit model? Uh, no.

8/16/2012 1 Comments
So a long time ago (read 6 weeks ago) I made and finished my 2nd swimsuit of the season.

I am in love with how it turned out! Here's Butterick 5795!

The suit is customized for cup size, which is always nice. It's also fully lined all the way around. Great for holding everything in!

What do you guys think?

8/10/2012

High Standards

8/10/2012 0 Comments

Y'all, I am really excited about a dish I made this week.  It's one of those dishes that demands appropriately amazing counterparts, and it's an original recipe by me!  What is it, though?  Is it a sauce? Is it a filling?  A stew?  A topping?  It's all of those.  Check it out...

Italian As-You-Wish
1 tbsp olive oil
1 large sweet onion, chopped
1/4 cup water
1 small head of garlic (about four or five large cloves), minced
1 large red pepper, roasted, skinned, and chopped
5 vine ripe or 7 Roma tomatoes, seeded and chopped
1 lb ground beef, pork, chicken, or turkey, browned
Large handful of basil, 1/4 to 1/2 cup depending on your taste, minced
1/4 cup Parmesan cheese
Salt and pepper

Pour the olive oil into a medium saucepan and heat over medium-high heat.  When the oil is hot, add the chopped onions, season with salt, and cook until desired doneness (anywhere from just barely softened to soft and golden brown) depending on dish application.  Once the onions are done, deglaze with the water and scrape any bits up from the bottom.  Add the minced garlic and cook for a few minutes until just softened.

If your dish is something like a bruschetta where everything needs to be pretty firm, brown the meat now and add with the tomatoes and red peppers.  If it's a sauce, stew, or filling, add the red peppers and tomatoes now, cover, and allow to cook down while you brown the meat.  Then add the meat to the mix.

Once the tomatoes, red peppers, and meat are all in, add the basil and cheese and stir to combine.  Season with salt and pepper to taste and then use the mix as desired.

Yes, the name is a wink and a nod to this man.  Ladies, do your best not to swoon.
This recipe will do whatever you ask of it.


I recommend starting by chopping the onions if you plan on getting them really caramelized.  Some people love the taste of a rawer, less cooked onion, but I personally love it when the onions get really soft and golden brown.  It can take a good long while, though; anywhere between 20 and 30 minutes.


Yes, you can roast peppers yourself!  Just pop it under your broiler (mine defaults to 500 degrees) and turn it about every seven minutes or when the skin gets nice and black.


When you pull the pepper out of the oven, pop it into a glass bowl and cover it with plastic.  Let it hang out for about ten minutes while you attend to the other vegetables.

Shortcut:
You can buy roasted red pepper in a jar, but this is a lot cheaper, even if it is a bit more time and effort.


Your mince can be pretty rough for this dish.  It's almost a chop really.

Shortcut:
You can buy pre-minced garlic in a jar, or you can mince it yourself in a food processor with oil.  The stuff you do yourself can be kept ready to go in the fridge.


Okay, so after ten or so minutes, the pepper should have cooled enough to skin it.  The skin separates from the flesh when it roasts, so you can literally just peel it away.


The seeds will also come away from the pepper very easily.  I turn it inside out to make sure I get them all and then chop.


Didn't I tell you I liked a good golden brown color?


I happened to have heirloom tomatoes on hand (all of my veggies this week came from Hidden Valley Farm here in Nashville), so I used them.  They are really yummy, but such a pain to seed.  I tried slicing  and quartering them to seed them.  I don't know if either way is really better.  It's awfully tedious no matter what.  This is a good job for little ones. :-) 

Shortcut:
You can also use tinned tomatoes for this.  I use them a lot.  Two cans of Italian style would work for this recipe.


Once again, how long this cooks for kind of depends on what you want.  You only want to barely warm it through (left) if you're using this as a bruschetta topping or something similar.  If it's going to be a sauce, you'll want to really cook it down (right).


If you choose to do this bruschetta style, make sure to have the meat (I used beef) already browned when you add the tomatoes.  If you're going for a stew or a sauce, it doesn't matter as much either way.


My original plan was to use this as a pasta sauce, but it didn't exactly work out that way.  People, count your blessings if you don't have to be a gluten-free house.  GF pasta is not the same as the real (good) stuff.  It's okay, but it just can't compare.  I found that most tend to fall apart no matter what precautions you take, and this time was, tragically, no exception.


Because I was so disappointed by the quality of the pasta, I only used about a cup of sauce for the whole box of pasta, which still worked well.  Sadly, it wasn't good enough for me.  I saved most of the sauce because I didn't want to waste it on inferior pasta, but what to do with it now?  Turn it into a filling.


Fast forward to the next evening.  I spooned my leftover sauce into bowls (there was a lot left)...


...and topped it with some precooked polenta.  Then I just popped it into the microwave to heat it up and voila!  Delicious Italian pot pie!  These are really big bowls, and I intended each one to be for dinner and lunch the next day.  Mike at his entire bowl!


 Now you see why I'm so excited.  :-)  There are so many possibilities!  You can add some spinach for some extra greenness if you want.  Or carrots, or zucchini.  You could leave the meat out if you have vegetarians to feed and replace it with quinoa.  Seriously, what's not to love?


8/08/2012

Project 10-9

8/08/2012 1 Comments
Hello August! Wow - It's August. Sheesh. Well not much to report this week. I didn't do very well about some of my goals, and some of them I did. 

  • Water. I need to get my average up to 4 cups a day. I've been stressy this week, so I've gotten off the water band wagon, but today I'm taking back my routine and owning it. I've even got water right next to me right now (and my coffee) :) 
  • Get to bed by 11 pm every night. I know its the summer, but the boys still wake up early.   Still failing at this, but I am getting up. Tomorrow is the first day of work. I want to work  out before hand. Means I'm up at 6 so I can get breakfast, workout and a shower all before work. :)   
  • Preventative measures. Wear my braces. No questions. Just do it. My knees will eventually thank me.  I didn't exercise so wearing my brace wasn't needed.     
  • Run. Run. Run. Run. Get back on track with my Nike+ goal. Fail +.   
  • Add the weights! Tone up those arms and torso. I did not fail this! I started Tony Horton's P90 today and had my good 'ole resistance band. Yay! I don't really like the resistance band, but its something and better than no weights. 
  • Get to the gym more. Its easy to take the easy road when I work out at home. The gym pushes me.  I've started working out at home. Home = Gym. I can dig it.  
  • Utilize pool time with the kids better. When its adult only swim, I need to swim laps. 15 minutes of laps. I've been slacking. We haven't been going to the pool. 
  • Try out turbo kick at the gym. I've taken it once and it scares me. I should give it a decent 3 tries before saying that its not for me. ANNNNNNND still failing........
  • Do more yoga/pilates. I need to stretch and improve my flexibility. Everything hurts and the stretching would feel good. Does stretching count?  
  • Be 225 by the time school starts in September. That's another 25 pounds in 10 weeks. I know I can do this.  So at my lowest this week I was 234.2, but today I was 236.2.  That's about a 2 pound gain from last week. I'm blaming stress, but I'm also not worried about it. I slacked off from exercising and my diet. What did I really expect to happen? So I'm back to tracking everything, I've started P90 and I'm going to work tomorrow. That's a lot of movement.  I'm excited about it and I know that I can tackle whatever. 

I think I need to change up my goals. Not only did I get lazy with my goals, but exercise and diet fell by the wayside as well. So here are my new goals this week! 
  • Reasonable bed time. 11 pm is not terrible and I have to get up in the morning. 
  • Keep with the P90 workout. 
  • Don't let things get to me so much. I do not need to absorb the weight of the world. I only need to worry about the  people in my house. 
  • Stick with my diet. Even though I'm going back to work doesn't mean I get  to slip on my diet.
  • Make me time. I like to run/walk/sew by myself. There's a reason there's a door to the house and my sewing room. 
  • Still shooting for 225 by Labor Day. 
Well there are my goals, and I feel pretty good about them. 

As a side note, P90 was not as difficult as I remember, but then again I'm also in a lot better  shape than I was. Oh and before I forget! My starting photos! 


I also have some new stats!   

September 8, 2011October 29, 2011March 18, 2012May 13, 2012May 31, 2012August 6, 2012
Bust49.5"48"47.5"47"45.5"43.5"
Waist40.5"40"39.5"39"38"36.5"
Hips54.5"53.5"52"52"51"48.5"
Upper Arm16.5"15.5"15"15"14"14"

8/07/2012

Coffee? Yes, please!

8/07/2012 0 Comments
Hey all again! I'm back! Two days in a row! 

I know, I know. Please  try to contain your shock and awe. :) 

So I'm back sharing things I've updated in my kitchen. When I moved all of the copper molds to above the kitchen cabinets, I moved the vases and jars I had up on the cabinets down to the counter top. I am using one as a utensil holder and the other two jars got turned into the most used items in the house, well, at least  one of them did. 

Problem? Yep, you couldn't tell the  jars apart, and unless you're in them every couple of hours (like me) then you'd have no idea which jar is which. Second problem - I don't like repeating myself (I blame this condition entirely on my children).  So my solution was simple! Tags for my jars! 
  
The tags were easy to make (hah!). I went to The Graphics Fairy and found some botanical prints of tea and coffee. Then worked on the tags until they were perfect in Silhouette Studio. It took some doing to get the letters to pop out of the back of the tag to act as a stopper for the images, but I got it and I loved the effect.

The only problem was the bright white cardstock I used. Never fear! Paint is here! I stamped all around the edges and then smeared the ink pad over the back of the tag, then I took metallic brown, black and gold and stippled them all over the tag. After all of that dried I glued the image inside the tag, and then topped it all off with a couple of coats of Mod Podge and called it a day. I love how these beauts look on my jars, and I love that I will never have to tell anyone again where the coffee  is. :)

Heather

 Linking up to: