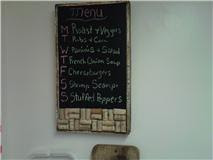
For my 1st guest post ever, I have decided to share with you my take on the chalkboard menu boards that I have been seeing everywhere.
Supplies: board, or picture frame
wine corks
sand paper
glue gun
primer
chalkboard spray paint
About 1 week ago, I was given this hideous rooster picture with a nice sturdy wooden frame. It looked a little something like this
I sure hope there are no rooster lovers out there that I am going to offend because this is seriously hideous in my opinion.
I sanded it down, and wiped it clean.
Then it was taped off on the frame and primed.
I am sorry for the picture quality, my camera has a mind of it's own and it decided to not want to work for this project so I used my phone. Also the lighting here is really bad, but hey, it's just primer. The finished product looks great, I promise.
I then took my frame outside and proceeded to spray paint with chalkboard spray paint. One can should be more than enough.
Once dry, I pulled the tape off and followed the directions to cover the board in chalk everywhere. I then wiped it clean and pulled out my glue gun, and corks.
I used 2 layers of corks, and put a very handy cork board on the bottom of my chalkboard menu.
I love this!! My husband came up with the pattern so I suppose I will give him a little credit. These pictures really don't do this menu board justice. {SORRY}
Finished result looks something like this
Ugh, I can not get the last picture to turn! It is just not my day for pictures I guess.
I love this board though, One day it will go perfect in my Italian themed kitchen, one day.
I hope you enjoyed my version of the menu chalkboard, please stop by my blog anytime. In the coming weeks I will be working on a Halloween wreath, and a Halloween idea to use on all of my saved formula cans.
Thank you so much Heather for this opportunity and have a great vacation!!!


I like that. Oh, and LOVE that your husband seems like a crafty guy, too!
ReplyDeleteThanks for joining our blog hop over at Sassy Sites! There are some amazing blogs out there, and you are definetly one of them! I'm a follower of yours too! Happy Friday! xoxo
ReplyDeleteMarni @ Sassy Sites!
What a great idea - I love posted menus, it keeps from getting asked "what's for dinner" constantly.
ReplyDelete