Follow Us @SewHalfCrazy

3/30/2010

Learning from the past....

3/30/2010 5 Comments
So my epic fail a few days ago was salvaged with buttons, but being as my sister is not the only one who received all the perseverance in the family, I was determined to make my paper-pieced decorative ball happen. So I decided to google search Styrofoam crafts and low and behold I found this......Dow has a craft site for Styrofoam. Go figure. So then I find this little gem: Old World Globes in a Bowl.....exactly what I was trying to achieve. So after head-smacking myself....I pull out the needed ingredients for this project. Beware though....this is a MESSY project.

What's needed:
  • Modge Podge (or a mixture of 2 parts glue to 1 part water. I used Modge Podge)
  • Image printed on paper (I got mine from The Graphics Fairy, I searched on maps and choose a map of Paris and London)
  • Styrofoam balls
  • toothpicks
  • cups
  • wax paper (I used this as a place mat)
  • paper plate
  • Spackle (I used DAP)
  • fine grit sanding block

What I did:

Using my fingers, I put a finger-full of Spackle onto the Styrofoam ball and then spread it around as evenly as possible. I did about half the ball then dropped it into the cup to dry while I did the other ball. I then went back and did the other halves. I place them in the cup to dry.

After they had dried a bit, I put in three toothpicks as a base and then tipped the cup over and placed the ball on the toothpicks to finish drying. Keep the cups you will need them later.

After the Spackle dried, I lightly sanded the balls to remove most of the knobby bits that were left after applying the Spackle. I didn't get them completely smooth but mostly.

I then place two tooth picks into opposite sides of the balls. I cut my images into 1/2" strips. You could also tear them, but I didn't want any tooth on my paper and the paper cutter was faster.

I put a good size amount of modge podge onto the paper plate. I then ran the backside of my image through the glue. I made sure to keep the entire thing over the plate and wax paper, because it did drip as I ran my fingers down it to remove the excess glue. I then laid the strips down over the ball, smoothing as I went. I covered the entire ball with paper. I found it easier to rest the ball inside the cup with the toothpicks acting as anchors while I prepped each strip of paper. The toothpicks also came in handy as I was smoothing the paper onto the ball, it gave me something to hang on to that wasn't covered in glue. Try not to touch the paper after its on the ball as it will rip and come off on your fingers.

After I had all the strips on the ball...I liberally coated my fingers in glue and did a once-over on the ball, making sure to keep my fingers wet with glue. If they get dry then your fingers will start to stick to the ball.

I laid the balls down inside the cups, making sure to balance them in the center so that none of the sides touched, and let them dry. I watched a movie while doing the gluing and the drying. By the time the movie was over the balls were ready to be handled.


I saw somewhere that you can also apply a shoe-polish finish to the paper balls to achieve something that looks like leather, and I may do this in the future, but for now I'm happy with my decoupage' :)  So there are all the balls that I decorated this week. I'm happy with the look and actually I may incorporate some smaller balls, I'm thinking just small wood ones (2" or smaller, I think) to fill in some of the spaces in the bowl. This is the bowl I got the other day from the Salvation Army.

I'm linking up to the following parties:
http://www.theshabbychiccottage.net/2010/03/transformation-thursday-paint-reveal.html?
Till next time....enjoy your day!

3/29/2010

Some Dollar Store Crafty-ness!

3/29/2010 0 Comments
I love cheap crafts. They make me happy because they usually look so much more expensive than they actually are. I was so excited when I saw two pillar holders and two taper candle sticks. I figured I could make a couple of altered hurricanes for Steve's lounge, and I knew he'd like them because they were so darn cheap. He'd also like them because they'd display his cigar bands in a better fashion than what he's done.  I'm also very pleased that the epoxy dries clear, as you'll see later on you can't tell that it's there.

Supplies:
  • 2 glass pillar holders
  • 2 glass taper candlesticks
  • gorilla glue epoxy
  • gorilla glue tape


What I did:

I washed the pillar holders and the candlesticks and thoroughly dried them. I place the pillar holders upside down so that the bottom was up. Sorry for the messy work area pictures. I was working on our kitchen island while my husband decided whether or not he wanted to make sugar cookies. The cookies did not get made, but they are still laying there on the island. *sigh*

Then I mixed my gorilla glue epoxy on a paper plate.

I then dipped the end of the candlestick into the epoxy, like you would rim a margarita glass with salt. I then centered the candlestick down on the bottom of the pillar holder.

I anchored the piece together with gorilla tape while the epoxy dried.


I'm going to fill these beauties with 1 1/2" balls that will be decoupaged with some of Steve's cigar bands. I think that will be a nice touch to his man room. :) Even better this project cost $4....can't get better than that!

Till next time...enjoy your day!

3/28/2010

Salvaging a craft project....

3/28/2010 3 Comments
Well my sister, Dana, and I salvaged our decorative ball project. We did not attempt the paper strips again, but instead painted two styrafoam balls bronze and then raided Mom's button chest. :) I think it turned out very well!

Here some pictures of  the process.

We pushed toothpicks into the bottoms of the styrafoam to make painting them easier. This was Dana's idea...she's a genius.


Here the balls are getting done! Painting was the fastest part of the project.
Here is the ball drying...we added more toothpicks to balance it.


I went through Mom's button stash and yanked the buttons that I liked the best out. This small pile is not enough to cover the ball. I had to go back several times and find more buttons that I liked.

I just hot glued the buttons onto the ball. Most of the buttons I used had knobby backs on them, so I pushed them into the ball first then removed them. Added glue and then pressed the button back into place. Easy Peasy!


 Here the ball is about half done. You can see it really starting to take shape, especially when it's next to the unbuttoned ball. :)
  

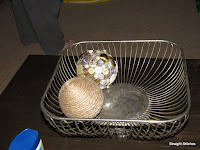
So here's the completed button ball! I love how it turned out. The other ball was just wrapped in jute. I have 1 more of each type of ball to make and then I need to figure out what to do with the last two balls. I got this dish from the Salvation Army Store in Manassas and I love how it looks and feels in my room!

Here are some close-ups of the button ball. I love the variety of the buttons. Mom had a lot of vintage buttons and I think the old mixed with the new look awesome together. Oh and a side note: the pearls you see randomly placed to fill some of the smaller spots are buttons that were left over from when Mom made my wedding dress. Yay!

This is a close-up of the jute ball, just so you can see how the ends were finished. A very simple project that takes little skill and very little time. Perfect for when Harrison is napping! Now I just need to get more jute, because I ran out :(  


I'm linking up to the following sites:
The Girl Creative

I'm also participating in this Blog Hop, check it out at The Crafty Girl Workshop

MckLinky Blog Hop


Thanks for reading and enjoy your day!

3/26/2010

Some new finds and an epic fail...

3/26/2010 3 Comments
So I had planned a great post about how my sister, Dana, and I made some decorative balls to fill a great thrift find this week, annnnnnnnnd it was an epic fail. I wanted to wrap 3" styrafoam balls with vintage graphics (think paper mache') and it did not work....at all. The only thing we managed to do was make a mess with glue. *le sigh* Oh well. My sister, the ever persevering, optimistic or just plain stubborn girl, is determined that this will work. I'm think we might have to go to plan b which involves coffee beans :) We'll just have to see, because tissue paper might be easier. Tomorrow is another day.

So I will now share with ya'll what I found in my grandfather's shed! These wonderful windows will be a perfect addition to my basement. I can't wait to get them to my house! They are leaded glass windows from my great-great grandmother's home at Burnley Farm, the original house that is. It will be so wonderful to have a piece of my maternal great-grandfather's home with us. My kids will never know their great-great grandparents, but I remember them, so I hope to tell Dev and H about them through family memories.


Can you see the chair hidden in that pile? Well, I am going to be taking this poor chair and giving it a facelift and a new home. It will look lovely in my living room! So Mom and I have some upholstery to do this spring. Time for new fabric....oh how I hate to shop for fabric. ;-) I'm loving the leg detail.


Here is my dear, sweet grandfather holding Harrison during our visit today. He's just a big softie :)

Sorry for the picture quality on the last pictures, but they were taken with my phone.

Have a great Friday and enjoy the weekend everyone!

3/23/2010

The Baptism!

3/23/2010 0 Comments
Well we are back from Pennsylvania and the Baptism was wonderful. We could not have asked for better weather or friends and family to share it with. I do not have any good pictures yet of the outfit, but honestly I don't know that there were any taken. It was a whirlwind of a day and I completely forgot about getting any pictures of the outfit, but here are a couple of pictures from Sunday that I want to share. :) Oh and I don't think I've mentioned it before, but my sisters are twins. Fraternal, of course.

This is my sister, Nicole, and Harrison. My grandmother, Bet, made his outfit! 

Probably the best shot I have found so far of the front of the dress and jacket. I'm holding Dev's hand on the left, and Dana, my other sister, is on his right.

Here is a shot of the paster, godparents (a family friend and my sister, Dana), Stephen and I. I think the outfit lays very nicely. :)

Just a closer shot of the above. :) You can't see it, but I'm wearing a small pink and silver brooch on the collar. It was my grandmother's.

Ahhhh, don't you just love family shots? This is my side of the family. My mom is the closet on the left, you can't see my grandmother who is holding on to Mom's waist, then my aunt, Dana, Nicole holding Devlin, Stephen, Me and Harrison and lastly, my dad.

This is Steve's family and the pastor! His brother and his wife, his father (Harry whom Harrison is named for), our neices, his mother and Dev (hiding), then Stephen, Harrison and I.

Showing off H to the congregation and praying I don't fall while stepping down off of the riser.

Nice side shot of the outfit and of us!

 
I found a picture of my grandmother, Bet! She's a wonderful lady and I am blessed to be her granddaughter!

Hopefully, I will get the shots that Harry took of all of us soon and I can share those with you all, but for now, since I was impatient, this is all I've got to share.  I hope you enjoyed and have a great evening!