Jess stop reading - unless you want don't want to wait to find out what I made you, then by all means read on. :)
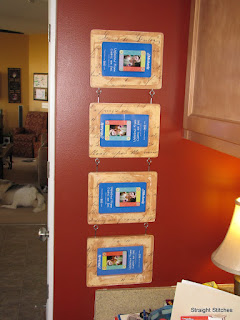
So I found the frames that were mentioned in the tutorial, and then had a hard time deciding on the finish for the frames. I originally wanted to just paint them white and then glaze them and add appliques. Then I thought about just decoupaging paper to them like the tutorial did, but I didn't want anything to color specific. I know that Jess is redoing her kitchen in a pretty taupe color (very similar to what I've picked for our master bedroom!) and she's keeping the green that was there along with white, but then I thought that while I envision these frames for her kitchen, she may not put them there. Oh the dilema!
Then I remembered that The Graphics Fairy has this lovely letter image! Bingo....we're golden.
I printed the image out on 13x19 paper. I needed two sheets to do all the frames. I traced around the frame, outside and inside, and then cut it out. I spaced the frames around on the letter in different areas so that no two frames had the same words on it.
After gluing and smoothing out the paper on the frames, I sanded the edges and then dipped a rag into some stain and rubbed it randomly around the front of the frames and then on the edges of each frame. I used Minwax water-based stain in Vermont Maple.
After that dried for a bit (I did not time anything, but I worked on it during nap time, so I would guess that the time it took me to run upstairs, rebink the baby, and then run back down. :) ) I added some more Modge Podge to the front and edges. I let that dry then added the hardware per the tutorial instructions.
I think these frames look lovely against my kitchen walls! I might have to make myself some of these, because I love the effect! They look much nicer than the calendar that is usually there, but that is a project for another day! .
 |
| Don't pay attention to the atrocious cut-in work on the cabinet. I still have some touching up to do! |
 |
| Please ignore the mess on the desk.... Pay no mind to the man behind the curtain! |
Don't you just love the filler cardboard in them? I personally think that the gaudy blue makes the project. ;-)
Oh....almost forgot...in the tutorial she attaches a lovely hanger metal thing to the top....obviously I don't have that. Each frame has a hole in the back for its stand.....a small dowel. I just happened to luck out when I discovered the top frame that I decided on had the hole in the right spot for me to use as a hanger. If it didn't, I was going to add some picture hanging hardware...the sawtooth kind, but I didn't have to, so it saved me some work!
Linking up to:
http://www.theshabbychiccottage.net/2010/04/transformation-thursday-back-to-basics.html
I hope that you guys enjoy this lovely day!


LOVE IT!! very cute. I love the image you used.
ReplyDeleteThis turned out great. I love the paper you used...what a great project. And I love how it hangs. I think you did a wonderful job. And yes the gaudy blue....it's wonderful girl! hahahaha....
ReplyDeleteBlessings,
Debbie
Fabulous!! These turned out great, what a wonderful project! Thanks so much for linking this up to "Brag Monday".
ReplyDeleteI'm curious what kind of printer you use so the image doesn't smear. Have not tried it with mine yet, but I know regular black ink printing smears and I have to spray fixative first before decoupaging. Thanx
ReplyDeleteI use an Epson 1280 inkjet. It's large format so that I can print my own scrapbooking papers, but I have also used my husband's Epson 280, also an inkjet. for the frame project I used matte presentation paper which is a little heavier than cardstock, but for other projects I have just used regular copy paper and as long as I don't soak the papers with the modge podge I have little to no smearing. When I do have to soak the papers (like for the decorative balls) I did have some smearing but I liked the effect so I ran with it.
ReplyDeleteI hope this helps!
Wow - amazingly cute. The graphics you chose are great.
ReplyDeleteThis is such a wonderful project, thank you for sharing.
ReplyDeleteThis is so cute! I too have an Epson printer and don't find much smearing when using Mod Podge.
ReplyDelete